springcloud-stream integrates rabbitmq notes
springcloud-stream integrates rabbitmq notes
1. Realize the main function
- Simply send and receive messages
- Message group
- Consumer quantity control
- Private message queue
2 show code
1. Introduce jar package
      2. 			<groupId>org.springframework.cloud</groupId>

      3. 			<artifactId>spring-cloud-starter-stream-rabbit</artifactId>

      4. 		</dependency>
2. yml configuration
This configuration implements one producer and two sets of consumers:
- The two groups of consumption are input1-test and input2-test;
- Each group is configured with an initial number of consumers of 2, and the maximum number of consumers is 3. Only one consumer in each group can receive messages.
auto-bind-dlq: true turns on the dead letter queue . Springboot will automatically create a dead letter queue and bind it to the default interactive machine. When the consumer reports an error 3 times, the program will automatically forward the message to the private message queue.
2. [rabbitmq](/search?q=rabbitmq):
3. host:
4. port: 5672
5. username:
6. password:
7. virtual-host:
8. cloud:
9. stream:
10. rabbit:
11. bindings:
12. input1:
13. consumer:
14. max-concurrency: 3 # 最大消费者数量,只有rabbitmq支持,kafka不支持
15. input2:
16. consumer:
17. max-concurrency: 3 # 最大消费者数量,只有rabbitmq支持,kafka不支持
18. auto-bind-dlq: true #rabbitmq自动创建队列名为output-test.input2-test.dlq的私信队列
19. bindings:
20. out1:
21. destination: output-test #rabbitmq 交换机
22. content-type: application/json
23. input1:
24. destination: output-test #rabbitmq 交换机
25. content-type: application/json
26. group: input1-test #分组,rabbitmq 创建队列名为output-test.input1-test
27. consumer:
28. concurrency: 2 #初始/最少/空闲时 消费者数量。默认1
29. input2:
30. destination: output-test #rabbitmq 交换机
31. content-type: application/json
32. group: input2-test #分组,rabbitmq 创建队列名为output-test.input2-test
33. consumer:
34. concurrency: 2 #初始/最少/空闲时 消费者数量。默认1

3. Code
3.1 Declare a channel
      2.     String OUTPUT="out1";

      3.

      4.     @Output(OUTPUT)

      5.     SubscribableChannel send();

      6. }
3.2 Producer of simulated messages
Mainly binding
@EnableBinding({Out1.class})
2. @RequestMapping("stream")
3. @EnableBinding({Out1.class})
4. public class TestSend {
5. @Autowired
6. private Out1 out1;
7.
8. @GetMapping
9. public String t() {
10.
11. Person person = new Person();
12. person.setName("测试");
13. person.setAge(18);
14. boolean send = out1.send().send(MessageBuilder.withPayload(person).build());
15. return "ok";
16. }
17.
18. }

3.3 Consumers
Similar to the producer, first declare the channel, then bind it with @EnableBinding, and then start listening with @StreamListener
      2.     String Input = "input1";

      3.     @Input(Input)

      4.     SubscribableChannel in();

      5. }

      6.

      7. public interface Input2 {

      8.     String Input = "input2";

      9.     @Input(Input)

      10.     SubscribableChannel in();

      11. }
      2. @EnableBinding({Input1.class, Input2.class})

      3. public class TestInput1 {

      4.     @StreamListener(Input1.Input)

      5.     public void in1(Person person){

      6.

      7.         System.err.println("1 收到" + JSONUtil.toJsonStr(person));

      8.     }

      9.     @StreamListener(Input2.Input)

      10.     public void in2(Person person){

      11.         System.err.println("2 收到" + JSONUtil.toJsonStr(person));

      12.

      13.     }

      14. }
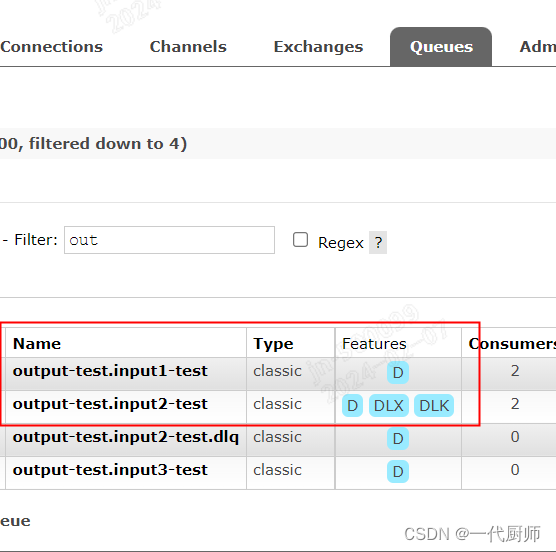
3.4 After the program starts successfully, you can see the automatically created queue through the rabbitmq console.
Three others
- The exchange created by stream by default belongs to the topic switch, and the routing key defaults to #
- The message has no expiration time by default. You can configure the ttl of the message. When the message survives in the queue for more than ttl, it will automatically enter the private message queue.