Summary of RabbitMQ cluster construction and testing_Personal test
Summary of RabbitMQ cluster construction and testing_Personal test
Introduction to RabbiMQ
RabbitMQ was developed in Erlang. Clustering is very convenient because Erlang is inherently a distributed language, but it does not itself support load balancing.
RabbitMQ mode
RabbitMQ modes are roughly divided into the following three types:
(1) Single mode.
(2) Normal mode (default cluster mode).
(3) Mirror mode (make the required queue into a mirror queue, which exists on multiple nodes. It belongs to the HA solution of RabbitMQ and is more suitable in situations with high business reliability requirements).
To implement mirroring mode, you need to first build a common cluster mode, and then configure the mirroring mode based on this mode to achieve high availability.
RabbitMQ features
RabbitMQ's cluster nodes include: memory nodes and disk nodes. RabbitMQ supports message persistence
, that is, data is written on disk. The most suitable solution is to have both memory nodes and disk nodes.
Node environment
192.168.1.17 rabbitmq3 memory node
192.168.1.18 rabbitmq2 memory node
192.168.1.19 rabbitmq1 disk node
Note: RabbitMQ cluster nodes must be in the same network segment. If it spans a wide area network, the effect will be worse.
RabbitMQ common cluster configuration
Configure hosts file
Change the computer names of the three MQ nodes to rabbitmq1, rabbitmq2 and rabbitmq3, and then modify the hosts configuration file
    #View hostname
    hostname

    #Modify hostname
    hostnamectl set-hostname rabbitmq1

    #or
    vim /etc/hostname    //The other two are the same.
    rabbitmq1

    vim /etc/hosts
    192.168.1.17 rabbitmq3
    192.168.1.18 rabbitmq2
    192.168.1.19 rabbitmq1

    #If you change the hostname after installing rabbitMQ, you may have problems starting up.
    # Create files on each of the three machines.
    vim /etc/[mq](/search?q=mq)/[rabbitmq](/search?q=rabbitmq)-env.conf
    NODENAME=rabbit@rabbitmq1 #Note that the hostname here modifies the corresponding node hostname
rabbitmq software installation
Install three rabbitMQs respectively
Install RabbitMQ offline on Centos and enable MQTT
Install RabbitMQ on arm architecture and upgrade erlang to solve Requires: erlang >= 23.2
    # Delete the files generated by rabbitmq's previous startups
    cd /var/lib/rabbitmq/
    rm -rf *

    # Restart
    sudo systemctl restart rabbitmq-server.service

    # Stop
    sudo systemctl stop rabbitmq-server.service

    #Check the status of the service
    sudo systemctl status rabbitmq-server.service

    #Check the boot status
    sudo systemctl is-enabled rabbitmq-server.service

    #View the status
    rabbitmqctl status

    #Create user admin and password beyond_2021.
    rabbitmqctl add_user admin beyond_2021

    #Set the admin role
    rabbitmqctl set_user_tags admin administrator

    #Assign permissions
    rabbitmqctl set_permissions -p "/" admin '. *' '. *' '. *'

    #RabbitMQ provides a very user-friendly graphical monitoring page plugin (rabbitmq_management) that allows us to see the status of Rabbit or the cluster status at a glance.
    # View plugin installation
    rabbitmq-plugins list

    #Enable plugins for the graphical monitoring page
    rabbitmq-plugins enable rabbitmq_management //The default port for the management console is 15672.

    # Enable the mqtt plugin
    rabbitmq-plugins enable [mqtt](/search?q=mqtt) //Default port mqtt is 1883 mqtt://192.168.1.17:1883

    # Enable the websocket plugin for Mqtt
    rabbitmq-plugins enable rabbitmq_web_mqtt //default port websocket is 15675 ws://192.168.1.17:15675/ws path is /ws

    # View listening ports (the plugin monitors port 15672)
    netstat -ntap |grep 5672
Copy erlang.cookie
The Rabbitmq cluster relies on the Erlang cluster to work, so the Erlang cluster environment must be built first. Each node in the Erlang cluster is implemented through a magic cookie. This cookie is stored in /var/lib/rabbitmq/.erlang.cookie, and the file has 400 permissions. Therefore, it is necessary to ensure that the cookies of each node are consistent, otherwise the nodes will not be able to communicate with each other.
    # View the cookie file for node rabbitmq1
    cat /var/lib/rabbitmq/.erlang.cookie
    hkhiehfdvnffggpq

    # Copy the value of the .erlang.cookie from the rabbitmq1 node to the other two nodes using scp.
    #rabbitmq1 copy to the other two nodes
    scp /var/lib/rabbitmq/.erlang.cookie root@192.168.1.17:/var/lib/rabbitmq/.erlang.cookie

    # Restart the service
    sudo systemctl restart rabbitmq-server.service

    scp /var/lib/rabbitmq/.erlang.cookie root@192.168.1.18:/var/lib/rabbitmq/.erlang.cookie

    sudo systemctl restart rabbitmq-server.service

    # If you get an error: Refer to the link: https://blog.csdn.net/u014209205/article/details/106647229
    chown rabbitmq:rabbitmq /var/lib/rabbitmq/.erlang.cookie
    chown rabbitmq:rabbitmq /var/lib/rabbitmq
    mkdir -pv /var/log/rabbitmq

    # Report an error:
     failed to open log file at '/var/log/rabbitmq/rabbit@rabbitmq3.log', reason: no such file or directory
     # Create file
     vim /var/log/rabbitmq/rabbit@rabbitmq3.log

    failed to open log file at '/var/log/rabbitmq/rabbit@rabbitmq3_upgrade.log', reason: no such file or directory
    #create file
     vim /var/log/rabbitmq/rabbit@rabbitmq3_upgrade.log
Add rabbitmq2 and rabbitmq3 as memory nodes to the rabbitmq1 node cluster
Executed under rabbitmq2 rabbitmq3
    rabbitmqctl stop_app //stop rabbit application

    rabbitmqctl join_cluster --ram rabbit@rabbitmq1 //join to memory node

    #Also join to disk node
    #rabbitmqctl join_cluster rabbit@rabbitmq1 //join to disk node

    rabbitmqctl start_app //start rabbit application

    # If you join the cluster you get an error
    Clustering node rabbit@rabbitmq2 with rabbit@rabbitmq1
    Error.
    incompatible_feature_flags
    Indication: Rabbitmq node versions are inconsistent.
(1) By default, rabbitmq is a disk node after startup. Under this cluster command, rabbitmq2 and rabbitmq3 are memory nodes, and rabbitmq1 is a disk node.
(2) If you want rabbitmq2 and rabbitmq3 to be disk nodes, just remove the –ram parameter.
(3) If you want to change the node type, you can use the command rabbitmqctl change_cluster_node_type disc(ram), provided that the rabbit application must be stopped.
In the RabbitMQ cluster, there must be at least one disk node, otherwise the queue metadata cannot be written to the cluster. When the disk node goes down, the cluster will not be able to write new queue metadata information.
Keep the version consistent, rabbitmq uninstall and upgrade
I have the rpm packages of rabbitmq3.8.2 and 3.8.18 here. If you need it, please leave me a message or comment.
    # View version
    rabbitmqctl version

    erl

    erl -version

    # Query rpm installer
    rpm -qa rabbitmq
    rpm -qa epel-release
    rpm -qa erlang

    # rpm uninstall older versions
    sudo rpm -e rabbitmq-server-3.8.2-1.el7.noarch.rpm
    sudo rpm -e erlang-22.2.8-1.el7.x86_64.rpm
    sudo rpm -e epel-release-7-11.noarch.rpm

    #yum query installer and uninstaller
    yum list | grep rabbitmq
    yum -y remove rabbitmq-server.noarch
    yum list | grep erlang
    yum -y remove rabbitmq-server.noarch
    yum remove socat

    #Install the latest, identical version
    sudo rpm -ivh epel-release-7-13.noarch.rpm
    sudo rpm -ivh erlang-23.3.4.4-1.el7.x86_64.rpm
    sudo rpm -ivh rabbitmq-server-3.8.18-1.el7.noarch.rpm

    # Then rejoin the cluster
    rabbitmqctl join_cluster --ram rabbit@rabbitmq1
View cluster status
    # View cluster status
    rabbitmqctl cluster_status
    # The following is displayed:
    Cluster status for node rabbit@rabbitmq1 ...
    Basics

    Cluster name: rabbit@rabbitmq1

    Disk Nodes

    rabbit@rabbitmq2
    rabbit@rabbitmq3
    rabbit@rabbitmq1

    Running Nodes

    rabbit@rabbitmq2
    rabbit@rabbitmq3
    rabbit@rabbitmq1

    Versions

    rabbit@rabbitmq2: RabbitMQ 3.8.18 on Erlang 23.3.4.4
    rabbit@rabbitmq3: RabbitMQ 3.8.18 on Erlang 23.3.4.4
    rabbit@rabbitmq1: RabbitMQ 3.8.18 on Erlang 23.3.4.4

    Maintenance status

    Node: rabbit@rabbitmq2, status: not under maintenance
    Node: rabbit@rabbitmq3, status: not under maintenance
    Node: rabbit@rabbitmq1, status: not under maintenance

    Alarms

    (none)

    Network Partitions

    (none)

    Listeners

    Node: rabbit@rabbitmq2, interface: [::], port: 15672, protocol: http, purpose: HTTP API
    Node: rabbit@rabbitmq2, interface: [::], port: 1883, protocol: mqtt, purpose: MQTT
    Node: rabbit@rabbitmq2, interface: [::], port: 15675, protocol: http/web-mqtt, purpose: MQTT over WebSockets
    Node: rabbit@rabbitmq2, interface: [::], port: 25672, protocol: clustering, purpose: inter-node and CLI tool communication
    Node: rabbit@rabbitmq2, interface: [::], port: 5672, protocol: amqp, purpose: AMQP 0-9-1 and AMQP 1.0
    Node: rabbit@rabbitmq3, interface: [::], port: 15672, protocol: http, purpose: HTTP API
    Node: rabbit@rabbitmq3, interface: [::], port: 1883, protocol: mqtt, purpose: MQTT
    Node: rabbit@rabbitmq3, interface: [::], port: 15675, protocol: http/web-mqtt, purpose: MQTT over WebSockets
    Node: rabbit@rabbitmq3, interface: [::], port: 25672, protocol: clustering, purpose: inter-node and CLI tool communication
    Node: rabbit@rabbitmq3, interface: [::], port: 5672, protocol: amqp, purpose: AMQP 0-9-1 and AMQP 1.0
    Node: rabbit@rabbitmq4, interface: [::], port: 25672, protocol: clustering, purpose: inter-node and CLI tool communication
    Node: rabbit@rabbitmq1, interface: [::], port: 5672, protocol: amqp, purpose: AMQP 0-9-1 and AMQP 1.0
    Node: rabbit@rabbitmq1, interface: [::], port: 15672, protocol: http, purpose: HTTP API
    Node: rabbit@rabbitmq1, interface: [::], port: 1883, protocol: mqtt, purpose: MQTT
    Node: rabbit@rabbitmq1, interface: [::], port: 15675, protocol: http/web-mqtt, purpose: MQTT over WebSockets

    Feature flags

    Flag: drop_unroutable_metric, state: enabled
    Flag: empty_basic_get_metric, state: enabled
    Flag: implicit_default_bindings, state: enabled
    Flag: maintenance_mode_status, state: enabled
    Flag: quorum_queue, state: enabled
    Flag: user_limits, state: enabled
    Flag: virtual_host_metadata, state: enabled
Removal of rabbitmq cluster nodes
    #Stop rabbitmq2 rabbitmq3 service or rabbitmqctl stop_app After stopping the application
    # On rabbitmq1 remove the node from the cluster
    rabbitmqctl forget_cluster_node rabbit@rabbitmq2
    rabbitmqctl forget_cluster_node rabbit@rabbitmq3

    #Reset data, username and password will be reset
    rabbitmqctl stop_app
    rabbitmqctl reset

    #Modify to disk node
    rabbitmqctl stop_app
    rabbitmqctl change_cluster_node_type disc(ram)
    rabbitmqctl start_app
Log in to rabbitmq web management console and create a new queue
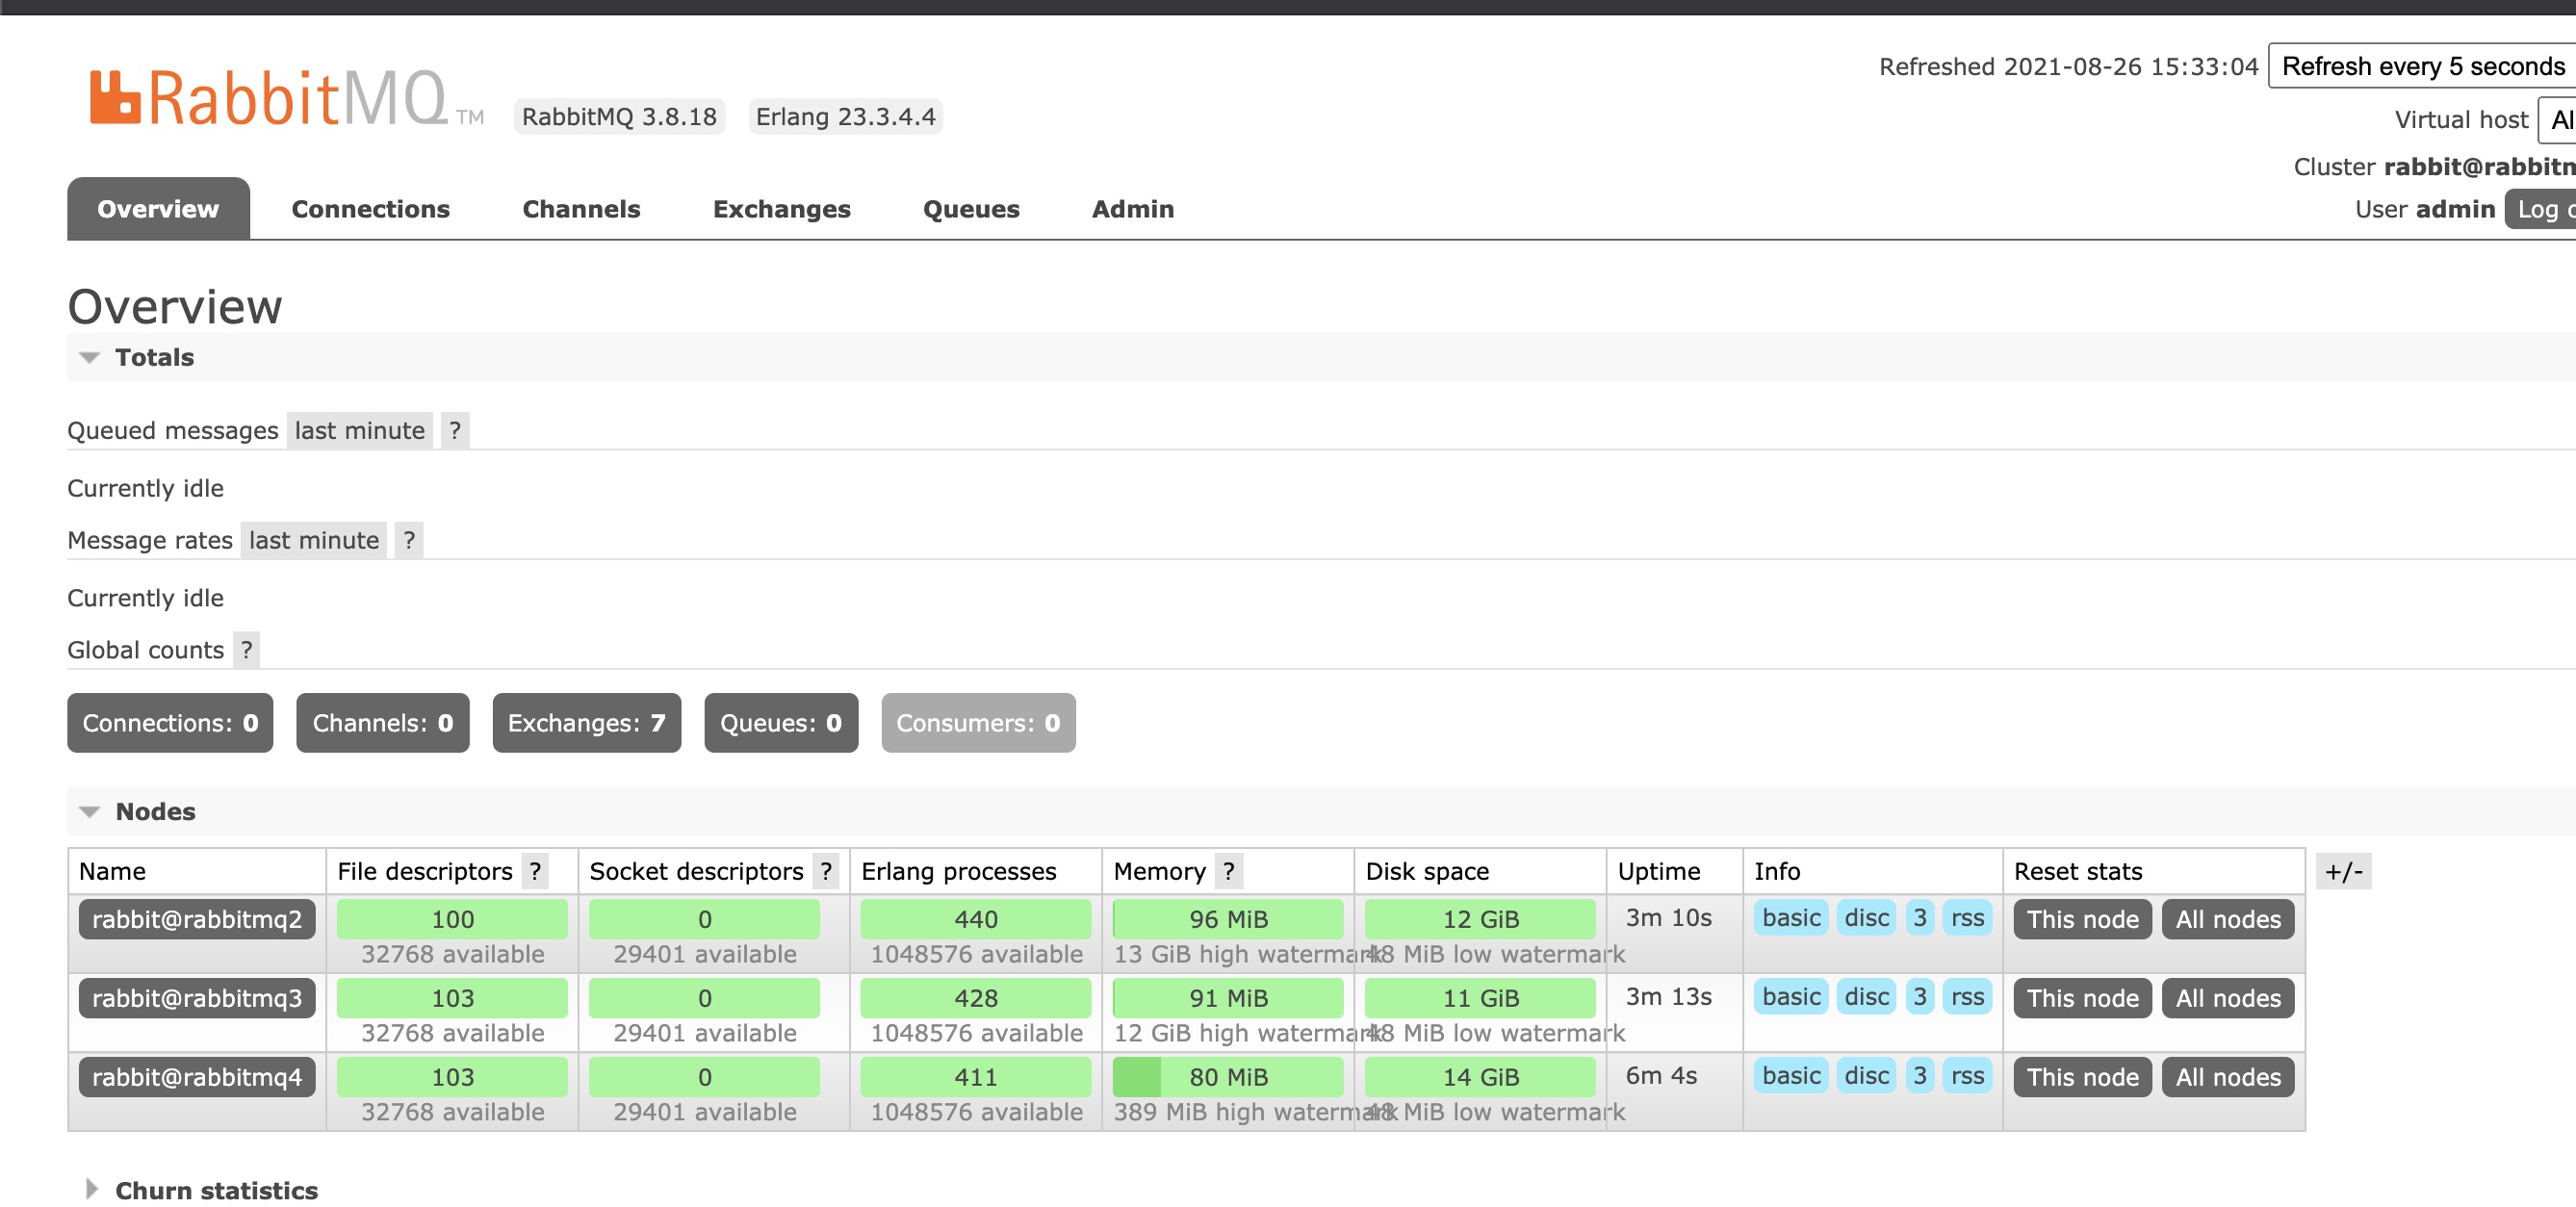
Open the browser and enter any node: For example, node 17, http://192.168.1.17:15672, enter the previously created user Username: admin, enter Password: beyond_2021, and the interface as shown in the figure will appear after logging in.
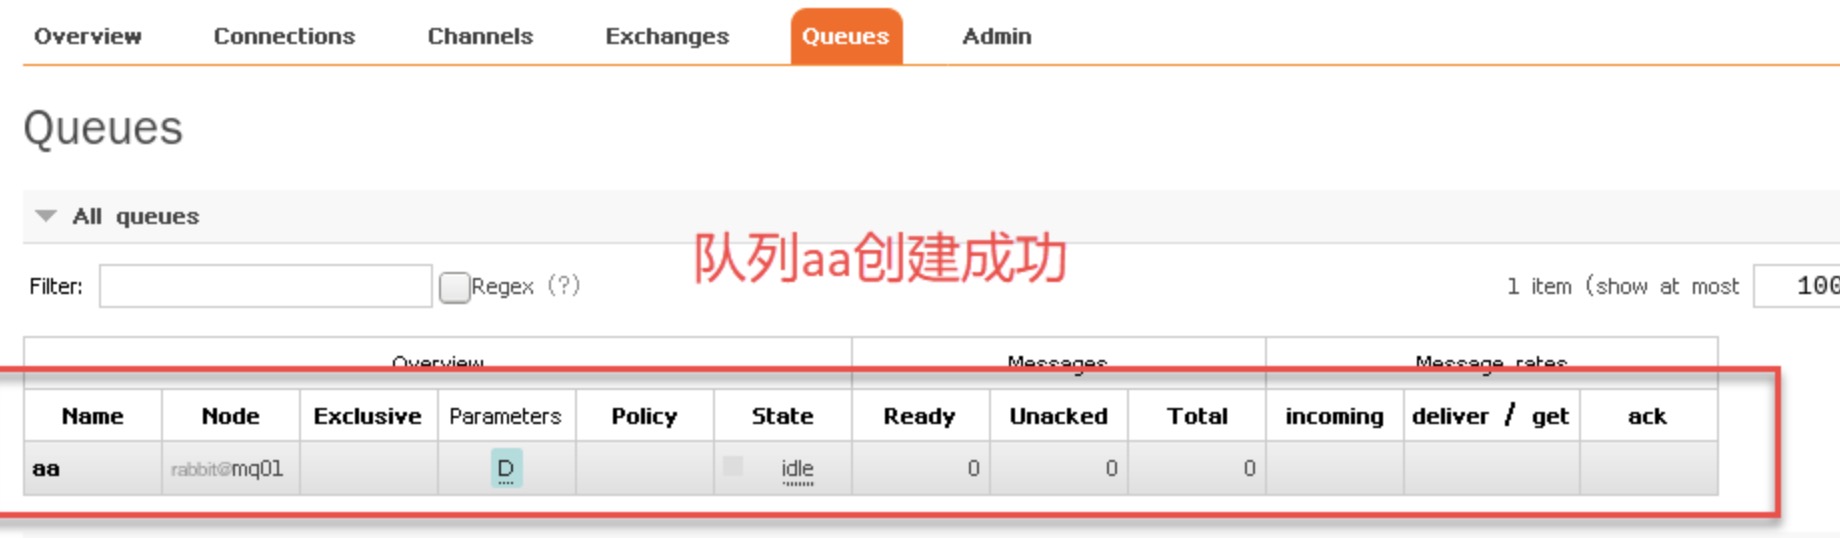
Create a queue according to the interface prompts

Queue created successfully
In the RabbitMQ cluster, there must be at least one disk node, otherwise the queue metadata cannot be written to the cluster. When the disk node goes down, the cluster will not be able to write new queue metadata information.
RabbitMQ mirror cluster configuration
The above has completed the RabbitMQ default cluster mode, but it does not guarantee the high availability of the queue. Although the switches and bindings can be copied to any node in the cluster, the queue contents will not be copied. Although this mode solves the node pressure of a project team, the downtime of the queue node directly causes the queue to be unable to be used and can only wait for restart. Therefore, if you want to be able to apply it normally even when the queue node is down or malfunctions, you must copy the queue content to the cluster. For each node, a mirror queue must be created.
The mirror queue is based on the ordinary cluster mode, and then some policies are added, so you still have to configure the ordinary cluster first, and then you can set up the mirror queue. We will continue with the above cluster.
The mirror queue can be set through the management side of the opened web page, or through commands. Here is the web page setting method.
Create rabbitmq policy
Create a policy on the console of any node.
For example: Create a policy on the console of rabbitmq1 node: http://192.168.1.17:15672
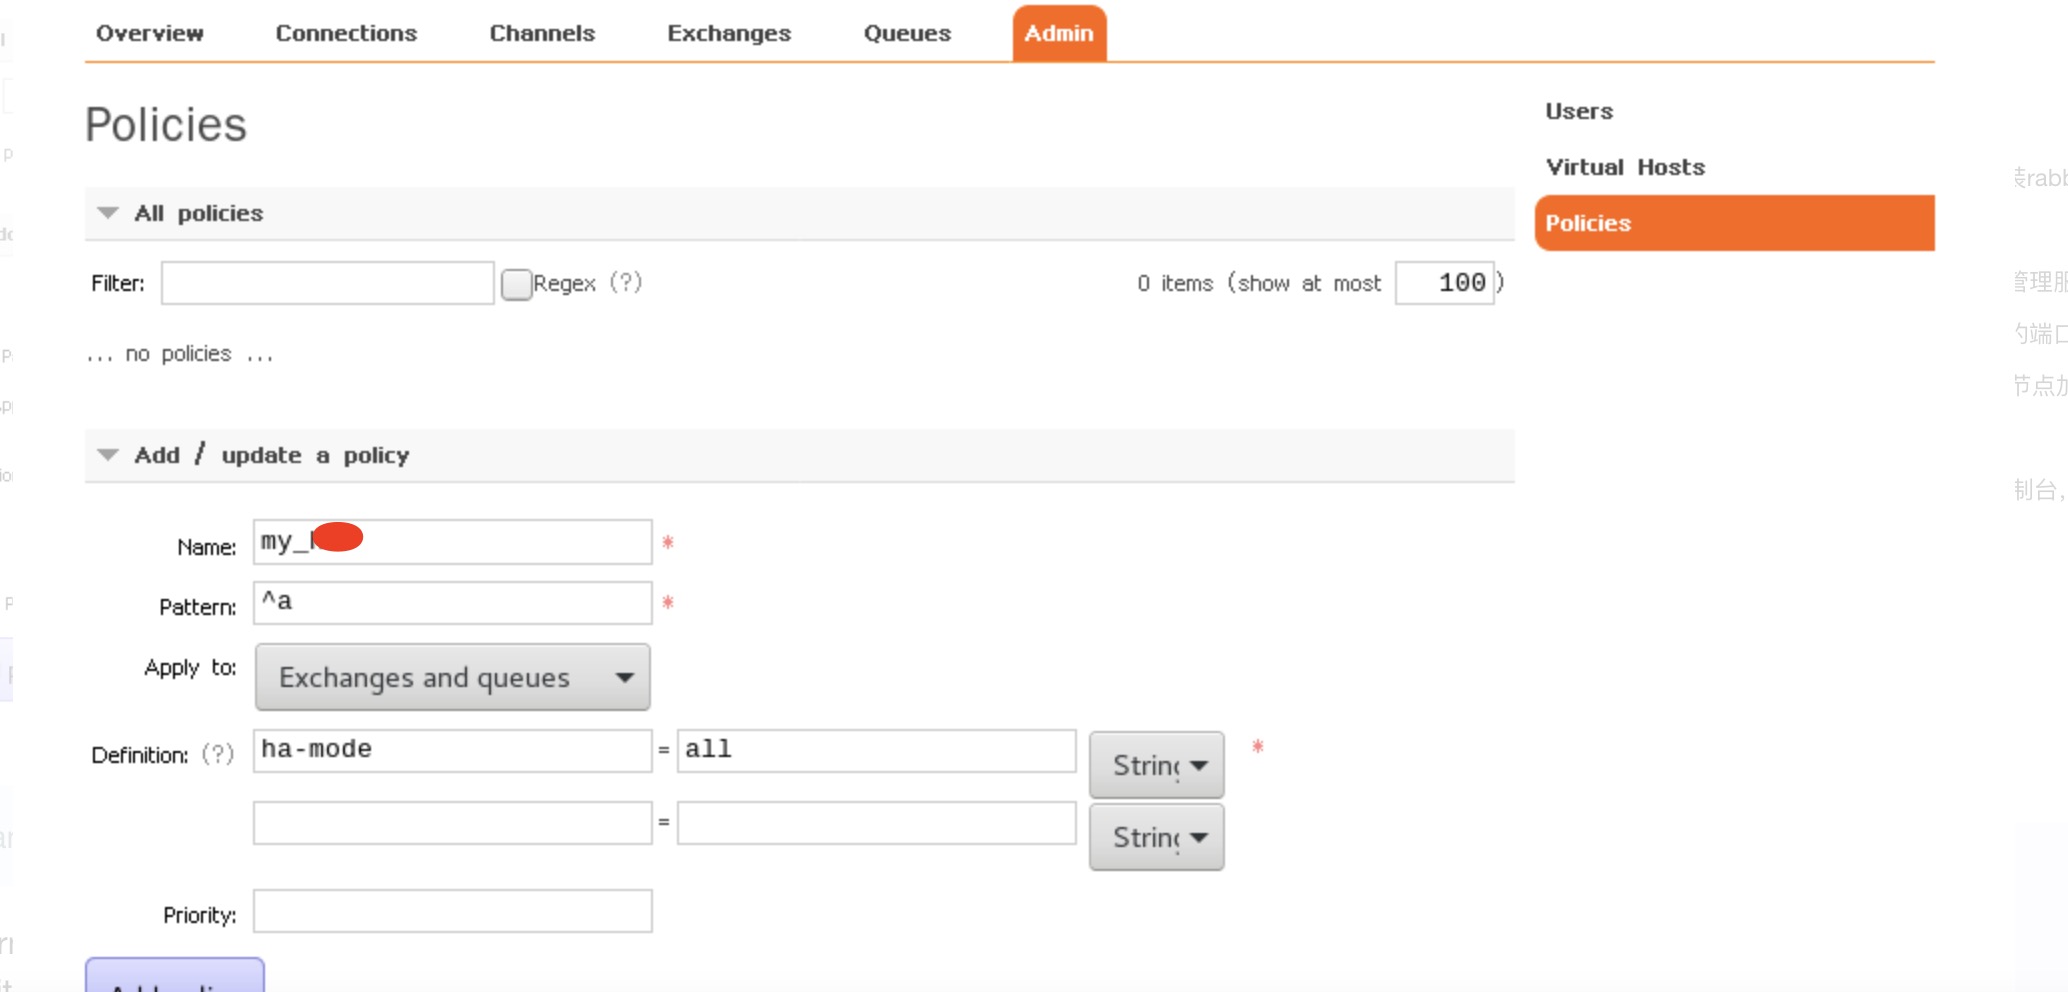
(1) For Web page configuration, click the Admin menu-->Policies option on the right-->Add/update a policy at the bottom on the left.
(2) Fill in the information according to your own needs according to the content in the picture.
-
Name: my_liang
-
Pattern: ^
-
Definition: ha-mode=all
-
Apply to Queues
-
Name: Policy name
-
Pattern: Matching rule, (^ a) means matching the queue starting with a. If it matches all queues, it is ^.
-
Definition: Use all in ha-mode mode, that is, synchronize all matching queues. Question marks link to help documentation.
(3) Click Add policy to add a policy
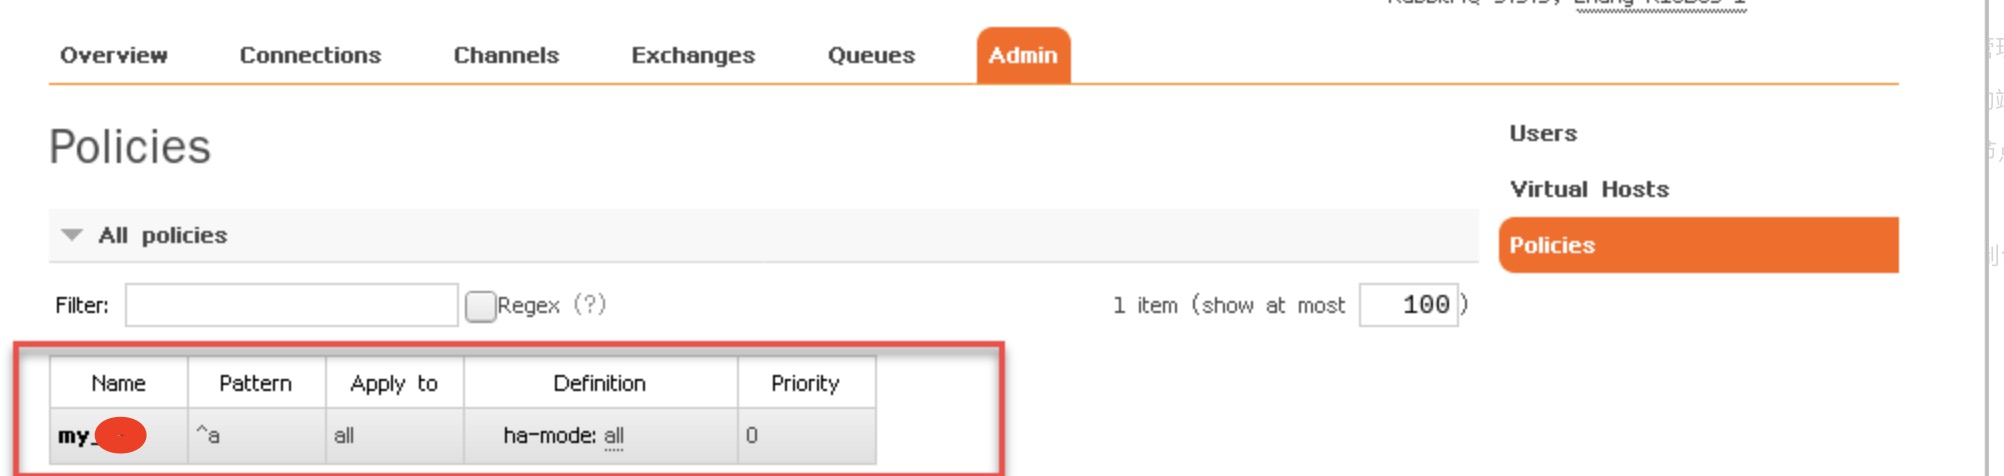
At this time, log in to the consoles of rabbitmq2 and rabbitmq3 nodes respectively, and you can see the strategy added above.
Add queue
Add queue: You can add it in the console, or you can use code or tools to subscribe and create the queue yourself.
Console creation
Add a queue on the console of the rabbitmq1 node
(1) Click the Queues menu –> Add a new queue on the lower left side
(2) Enter the values of the Name and Arguments parameters, and other values can be defaulted

- Name:queue name
- Durability: whether the queue is durable
- Node: the node of the message queue
- Auto delete: Automatically delete
- Arguments: type of strategy used
(3) Click Add queue
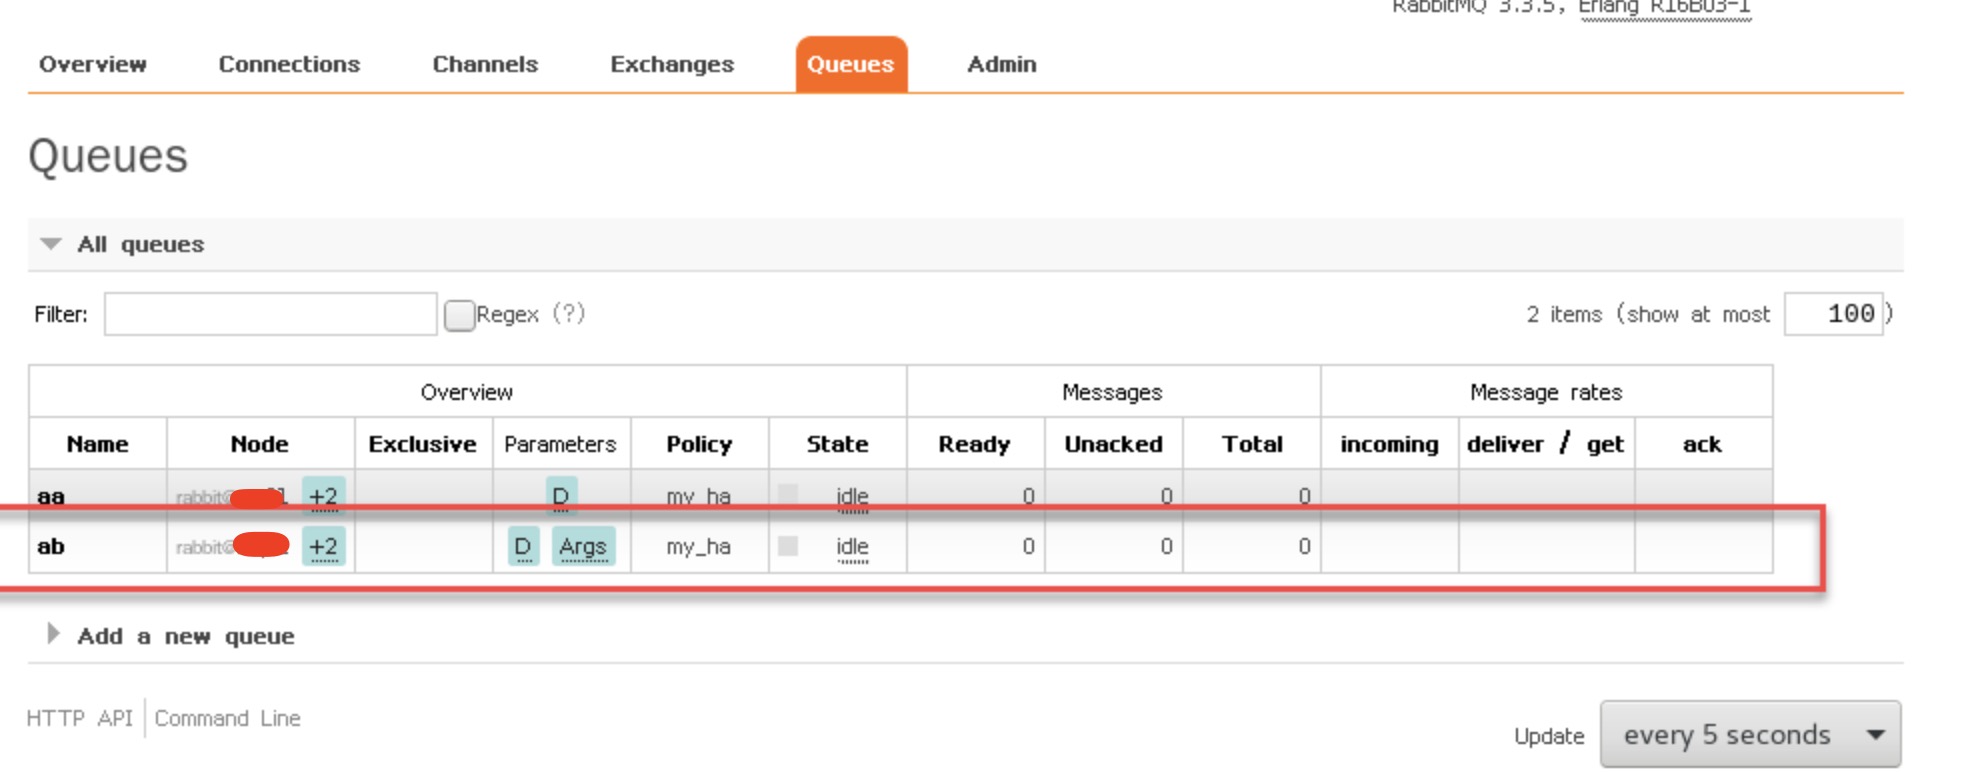
Point the mouse at +2 to display the other two message nodes.
Send message to queue
(1) Click the ab queue button
(2) Drag the scroll bar and click publish message
(3) Fill in the relevant content
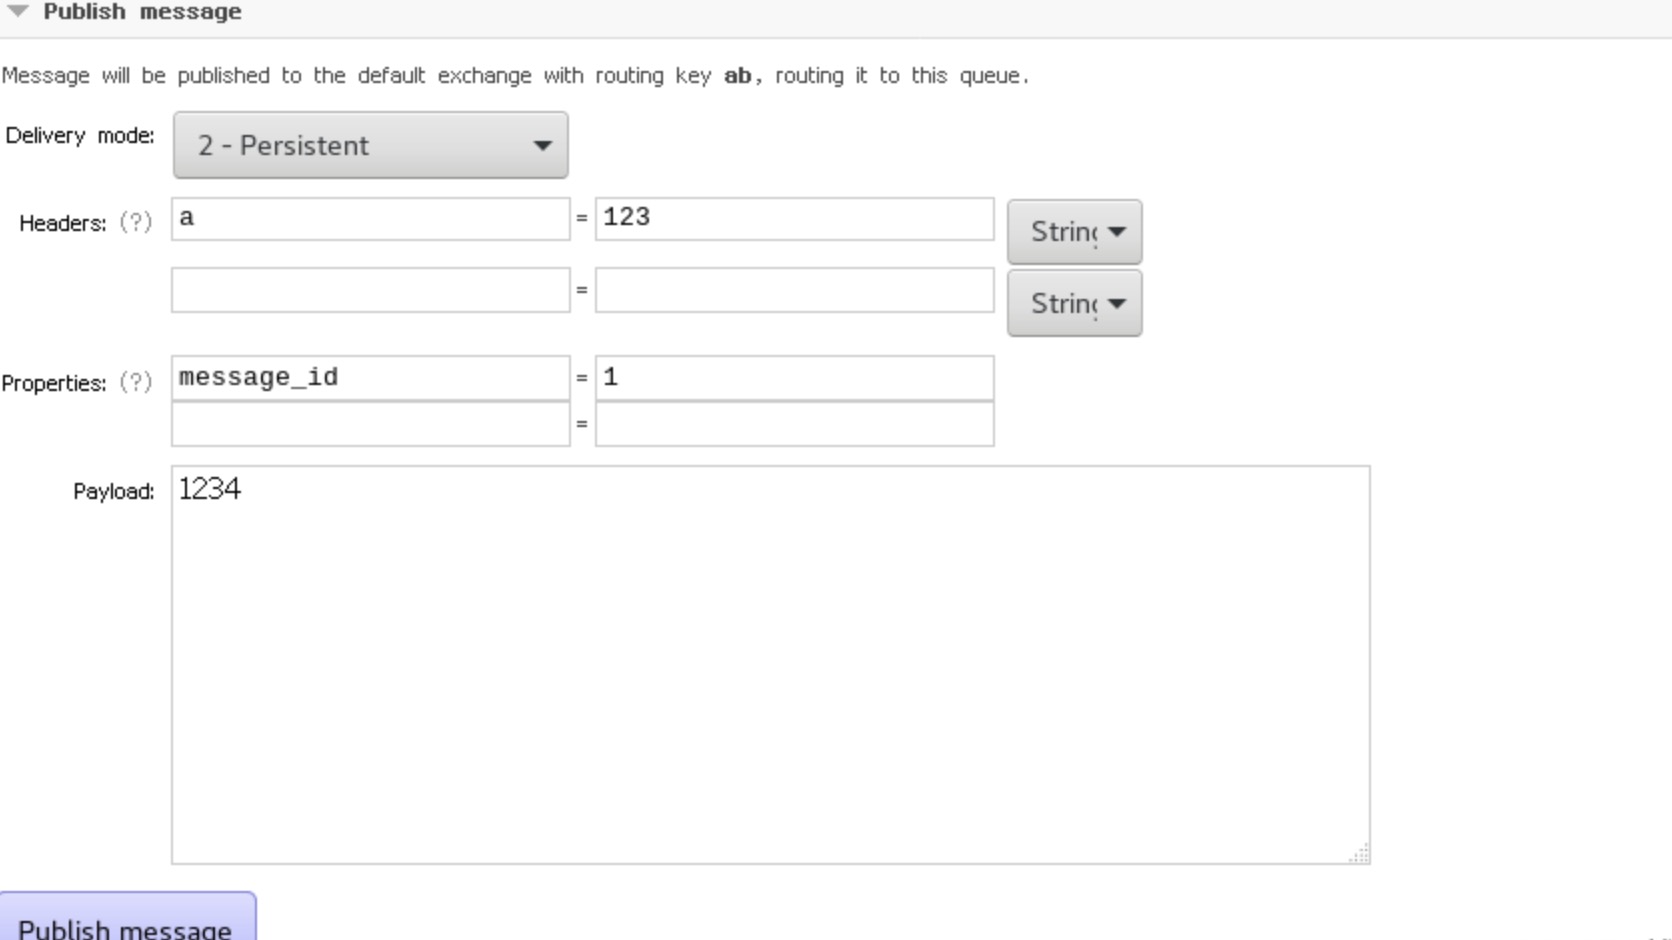
- Persistent: indicates persistence
- Headers: Just fill in whatever you want
- Properties: Click the question mark and select a message ID number
- Payload: message content
(4) Click the Publish message button to send the message
Close the message sending prompt window
Click the queue button and find that there is an additional message record in the Ready and Total of the ab queue.

Do destructive testing
(1) Close the service of the rabbitmq1 node, and then check whether the message record still exists through rabbitmq2 and rabbitmq3.
rabbitmqctl stop_app //Stop the rabbit application of rabbitmq1
View the console of the rabbitmq2 or rabbitmq3 node

You can see that the ab queue has been displayed as +1 from the previous +2, and the message record exists.
(2) Close the service of the rabbitmq2 node and check whether the message record still exists through rabbitmq3.
rabbitmqctl stop_app //Stop the rabbit application of rabbitmq2
From the rabbitmq3 console, you can see that the ab queue and message records still exist, but they have become a node.
(3) Restart the rabbitmq1 and rabbitmq2 services
rabbitmqctl start_app //Start the rabbit application of rabbitmq1 and rabbitmq2
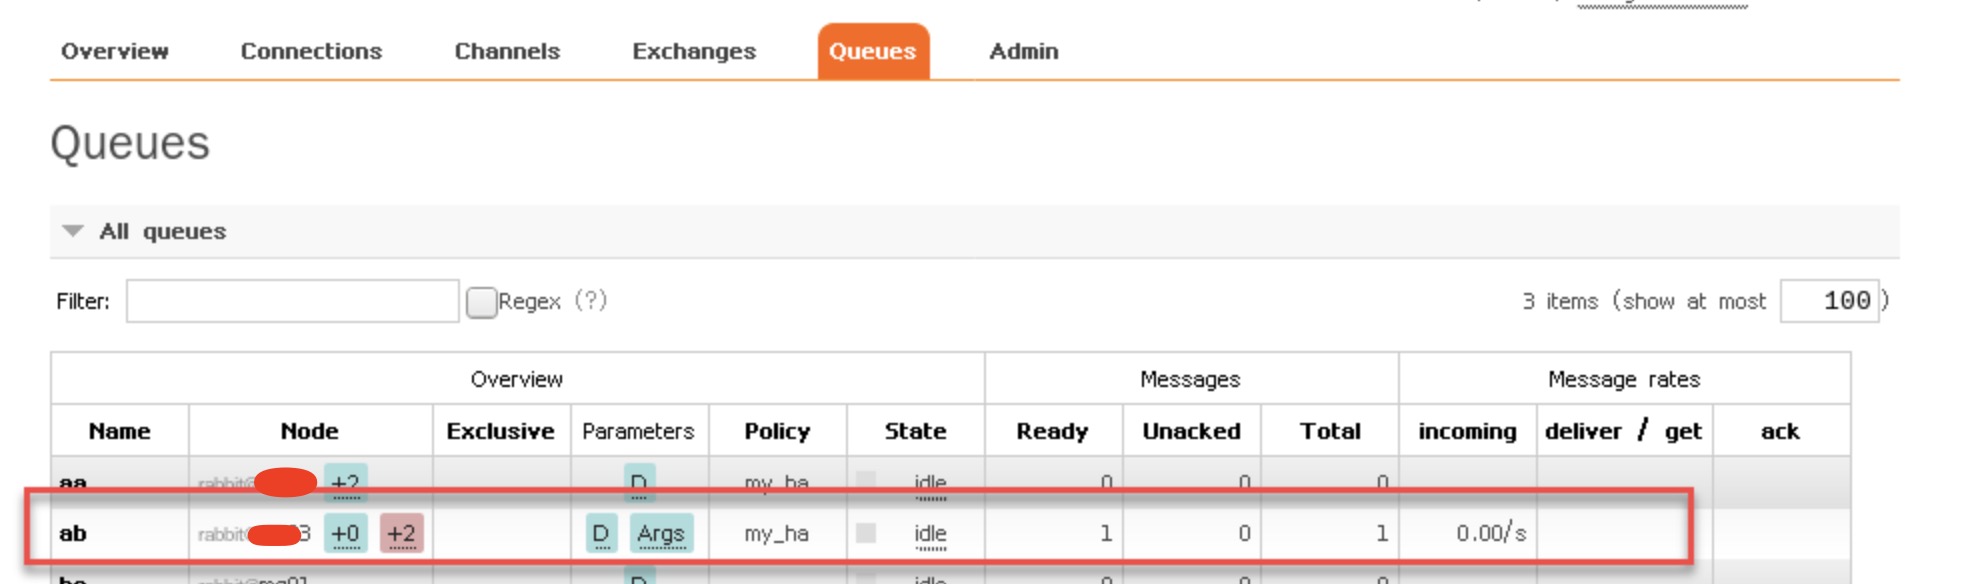
You can see that the +2 behind the ab queue turns pink, and pointing the mouse up shows that the mirror cannot be synchronized. If the rabbitmq3 node service is stopped at this time, the messages in the queue will be lost.
The solution is to choose to execute the synchronization command on the rabbitmq1 or rabbitmq2 node.
rabbitmqctl sync_queue ab //Synchronize ab queue
After the synchronization is completed, the +2 turns blue again.
In this way, we have tested the destructive test of the rabbitmq cluster, indicating that the cluster configuration is successful.
Reference link:
https://blog.51cto.com/11134648/2155934