Stage 6: Service Framework Basics (Chapter 2-MQ (Service Asynchronous Communication))
Stage 6: Service Framework Basics (Chapter 2-MQ (Service Asynchronous Communication))
Stage 6: [Service Framework Basics](/search?q=Service Framework Basics) (Chapter 2-MQ (Service Asynchronous Communication))
- RabbitMQ
- 1. First introduction to MQ
-
- 1.1. Synchronous and asynchronous communication
-
- 1.1.1. Synchronous communication
- 1.1.2.Asynchronous communication
- 1.2.Technical comparison:
- 2. Quick Start
-
- 2.1. Install RabbitMQ [==Important==]
-
- 2.1.1. Install
RabbitMQ, refer to the pre-course materials:
- 2.1.1. Install
- 2.1.2. Introduction
- 2.2.==RabbitMQ message model==
- 2.3.==Import Demo project==
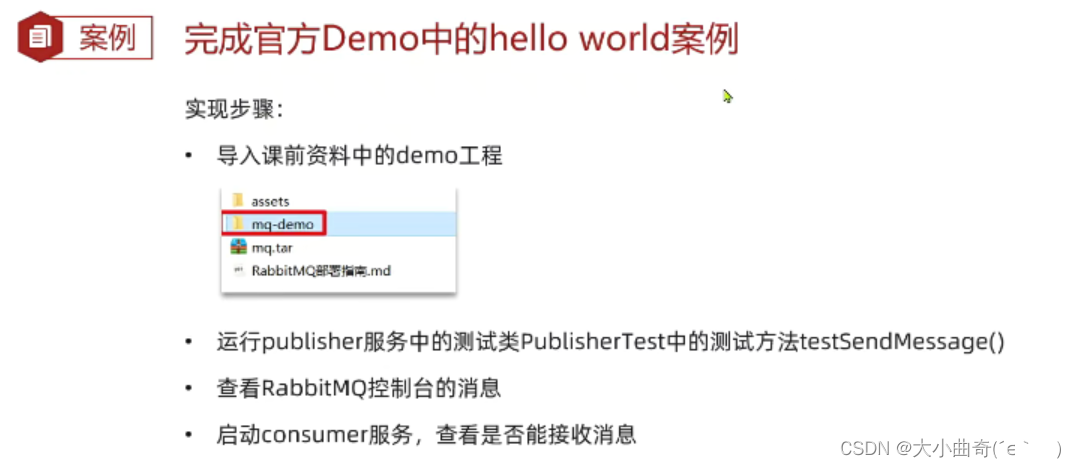
- 2.4. Getting Started Case [==Not important, too cumbersome==]
-
- 2.4.1.publisher implementation
- 2.4.2.consumer implementation
- 2.5. Summary
- 3. SpringAMQP [==Important==]
-
- 3.1. Basic Queue simple queue model [==Official
HelloWorldfirst case==]
- 3.1. Basic Queue simple queue model [==Official
-
- 3.1.1.Message sending
- 3.1.2. Message reception
- 3.1.3.Testing
- 3.2. WorkQueue task model [==Official second case==]
-
- 3.2.1.Message sending
- 3.2.2. Message reception
- 3.2.3.Testing
- 3.2.4. Those who can do more work (improvements in the average distribution of messages)
- 3.2.5. Summary
- 3.3.Publish /Subscribe
- 3.4. Fanout (broadcast) [==Official third case== (With a switch, ==The switch sends messages to all queues==)]
-
- 3.4.1. Declare queues and switches
- 3.4.2. Message sending
- 3.4.3. Message reception
- 3.4.4. Summary
- 3.5. Direct [==Official fourth case==]
-
- 3.5.1. Declaring queues and switches based on annotations ==
- 3.5.2. Message sending
- 3.5.3.==Summary==
- 3.6. Topic (wildcard) [==Official fifth case==]
-
- 3.6.1.Description
- 3.6.2. Message sending
- 3.6.3. Message reception
- 3.6.4.==Summary==
- 3.7. Message converter【==Important==】
-
- 3.7.1. Test the default converter
- 3.7.2. Configure JSON converter
RabbitMQ
1. First introduction to MQ
1.1. Synchronous and asynchronous communication
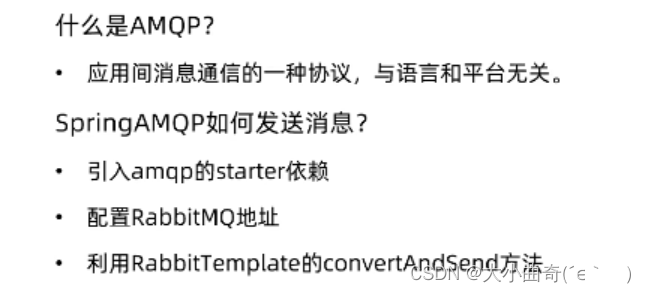
There are two ways of communication between microservices: synchronous and asynchronous.:
- Synchronous communication: Just like making a phone call, real-time response is required.
- Asynchronous communication: Just like sending an email, you don’t need to reply immediately.

Both methods have their own pros and cons. You can get an immediate response when you call, but you can't talk to multiple people at the same time. Sending emails allows you to send and receive emails to multiple people at the same time, but there is often a delay in response.
1.1.1. Synchronous communication
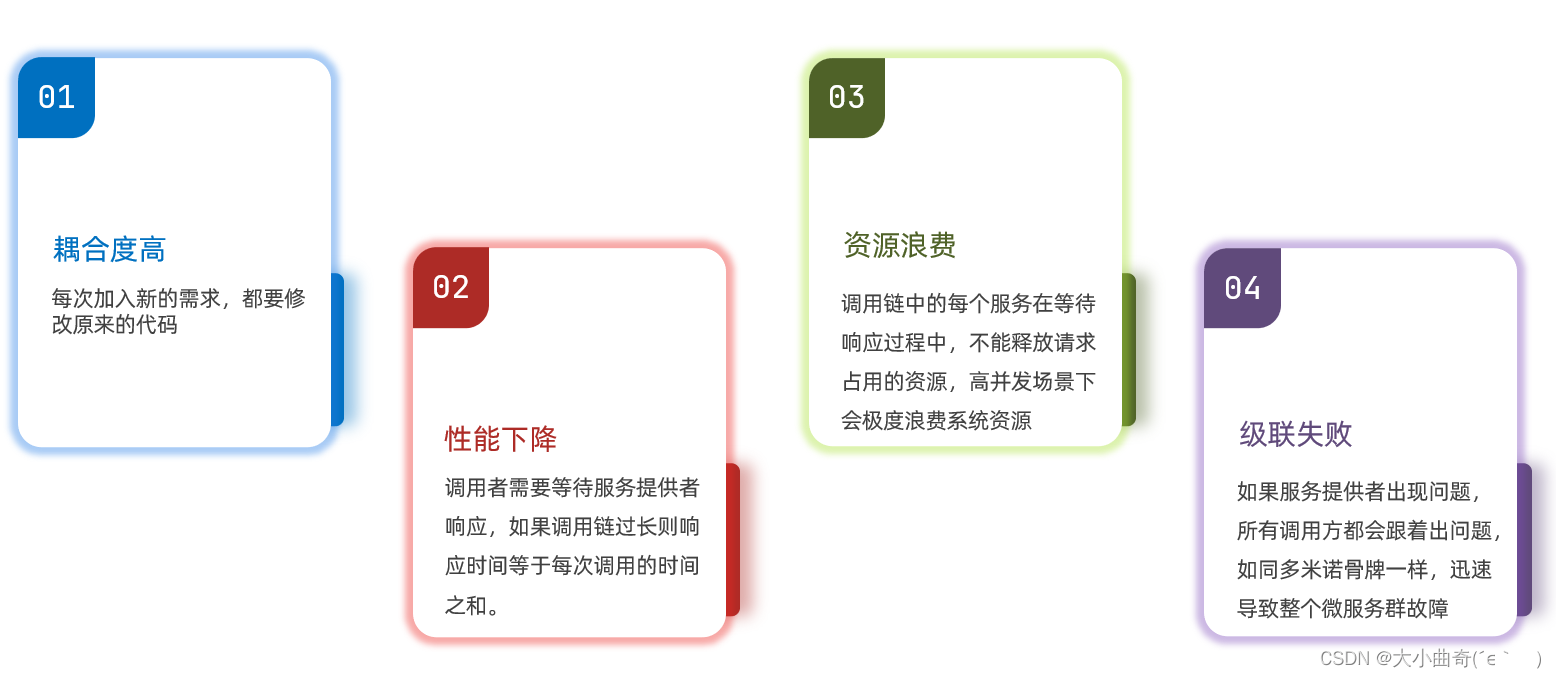
The call we learned before Feignis a synchronous method. Although the call can get results in real time, there are the following problems:
Summarize:
Advantages of synchronous calls:
- Strong timeliness, results can be obtained immediately
Problems with synchronous calls:
- High degree of coupling
- Reduced performance and throughput
- There is additional resource consumption
- There is a cascading failure problem
1.1.2.Asynchronous communication
Asynchronous calls can avoid the above problems:
Let's take the purchase of goods as an example. After paying, the user needs to call the order service to complete the order status modification, call the logistics service, allocate the corresponding inventory from the warehouse and prepare for shipment.
In event mode,The payment service is an event publisher (publisher), after the payment is completed, you only need to publish a payment success event (event), with the order id in the event.
Order service and logistics service are event subscribers (Consumer), subscribe to the event of successful payment, and complete your business after listening to the event.
In order to decouple the event publisher and subscriber, the two do not communicate directly, but there is an intermediary ( Broker).Publisher publishes events to Broker, doesn't care who subscribes to the event.订阅者从Broker订阅事件,不关心谁发来的消息。

Broker 是一个像数据总线一样的东西,所有的服务要接收数据和发送数据都发到这个总线上,这个总线就像协议一样,让服务间的通讯变得标准和可控 。
好处:
- 吞吐量提升:无需等待订阅者处理完成,响应更快速
- 故障隔离:服务没有直接调用,不存在级联失败问题
- 调用间没有阻塞,不会造成无效的资源占用
- 耦合度极低,每个服务都可以灵活插拔,可替换
- 流量削峰:不管发布事件的流量波动多大,都由Broker接收,订阅者可以按照自己的速度去处理事件
缺点:
- 架构复杂了,业务没有明显的流程线,不好管理
- 需要依赖于Broker的可靠、安全、性能
好在现在开源软件或云平台上 Broker 的软件是非常成熟的,比较常见的一种就是我们今天要学习的MQ技术。
1.2.技术对比:
MQ,中文是消息队列(MessageQueue),字面来看就是存放消息的队列。也就是事件驱动架构中的Broker。
比较常见的MQ实现:
- ActiveMQ
RabbitMQ- RocketMQ
- Kafka
几种常见MQ的对比:
| RabbitMQ| ActiveMQ| RocketMQ| Kafka
---|---|---|---|---
公司/社区| Rabbit| Apache| 阿里| Apache
开发语言| Erlang| Java| Java| Scala&Java
协议支持| AMQP,XMPP,SMTP,STOMP| OpenWire,STOMP,REST,XMPP,AMQP| 自定义协议| 自定义协议
可用性| 高| 一般| 高| 高
单机吞吐量| 一般| 差| 高| 非常高
消息延迟| 微秒级| 毫秒级| 毫秒级| 毫秒以内
消息可靠性| 高| 一般| 高| 一般
追求可用性:Kafka、 RocketMQ 、RabbitMQ
追求可靠性:RabbitMQ、RocketMQ
追求吞吐能力:RocketMQ、Kafka
追求消息低延迟:RabbitMQ、Kafka
2.快速入门
2.1.安装RabbitMQ 【重要】
安装过程中出现了一些问题:通过参考一下资料得到了解决:
https://blog.csdn.net/lslslsls77/article/details/125611788
https://blog.csdn.net/qq_42115732/article/details/99541012
2.1.1、安装RabbitMQ,参考课前资料:
我们在Centos7虚拟机中使用Docker来安装。
1、下载镜像
方式一:在线拉取
docker pull [rabbitmq](/search?q=rabbitmq):3.8-management
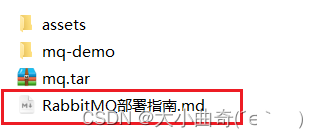
方式二:从本地加载
在课前资料已经提供了镜像包:

上传到虚拟机的/tmp目录下了,这是一个临时目录
2、上传到虚拟机中后,使用命令加载镜像即可:
执行docker命令前需要先启动docker服务:systemctl start docker
docker load -i mq.tar
导入成功:

我们查看一下:在/tmp下执行docker images命令:

发现一个名为rabbitmq,版本为3-management的镜像已经导入成功了
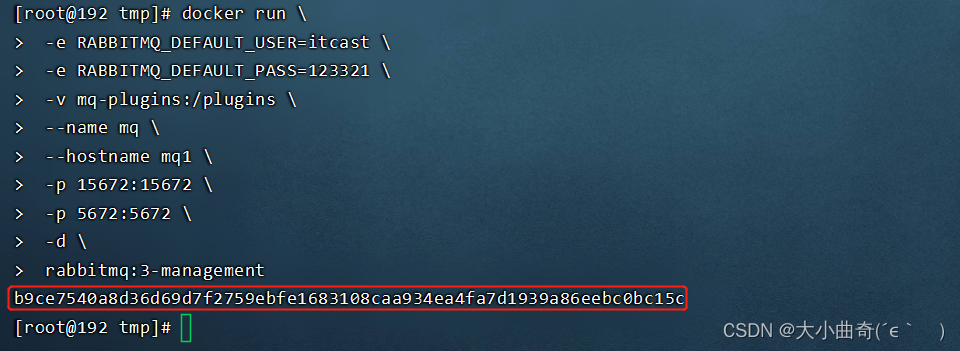
3、安装MQ
执行下面的命令来运行MQ容器:
    docker run \
     -e RABBITMQ_DEFAULT_USER=itcast \
     -e RABBITMQ_DEFAULT_PASS=123321 \
     --name mq \
     --hostname mq1 \
     -p 15672:15672 \
     -p 5672:5672 \
     -d \
     rabbitmq:3-management
-e是配置环境变��量,这里配置了两个:用户名和密码;用于访问mq或者登陆它的管理平台;
--name mq \是起一个名字;
--hostname mq1 \是配置主机名,可以不配,但是做集群不是时一定要配
-p 15672:15672 \端口映射,rabbitmq管理平台的端口,提供一个UI界面,管理起来方便;;
-p 5672:5672 \端口映射,将来做消息通信的接口,收发消息通过这个端口来建立连接;
-d \是后台运行
rabbitmq:3-management是镜像的名称;
使用上面方式运行容器出错:
docker: Error response from daemon: Conflict. The container name "/mq" is already in use by container "670cefe07ee4ffb414b9449a7eeed2280dd9d05050f85988b6093599b6f01326". You have to remove (or rename) that container to be able to reuse that name.
出现上述的错误,是因为docker容器里面已经存在,如果不需要,则删除。docker rm fb087642b497(该containerID)
如果想要再次使用,使用
docker restart 镜像名重启该container容器。
运行MQ容器时会出现错误 :
docker:docker run \ -e RABBITMQ_DEFAULT_USER=itcast \ -e RABBITMQ_DEFAULT_PASS=123321 \ --name mq \ --hostname mq1 \ -p 15672:15672 \ -p 5672:5672 \ -d \ rabbitmq:3-management
解决办法:
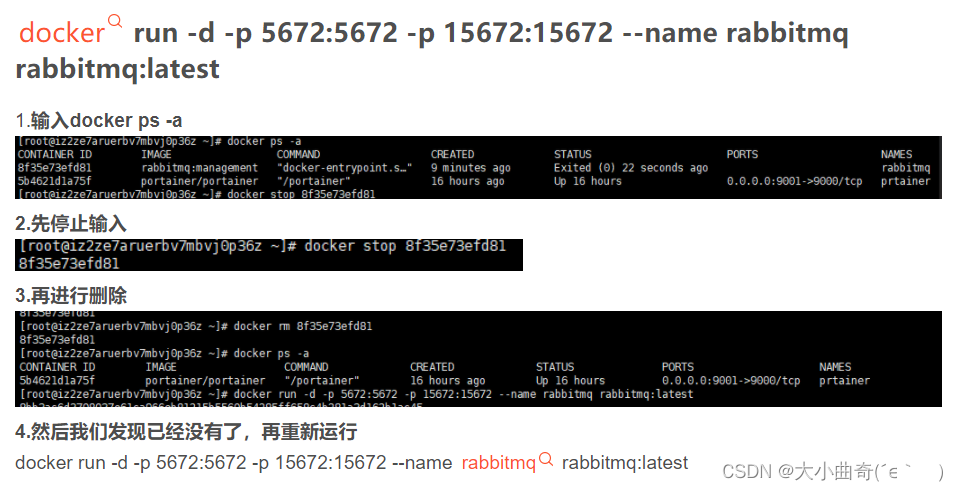
通过docker ps命令查看一下

发现成功的启动起来了;启动起来之后我们就可以访问了;访问15672这个端口:http://192.168.138.100:15672/
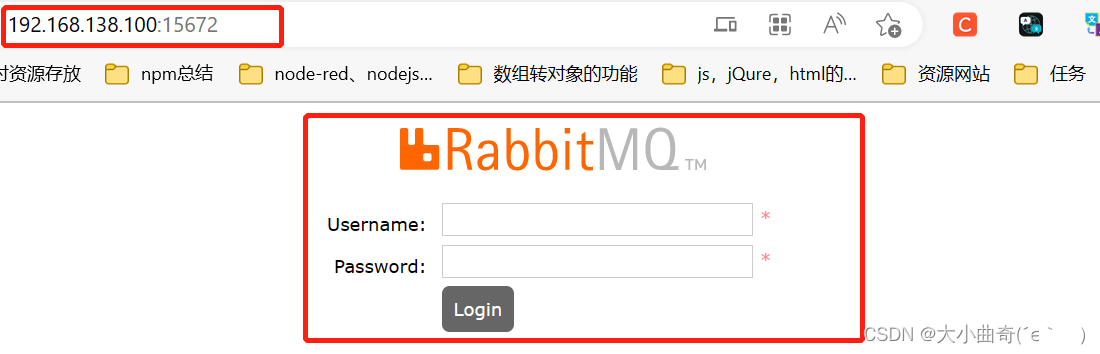
用户名是itcast,密码是123321,点击Login就可以进入用户管理平台了;

2.1.2、介绍
MQ的基本结构:
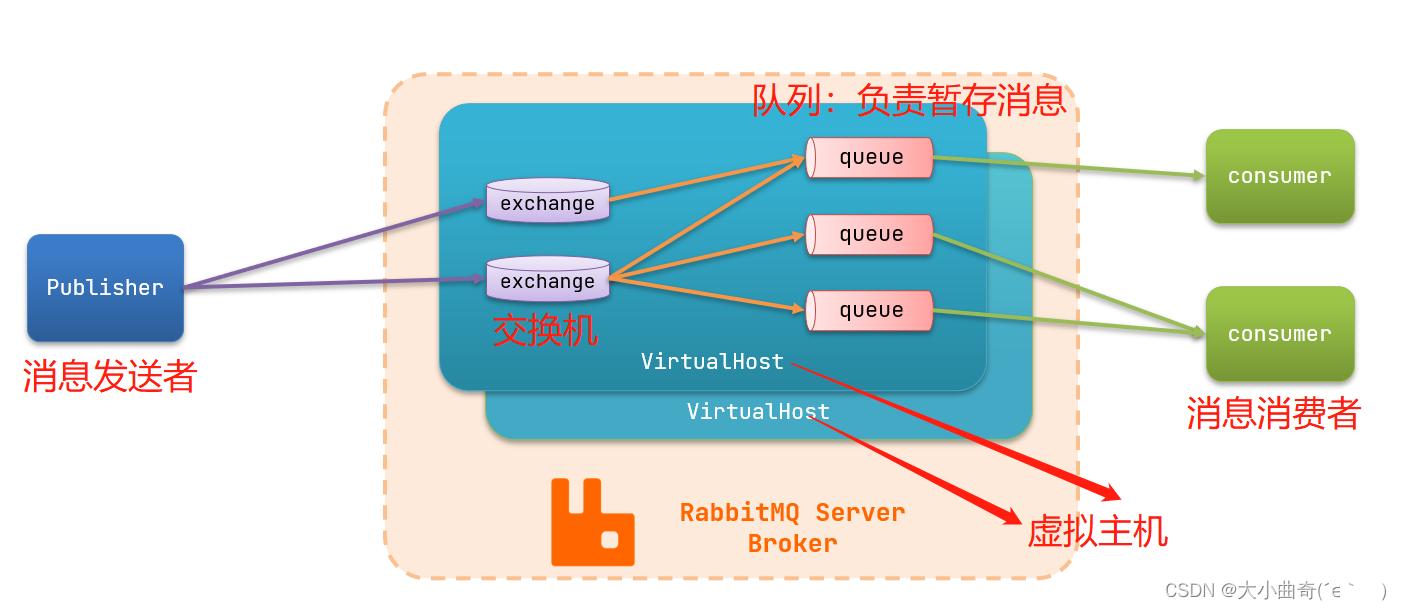
RabbitMQ中的一些角色:
- publisher:生产者
- consumer:消费者
- exchange个:交换机,负责消息路由
- queue:队列,存储消息
- virtualHost:虚拟主机,隔离不同租户的exchange、queue、消息的隔离
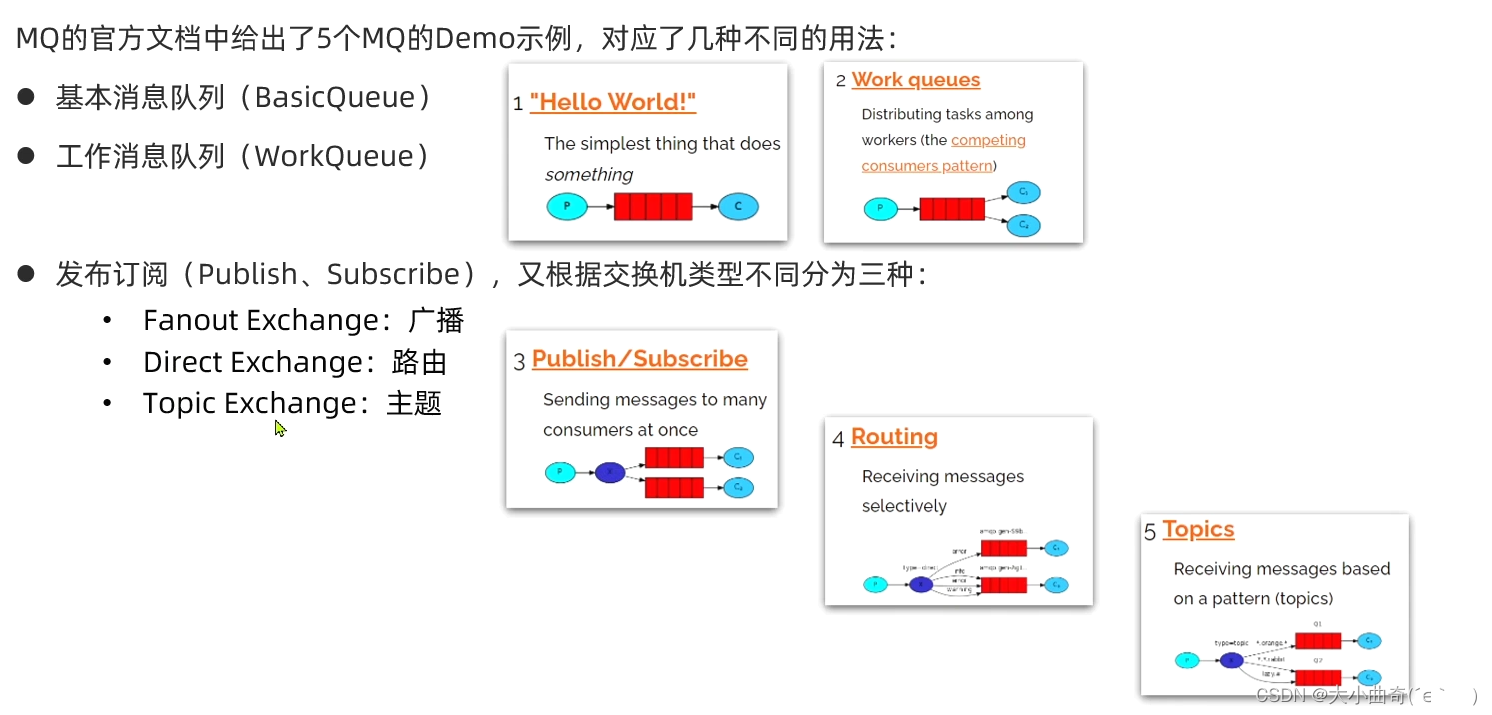
2.2.RabbitMQ消息模型
RabbitMQ官方提供了5个不同的Demo示例,对应了不同的消息模型:
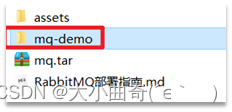
2.3.导入Demo工程
课前资料提供了一个Demo工程,mq-demo:
导入后可以看到结构如下:
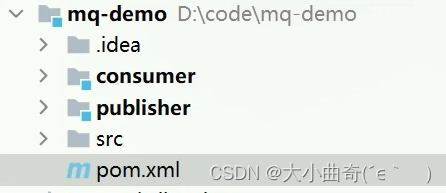
包括三部分:
mq-demo:父工程,管理项目依赖publisher:消息的发送者consumer:消息的消费者
2.4.入门案例 【不重要,过于繁琐】
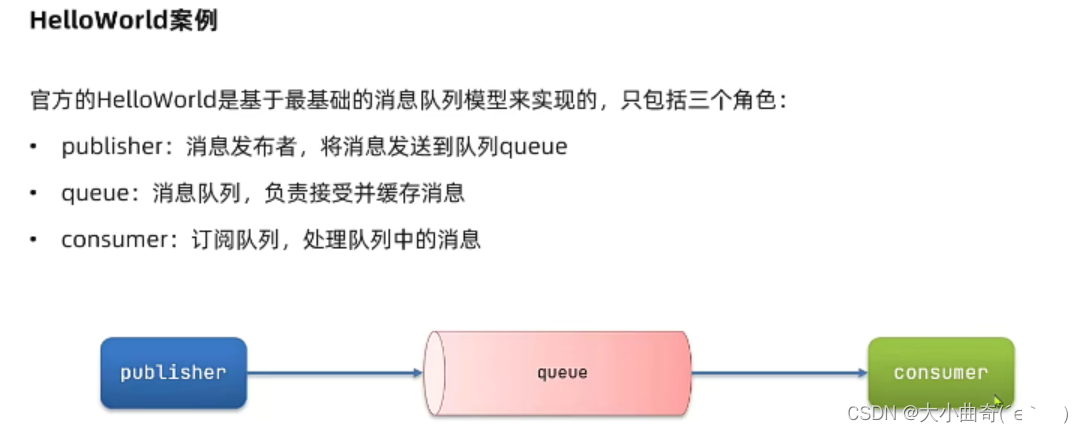
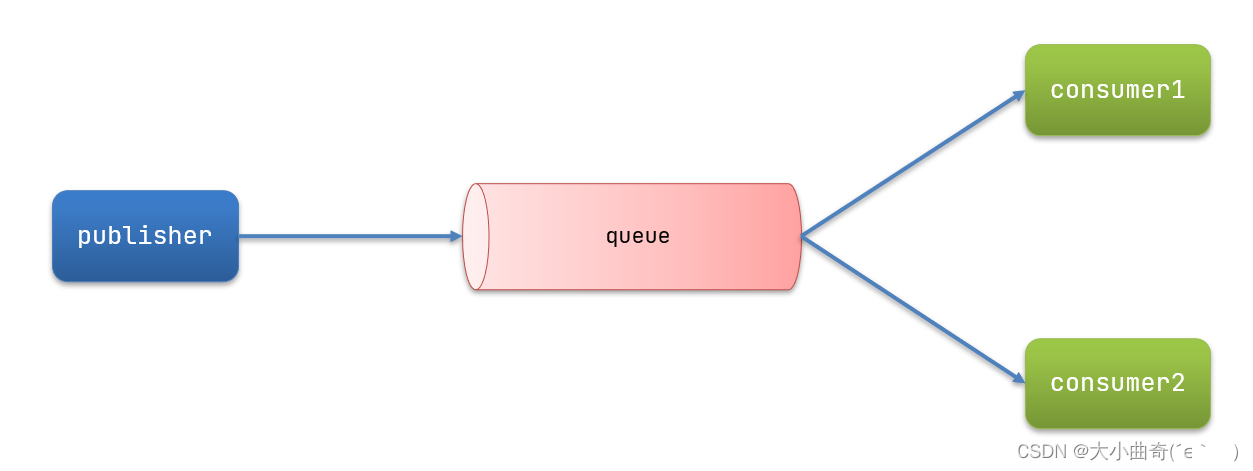
简单队列模式的模型图:

官方的HelloWorld是基于最基础的消息队列模型来实现的,只包括三个角色:
- publisher:消息发布者,将消息发送到队列queue
- queue:消息队列,负责接受并缓存消息
- consumer:订阅队列,处理队列中的消息
2.4.1.publisher实现
思路:
- 建立连接
- 创建Channel (通道)
- 声明队列
- 发送消息
- 关闭连接和channel(通道)
代码实现:
    package cn.itcast.mq.helloworld;

    public class PublisherTest {
        @Test
        public void testSendMessage() throws IOException, TimeoutException {
            // 1.建立连接
            ConnectionFactory factory = new ConnectionFactory();
            // 1.1.设置连接参数,分别是:主机名、端口号、vhost、用户名、密码
            factory.setHost("192.168.130.100");  //虚拟机ip地址
            factory.setPort(5672);  //消息通信的接口
            factory.setVirtualHost("/"); //虚拟主机
            factory.setUsername("itcast"); //用户名
            factory.setPassword("123321"); //密码
            // 1.2.建立连接
            Connection connection = factory.newConnection(); //到此控制台已经建立了一个连接;

            // 2.创建通道Channel
            Channel channel = connection.createChannel();  //到此建立了一个通道;

            // 3.创建队列
            String queueName = "simple.queue";
            channel.queueDeclare(queueName, false, false, false, null); //到此队列被创建了

            // 4.发送消息
            String message = "hello, rabbitmq!";
            channel.basicPublish("", queueName, null, message.getBytes());
            System.out.println("发送消息成功:【" + message + "】");
            //发完消息,通道和链接就可以关闭了,解除了耦合;异步;
            // 5.关闭通道和连接
            channel.close();
            connection.close();

        }
    }
发完消息,通道和链接就可以关闭了,解除了耦合;异步的体现,这时消费者就可以接收消息了;
2.4.2.consumer实现
代码思路:
- 建立连接
- 创建Channel(通道)
- 声明队列
- 订阅消息
代码实现:
    package cn.itcast.mq.helloworld;

    public class ConsumerTest {
        public static void main(String[] args) throws IOException, TimeoutException {
            // 1.建立连接
            ConnectionFactory factory = new ConnectionFactory();
            // 1.1.设置连接参数,分别是:主机名、端口号、vhost、用户名、密码
            factory.setHost("192.168.130.100");
            factory.setPort(5672);
            factory.setVirtualHost("/");
            factory.setUsername("itcast");
            factory.setPassword("123321");
            // 1.2.建立连接
            Connection connection = factory.newConnection();

            // 2.创建通道Channel
            Channel channel = connection.createChannel();

            // 3.创建队列
            String queueName = "simple.queue";
            channel.queueDeclare(queueName, false, false, false, null);

            // 4.订阅消息
            channel.basicConsume(queueName, true, new DefaultConsumer(channel){
                @Override
                public void handleDelivery(String consumerTag, Envelope envelope,
                                           AMQP.BasicProperties properties, byte[] body) throws IOException {
                    // 5.处理消息
                    String message = new String(body);
                    System.out.println("接收到消息:【" + message + "】");
                }
            });
            System.out.println("等待接收消息。。。。");
        }
    }
2.5.总结
基本消息队列的消息发送流程:
- 建立connection(连接)
- 创建channel(通道)
- 利用channel声明队列
- 利用channel向队列发送消息
基本消息队列的消息接收流程:
- 建立connection(连接)
- 创建channel(通��道)
- 利用channel声明队列
- 定义consumer的消费行为handleDelivery()
- 利用channel将消费者与队列绑定
3.SpringAMQP【重要】
代替2中的入门案例
SpringAMQP是基于RabbitMQ封装的一套模板,并且还利用SpringBoot对其实现了自动装配,使用起来非常方便。
SpringAmqp的官方地址:https://spring.io/projects/spring-amqp
SpringAMQP提供了三个功能:
- 自动声明队列、交换机及其绑定关系
- 基于注解的监听器模式,异步接收消息
- 封装了
RabbitTemplate工具,用于发送消息
3.1.Basic Queue 简单队列模型【官方HelloWorld第一个案例】
简单来说��就是让一个消费者绑定到一个队列,消费队列中的消息 。
在父工程mq-demo中引入amqp依赖
    <!--AMQP依赖,包含RabbitMQ-->
    <dependency>
        <groupId>org.springframework.boot</groupId>
        <artifactId>spring-boot-starter-amqp</artifactId>
    </dependency>
3.1.1.消息发送
首先配置MQ地址,在publisher服务的application.yml中添加配置:
    spring:
      rabbitmq:
        host: 192.168.138.100 # 主机名
        port: 5672 # 端口
        virtual-host: / # 虚拟主机
        username: itcast # 用户名
        password: 123321 # 密码
然后在publisher服务中编写测试类SpringAmqpTest,并利用RabbitTemplate实现消息发送:
    package cn.itcast.mq.spring;

    @RunWith(SpringRunner.class)
    @SpringBootTest
    public class SpringAmqpTest {

        @Autowired
        private RabbitTemplate rabbitTemplate;

        @Test
        public void testSimpleQueue() {
            // 队列名称
            String queueName = "simple.queue";
            // 消息
            String message = "hello, spring amqp!";
            // 发送消息
            rabbitTemplate.convertAndSend(queueName, message);
        }
    }
3.1.2.消息接收
首先配置MQ地址,在consumer服务的application.yml中添加配置:
    spring:
      rabbitmq:
        host: 192.168.138.100 # 主机名
        port: 5672 # 端口
        virtual-host: / # 虚拟主机
        username: itcast # 用户名
        password: 123321 # 密码
然后在consumer服务的cn.itcast.mq.listener包中新建一个类SpringRabbitListener,代码如下:
    package cn.itcast.mq.listener;
    @Component //这个类为了让spring知道,我们把他定义成一个类;
    public class SpringRabbitListener {

        @RabbitListener(queues = "simple.queue")  //定义监听那个队列
        public void listenSimpleQueueMessage(String msg) throws InterruptedException { //发的是字符串,所以接的也是字符串;
            System.out.println("spring 消费者接收到消息:【" + msg + "】");
        }
    }
3.1.3.测试
启动consumer服务,然后在publisher服务中运行测试代码,发送MQ消息
3.2.WorkQueue 任务模型【官方第二个案例】
Work queues,也被称为(Task queues),任务模型。简单来说就是让多个消费者绑定到一个队列,共同消费队列中的消息 。
当消息处理比较耗时的时候,可能生产消息的速度会远远大于消息的消费速度。长此以往,消息就会堆积越来越多,无法及时处理。
此时就可以使用work 模型,多个消费者共同参与消息处理,速度就能大大提高了。
3.2.1.消息发送
这次我们循环发送,模拟大量消息堆积现象。
在publisher服务中的SpringAmqpTest类中添加一个测试方法:
    /**
         * workQueue
         * 向队列中不停发送消息,模拟消息堆积。
         */
    @Test
    public void testWorkQueue() throws InterruptedException {
        // 队列名称
        String queueName = "simple.queue";
        // 消息
        String message = "hello, message_";
        for (int i = 0; i < 50; i++) {
            // 发送消息
            rabbitTemplate.convertAndSend(queueName, message + i);
            Thread.sleep(20);//休眠
        }
    }
3.2.2.消息接收
要模拟多个消费者绑定同一个队列,我们在consumer服务的SpringRabbitListener中添加2个新的方法:
    @RabbitListener(queues = "simple.queue")
    public void listenWorkQueue1(String msg) throws InterruptedException {
        System.out.println("消费者1接收到消息:【" + msg + "】" + LocalTime.now());
        Thread.sleep(20);  //休眠
    }

    @RabbitListener(queues = "simple.queue")
    public void listenWorkQueue2(String msg) throws InterruptedException {
        System.err.println("消费者2........接收到消息:【" + msg + "】" + LocalTime.now());
        Thread.sleep(200);  //休眠
    }
注意到这个消费者sleep了多少多少毫秒,模拟任务耗时。
3.2.3.测试
启动ConsumerApplication后,在执行publisher服务中刚刚编写的发送测试方法testWorkQueue。
可以看到消费者1很快完成了自己的25条消息。消费者2却在缓慢的处理自己的25条消息。
也就是说消息是平均分配给每个消费者,并没有考虑到消费者的处理能力。这样显然是有问题的。
3.2.4.能者多劳(对消息平均分配的改进)
在spring中有一个简单的配置,可以解决这个问题。我们修改consumer服务的application.yml文件,添加配置:
    spring:
      rabbitmq:
        listener:
          simple:
            prefetch: 1 # 每次只能获取一条消息,处理完成才能获取下一个消息
3.2.5.总结
Work模型的使用:
- 多个消费者绑定到一个队列,同一条消息只会被一个消费者处理
- 通过设置
prefetch来控制消费者预取的消息数量
3.3.发布/订阅
发布订阅的模型如图:
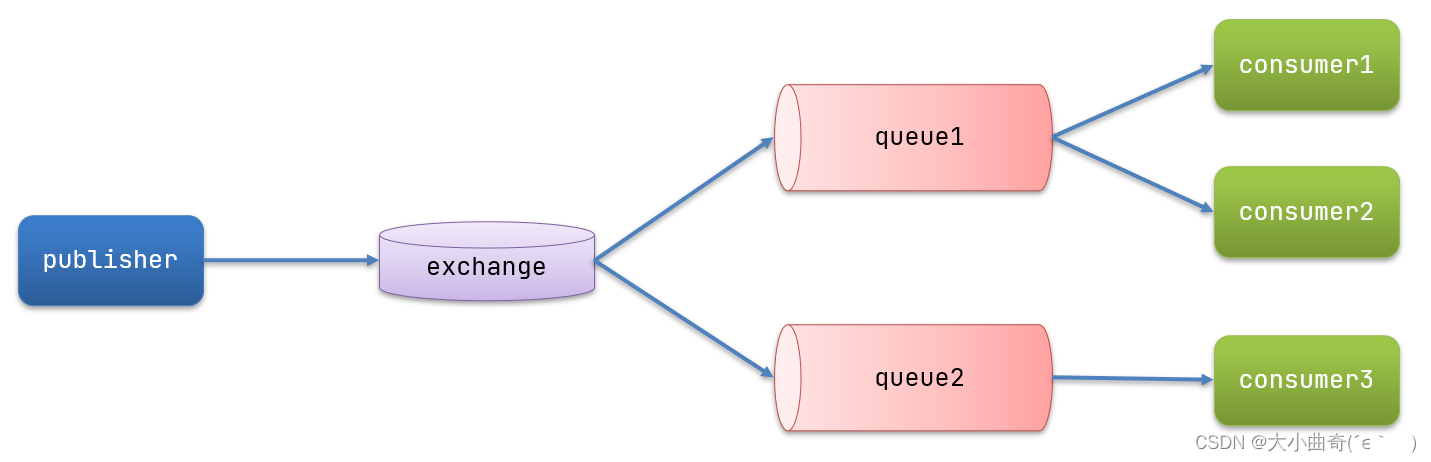
可以看到,在订阅模型中,多了一个exchange(交换机)角色,而且过程略有变化:
Publisher:生产者,也就是要发送消息的程序,但是不再发送到队列中,而是发给X(交换机)Exchange:交换机,图中的X。一方面,接收生产者发送的消息。另一方面,知道如何处理消息,例如递交给某个特别队列、递交给所有队列、或是将�消息丢弃。到底如何操作,取决于Exchange的类型。Exchange有以下3种类型:Fanout:广播,将消息交给所有绑定到交换机的队列Direct:定向,把消息交给符合指定routing key 的队列Topic:通配符,把消息交给符合routing pattern(路由模式) 的队列
Consumer:消费者,与以前一样,订阅队列,没有变化Queue:消息队列也与以前一样,接收消息、缓存消息。
Exchange(交换机)只负责转发消息,不具备存储消息的能力 ,因此如果没有任何队列与Exchange绑定,或者没有符合路由规则的队列,那么消息会丢失!
3.4.Fanout(广播)【官方第三个案例(有了交换机,交换机将消息发给所有队列)】
Fanout,英文翻译是扇出,我觉得在MQ中叫广播更合适。
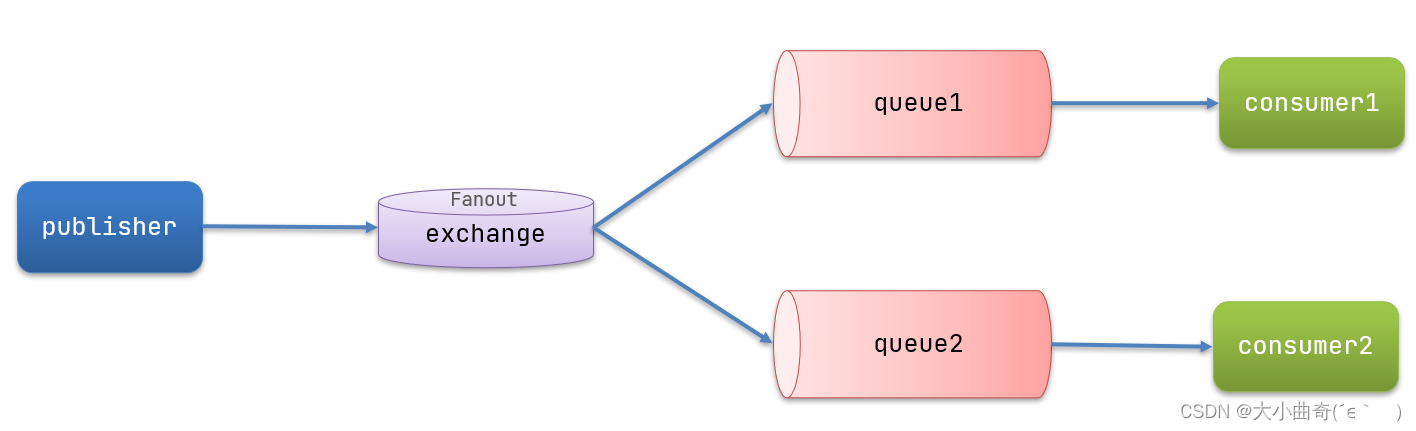
在广播模式下,消息发送流程是这样的:
- 1) 可以有多个队列
- 2) 每个队列都要绑定到Exchange(交换机)
- 3) 生产者发送的消息,只能发送到交换�机,交换机来决定要发给哪个队列,生产者无法决定
- 4) 交换机把消息发送给绑定过的所有队列
- 5) 订阅队列的消费者都能拿到消息
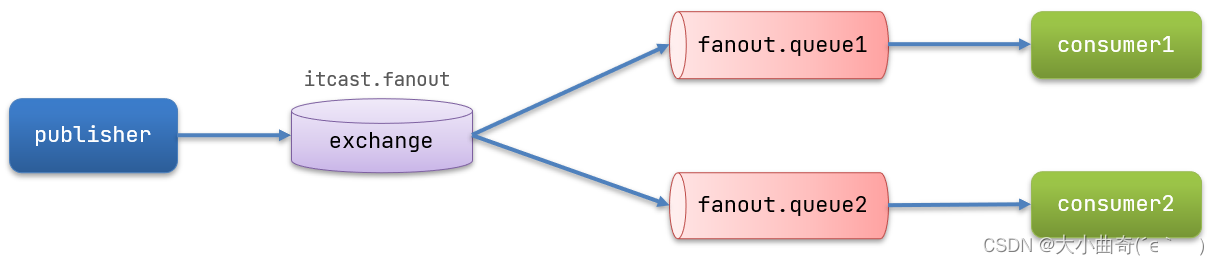
我们的计划是这样的:
- 创建一个交换机
itcast.fanout,类型是Fanout - 创建两个队列
fanout.queue1和fanout.queue2,绑定到交换机itcast.fanout
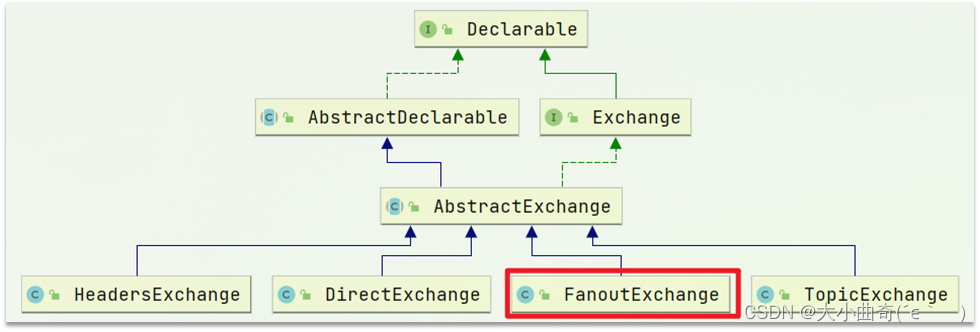
3.4.1.声明队列和交换机
Spring提供了一个接口Exchange,来表示所有不同类型的交换机:
在consumer中创建一个类,声明队列和交换机并实现两者绑定:
    package cn.itcast.mq.config;

    @Configuration
    public class FanoutConfig {
        /**
         * 声明交换机
         * @return Fanout类型交换机
         */
        @Bean
        public FanoutExchange fanoutExchange(){
            return new FanoutExchange("itcast.fanout");
        }

        /**
         * 第1个队列
         */
        @Bean
        public Queue fanoutQueue1(){
            return new Queue("fanout.queue1");
        }
        /**
         * 绑定队列1和交换机
         */
        @Bean
        public Binding bindingQueue1(Queue fanoutQueue1, FanoutExchange fanoutExchange){
            return BindingBuilder.bind(fanoutQueue1).to(fanoutExchange);
        }

        /**
         * 第2个队列
         */
        @Bean
        public Queue fanoutQueue2(){
            return new Queue("fanout.queue2");
        }
        /**
         * 绑定队列2和交换机
         */
        @Bean
        public Binding bindingQueue2(Queue fanoutQueue2, FanoutExchange fanoutExchange){
            return BindingBuilder.bind(fanoutQueue2).to(fanoutExchange);
        }
    }
3.4.2.消息发送
在publisher服务的SpringAmqpTest类中添加测试方法:
    @Test
    public void testFanoutExchange() {
        // 队列名称
        String exchangeName = "itcast.fanout";
        // 消息
        String message = "hello, everyone!";
        rabbitTemplate.convertAndSend(exchangeName, "", message);
    }
3.4.3.消息接收
在consumer服务的SpringRabbitListener中添加两个方法,作为消费者:
    @RabbitListener(queues = "fanout.queue1")
    public void listenFanoutQueue1(String msg) {
        System.out.println("消费者1接收到Fanout消息:【" + msg + "】");
    }

    @RabbitListener(queues = "fanout.queue2")
    public void listenFanoutQueue2(String msg) {
        System.out.println("消费者2接收到Fanout消息:【" + msg + "】");
    }
3.4.4.总结
交换机的作用是什么?
- 接收publisher发送的消息
- 将消息按照规则路由到与之绑定的队列
- 不能缓存消息,路由失败,消息丢失
- FanoutExchange会将消息路由到每个绑定的队列
声明队列、交换机、绑定关系的Bean是什么?
- Queue
- FanoutExchange
- Binding
3.5.Direct(定向) 【官方第四个案例】
路由模式
在Fanout模式中,一条消息,会被所有订阅的队列都消费。但是,在某些场景下,我们希望不同的消息被不同的队列消费。这时就要用到Direct类型的Exchange。
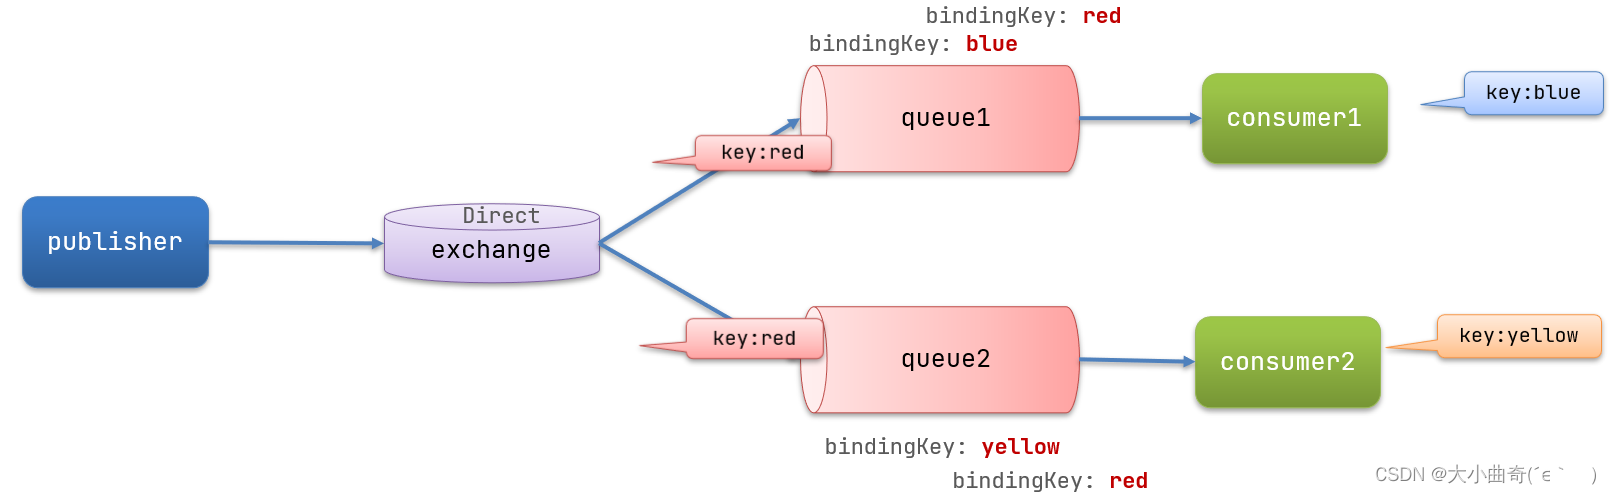
在Direct模型下:
- 队列与交换机的绑定,不能是任意绑定了,而是要指定一个
RoutingKey(路由key) - 消息的发送方在向 Exchange发送消息时,也必须指定消息的
RoutingKey。 - Exchange不再把消息交给每一个绑定的队列,而是根据消息的
Routing Key进行判断,只有队列的Routingkey与消息的Routing key完全一致,才会接收到消息
The case requirements are as follows :
- Utilization
@RabbitListenerstatementExchange,Queue,RoutingKey - In
consumerthe service, write two consumer methods to listendirect.queue1anddirect.queue2 publisherWrite a test method in to senditcast. directa message to
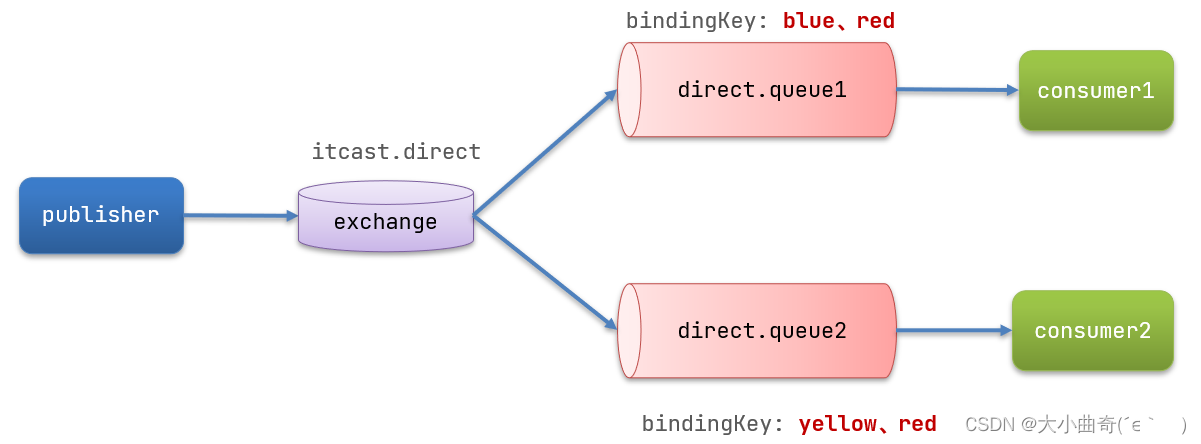
3.5.1. Based on annotationsdeclare queueandswitch
It is troublesome to declare queues and switches based @Beanon the method. Spring also provides annotation-based declaration. Add two consumers
in and declare the queue and switch based on annotations:consumer``SpringRabbitListener
    @RabbitListener(bindings = @QueueBinding(
        //队列
        value = @Queue(name = "direct.queue1"),
        //交换机名称及其类型
        exchange = @Exchange(name = "itcast.direct", type = ExchangeTypes.DIRECT),
        //key
        key = {"red", "blue"}
    ))
    public void listenDirectQueue1(String msg){  //监听
        System.out.println("消费者接收到direct.queue1的消息:【" + msg + "】");
    }

    @RabbitListener(bindings = @QueueBinding(
        value = @Queue(name = "direct.queue2"),
        exchange = @Exchange(name = "itcast.direct", type = ExchangeTypes.DIRECT),
        key = {"red", "yellow"}
    ))
    public void listenDirectQueue2(String msg){
        System.out.println("消费者接收到direct.queue2的消息:【" + msg + "】");
    }
3.5.2. Message sending
Add a test method to the service publisher's class:SpringAmqpTest
    @Test
    public void testSendDirectExchange() {
        // 交换机名称
        String exchangeName = "itcast.direct";
        // 消息
        String message = "红色警报!日本乱排核废水,导致海洋生物变异,惊现哥斯拉!";
        // 发送消息
        rabbitTemplate.convertAndSend(exchangeName, "red", message);
    }
3.5.3.Summarize
Describe the difference between Directa switch and Fanouta switch?
- Fanout switch routes messages to each queue bound to it
- The Direct switch determines which queue to route to based on the RoutingKey.
- Similar to Fanout functionality if multiple queues have the same RoutingKey
What are the common annotations for declaring queues and switches based on the @RabbitListener annotation?
- @Queue declares a queue
- @Exchange declares the exchange
3.6. Topic (wildcard) [Official fifth case】
3.6.1.Description
Topic``ExchangeCompared with other types Direct, messages can be RoutingKeyrouted to different queues. It’s just that Topicthe type Exchangeallows the queue Routing keyto use wildcards when binding!
RoutingkeyGenerally, it consists of one or more words, and multiple words are separated by ".", for example:item.insert
Wildcard rules:
#: Match one or more words
*: Match no more, no less, exactly 1 word
Example:
item.#:can match item.spu.insertor item.spu
item.*:can only matchitem.spu
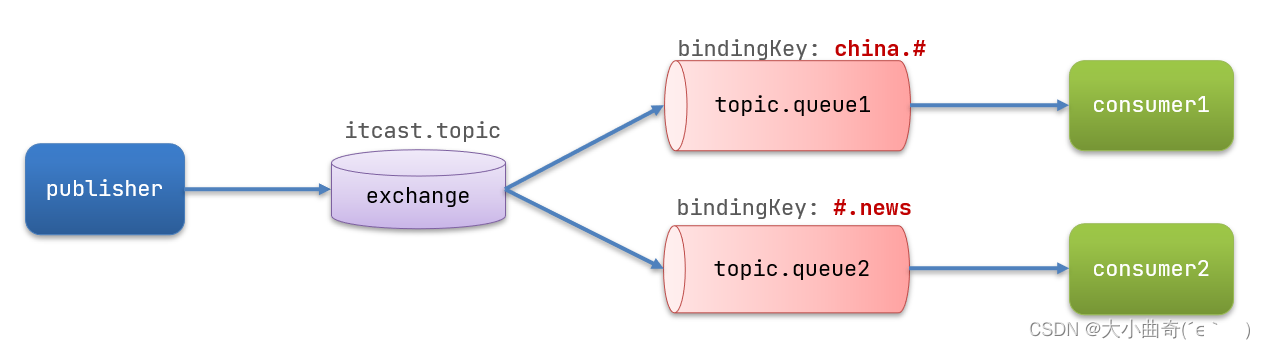
Illustration:

Explanation:
- Queue1: It is bound to
china.#, so anythingchina.starting withrouting keywill be matched. Including china.news and china.weather - Queue4: Binding is
#.news, so anything.newsending withrouting keywill be matched. Including china.news and japan.news
Case requirements:
The implementation ideas are as follows:
- And use
@RabbitListenerthe statementExchange,Queue,RoutingKey - In
consumerthe service, write two consumer methods to listentopic.queue1andtopic.queue2 publisherWrite a test method in to senditcast. topica message to
3.6.2. Message sending
Add a test method to the service publisher's class:SpringAmqpTest
    /**
         * topicExchange
         */
    @Test
    public void testSendTopicExchange() {
        // 交换机名称
        String exchangeName = "itcast.topic";
        // 消息
        String message = "喜报!孙悟空大战哥斯拉,胜!";
        // 发送消息
        rabbitTemplate.convertAndSend(exchangeName, "china.news", message);
    }
3.6.3. Message reception
Add method to service consumer:SpringRabbitListener
    @RabbitListener(bindings = @QueueBinding(
        //队列名称
        value = @Queue(name = "topic.queue1"),
        //交换机名称及类型
        exchange = @Exchange(name = "itcast.topic", type = ExchangeTypes.TOPIC),
        key = "china.#"
    ))
    public void listenTopicQueue1(String msg){
        System.out.println("消费者接收到topic.queue1的消息:【" + msg + "】");
    }

    @RabbitListener(bindings = @QueueBinding(
        value = @Queue(name = "topic.queue2"),
        exchange = @Exchange(name = "itcast.topic", type = ExchangeTypes.TOPIC),
        key = "#.news"
    ))
    public void listenTopicQueue2(String msg){
        System.out.println("消费者接收到topic.queue2的消息:【" + msg + "】");
    }
3.6.4.Summarize
Describe the difference between Direct switches and Topic switches?
- The message received by the Topic switch
RoutingKeymust be multiple words,**.**separated by bindingKeyWildcards can be specified when binding a topic switch to a queue.#: represents 0 or more words*: represents 1 word
3.7.Message converter【important】
As mentioned before, Spring will serialize the message you send into bytes and send them to MQ. When receiving the message, it will also deserialize the bytes into Java objects.

However, by default, the serialization method used by Spring is JDK serialization. As we all know, JDK serialization has the following problems:
- Data size is too large
- There is a security vulnerability
- Poor readability
Let's test it out.
3.7.1. Test the default converter
We modify the message sending code and send a Map object:
    @Test
    public void testSendMap() throws InterruptedException {
        // 准备消息
        Map<String,Object> msg = new HashMap<>();
        msg.put("name", "Jack");
        msg.put("age", 21);
        // 发送消息
        rabbitTemplate.convertAndSend("simple.queue","", msg);
    }
Stop consumerthe service
and check the console after sending the message:
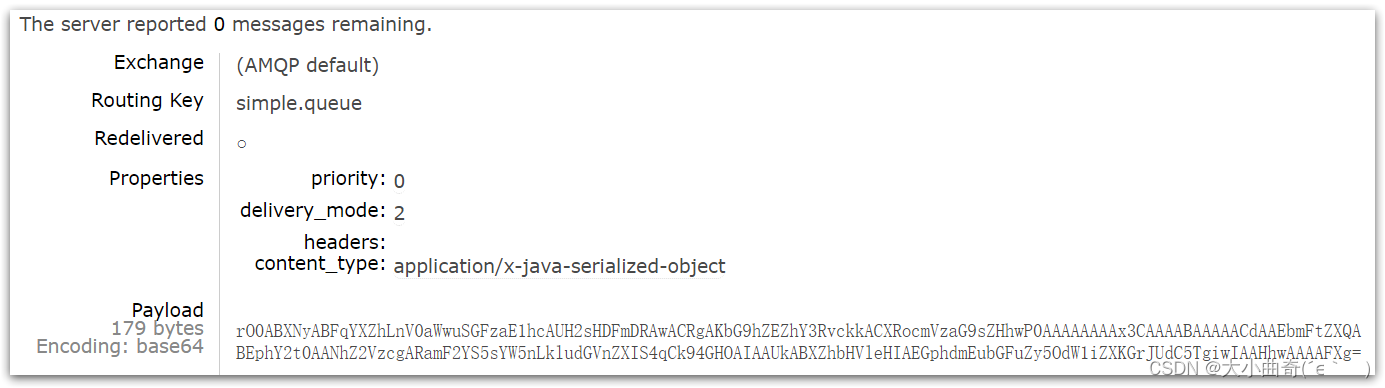
you can find that the message sent by name is short and concise, but when sent to the server, it is a very long string, which affects the transmission efficiency;
3.7.2. Configure JSON converter
Obviously, the JDK serialization method is not suitable. We hope that the message body will be smaller and more readable, so we can use JSON for serialization and deserialization.
Introduce dependencies in both services publisher(consumerJust import it into their common parent dependency):
    <dependency>
        <groupId>com.fasterxml.jackson.dataformat</groupId>
        <artifactId>jackson-dataformat-xml</artifactId>
        <version>2.9.10</version>
    </dependency>
Configure the message converter. Just
add one to the startup class Bean:
    @Bean
    public MessageConverter jsonMessageConverter(){
        return new Jackson2JsonMessageConverter();
    }