RabbitMQ working mode code examples and integrating RabbitMQ with SpringBoot
RabbitMQ working mode code examples and integrating RabbitMQ with SpringBoot
1. The working mode of RabbitMQ
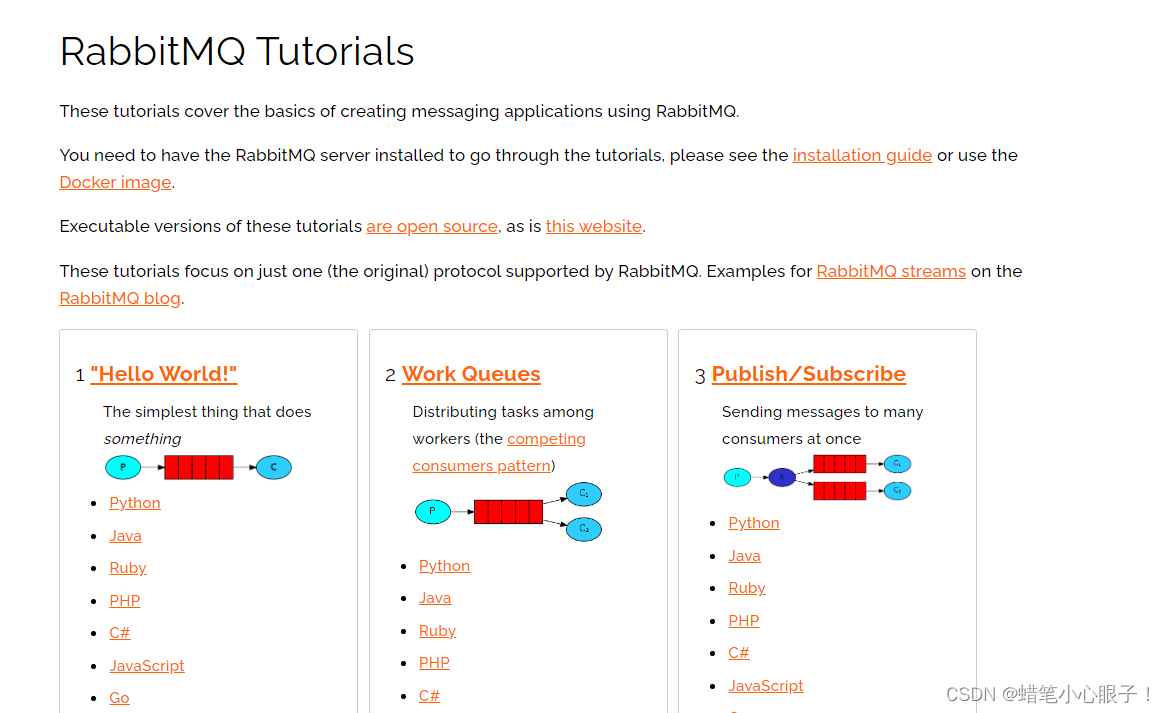
The working mode of RabbitMQ refers to the different messaging methods in RabbitMQ, including simple mode, work queue mode, publish and subscribe mode, routing mode and topic mode. These working modes are suitable for different application scenarios. For detailed documentation, please refer to RabbitMQ’s official website: RabbitMQ: easy to use, flexible messaging and streaming — RabbitMQ
Depend on information
2. <project xmlns="http://maven.apache.org/POM/4.0.0"
3. xmlns:xsi="http://www.w3.org/2001/XMLSchema-instance"
4. xsi:schemaLocation="http://maven.apache.org/POM/4.0.0 http://maven.apache.org/xsd/maven-4.0.0.xsd">
5. <modelVersion>4.0.0</modelVersion>
6.
7. <groupId>com.itheima</groupId>
8. [rabbitmq](/search?q=rabbitmq)-consumer
9. <version>1.0-SNAPSHOT</version>
10.
11.
12. <dependencies>
13. <dependency>
14. <groupId>com.rabbitmq</groupId>
15. <artifactId>amqp-client</artifactId>
16. <version>5.6.0</version>
17. </dependency>
18. </dependencies>
19.
20.
21. <build>
22. <plugins>
23. <plugin>
24. <groupId>org.apache.maven.plugins</groupId>
25. <artifactId>maven-compiler-plugin</artifactId>
26. <version>3.8.0</version>
27. <configuration>
28. <source>1.8</source>
29. <target>1.8</target>
30. </configuration>
31. </plugin>
32. </plugins>
33. </build>
34. </project>

1. Simple mode
Simple simple mode: one producer, one queue, one consumer, this kind of switch does not participate
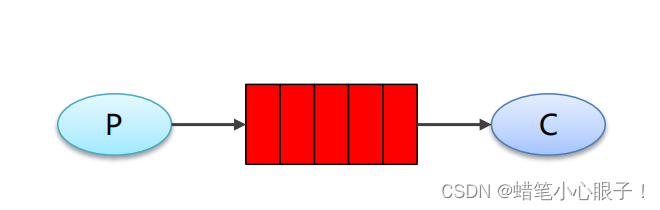
Among them, P is the producer, C is the consumer, and the red one is the message queue or MQ. The following modes are the same.
Producer code:
2. public static void main(String[] args) throws IOException, TimeoutException {
3. //1.创建连接工厂
4. ConnectionFactory factory = new ConnectionFactory();
5. //2.设置参数
6. factory.setHost("123.207.72.43");//ip 默认值是localhost
7. factory.setPort(5672);
8. factory.setVirtualHost("/");
9. factory.setUsername("admin");//用户名 默认是guest
10. factory.setPassword("123");
11. //3.创建连接
12. Connection connection = factory.newConnection();
13. //4.创建 channel
14. Channel channel = connection.createChannel();
15. //5.创建队列 Queue
16. //如果没有一个名字叫hello_world的队列就会自动创建一个
17. /**
18. * queueDeclare(String queue, boolean durable, boolean exclusive, boolean autoDelete, Map<String, Object> arguments)
19. * queue:队列名称
20. * durable:是否持久化,当mq重启之后还在
21. * exclusive:是否独占,只能有一个消费者监听这个队列或者当connection关闭时,是否删除队列
22. * autoDelete:是否自动删除,当没有consumer时,自动删除掉
23. * arguments:参数
24. */
25. channel.queueDeclare("hello_world",true,false,false,null);
26.
27. String body = "hello rabbitmq";
28. //6.发送消息
29. /**
30. * basicPublish(String exchange, String routingKey, AMQP.BasicProperties props, byte[] body)
31. * exchange:交换机名称,简单模式下交换机会使用默认的“”
32. * routingKey:路由名称,默认交换机使用队列名称
33. * props:配置信息
34. * body:发送消息数据
35. */
36. channel.basicPublish("","hello_world",null,body.getBytes());
37. //7.释放资源
38. channel.close();
39. connection.close();
40. }
41. }

Consumer code:
2. public static void main(String[] args) throws IOException, TimeoutException {
3. //1.创建连接工厂
4. ConnectionFactory factory = new ConnectionFactory();
5. //2.设置参数
6. factory.setHost("123.207.72.43");//ip 默认值是localhost
7. factory.setPort(5672);
8. factory.setVirtualHost("/");
9. factory.setUsername("admin");//用户名 默认是guest
10. factory.setPassword("123");
11. //3.创建连接
12. Connection connection = factory.newConnection();
13. //4.创建 channel
14. Channel channel = connection.createChannel();
15. //5.创建队列 Queue
16. //如果没有一个名字叫hello_world的队列就会自动创建一个
17. channel.queueDeclare("hello",true,false,false,null);
18. //6.接收消息
19. /**
20. * basicConsume(String queue, boolean autoAck, Consumer callback)
21. * queue:队列名称
22. * autoAck:是否自动确认
23. * callback:回调对象
24. */
25. Consumer consumer = new DefaultConsumer(channel) {
26. /**
27. * 回调方法,当收到消息后会执行这个方法
28. * consumerTag:标识
29. * envelope:获取一些信息,交换机,路由key...
30. * properties:配置信息
31. * body:数据
32. * @param consumerTag
33. * @throws IOException
34. */
35. @Override
36. public void handleDelivery(String consumerTag, Envelope envelope, AMQP.BasicProperties properties, byte[] body) throws IOException {
37. System.out.println("consumerTag: " + consumerTag);
38. System.out.println("Exchange: " + envelope.getExchange());
39. System.out.println("RoutingKey: " + envelope.getRoutingKey());
40. System.out.println("properties: " + properties);
41. System.out.println("body: " + new String(body));
42. }
43. };
44. channel.basicConsume("hello_world",true,consumer);
45.
46. //消费者不需要关闭资源,需要一直监听
47. }
48. }

2. Work/queue mode
Queue queue mode: producers publish messages to a queue, and consumers obtain messages from the queue

Producer code:
2. public static void main(String[] args) throws IOException, TimeoutException {
3. //1.创建连接工厂
4. ConnectionFactory factory = new ConnectionFactory();
5. //2.设置参数
6. factory.setHost("123.207.72.43");//ip 默认值是localhost
7. factory.setPort(5672);
8. factory.setVirtualHost("/");
9. factory.setUsername("admin");//用户名 默认是guest
10. factory.setPassword("123");
11. //3.创建连接
12. Connection connection = factory.newConnection();
13. //4.创建 channel
14. Channel channel = connection.createChannel();
15. //5.创建队列 Queue
16. //如果没有一个名字叫hello_world的队列就会自动创建一个
17. channel.queueDeclare("work_queues",true,false,false,null);
18.
19. for (int i = 0; i < 10; i++) {
20. String body = i + "hello rabbitmq";
21. //6.发送消息
22. channel.basicPublish("","work_queues",null,body.getBytes());
23. }
24. //7.释放资源
25. channel.close();
26. connection.close();
27. }
28. }

Consumer code:
2. public class Consumer_WorkQueues1 {
3. public static void main(String[] args) throws IOException, TimeoutException {
4. //1.创建连接工厂
5. ConnectionFactory factory = new ConnectionFactory();
6. //2.设置参数
7. factory.setHost("123.207.72.43");//ip 默认值是localhost
8. factory.setPort(5672);
9. factory.setVirtualHost("/");
10. factory.setUsername("admin");//用户名 默认是guest
11. factory.setPassword("123");
12. //3.创建连接
13. Connection connection = factory.newConnection();
14. //4.创建 channel
15. Channel channel = connection.createChannel();
16. //5.创建队列 Queue
17. //如果没有一个名字叫hello_world的队列就会自动创建一个
18. channel.queueDeclare("work_queues",true,false,false,null);
19. //6.接收消息
20. Consumer consumer = new DefaultConsumer(channel) {
21. /**
22. * 回调方法,当收到消息后会执行这个方法
23. * @param consumerTag
24. * @throws IOException
25. */
26. @Override
27. public void handleDelivery(String consumerTag, Envelope envelope, AMQP.BasicProperties properties, byte[] body) throws IOException {
28. System.out.println("consumerTag: " + consumerTag);
29. System.out.println("Exchange: " + envelope.getExchange());
30. System.out.println("RoutingKey: " + envelope.getRoutingKey());
31. System.out.println("properties: " + properties);
32. System.out.println("body: " + new String(body));
33. }
34. };
35. channel.basicConsume("work_queues",true,consumer);
36.
37. }
38. }
39.
40.
41. //消费者2
42. public class Consumer_WorkQueues2 {
43. public static void main(String[] args) throws IOException, TimeoutException {
44. //1.创建连接工厂
45. ConnectionFactory factory = new ConnectionFactory();
46. //2.设置参数
47. factory.setHost("123.207.72.43");//ip 默认值是localhost
48. factory.setPort(5672);
49. factory.setVirtualHost("/");
50. factory.setUsername("admin");//用户名 默认是guest
51. factory.setPassword("123");
52. //3.创建连接
53. Connection connection = factory.newConnection();
54. //4.创建 channel
55. Channel channel = connection.createChannel();
56. //5.创建队列 Queue
57. //如果没有一个名字叫hello_world的队列就会自动创建一个
58. channel.queueDeclare("work_queues",true,false,false,null);
59. //6.接收消息
60. Consumer consumer = new DefaultConsumer(channel) {
61. /**
62. * 回调方法,当收到消息后会执行这个方法
63. * @param consumerTag
64. * @throws IOException
65. */
66. @Override
67. public void handleDelivery(String consumerTag, Envelope envelope, AMQP.BasicProperties properties, byte[] body) throws IOException {
68. System.out.println("consumerTag: " + consumerTag);
69. System.out.println("Exchange: " + envelope.getExchange());
70. System.out.println("RoutingKey: " + envelope.getRoutingKey());
71. System.out.println("properties: " + properties);
72. System.out.println("body: " + new String(body));
73. }
74. };
75. channel.basicConsume("work_queues",true,consumer);
76.
77. }
78. }

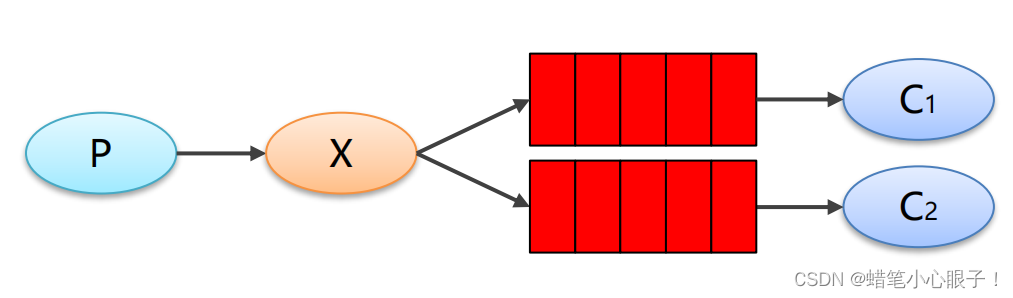
3. Direct connection mode
Direct mode: the producer sends the message directly to the queue, and the consumer obtains the message from the queue
Producer code:
2. public static void main(String[] args) throws IOException, TimeoutException {
3. //1.创建连接工厂
4. ConnectionFactory factory = new ConnectionFactory();
5. //2.设置参数
6. factory.setHost("123.207.72.43");//ip 默认值是localhost
7. factory.setPort(5672);
8. factory.setVirtualHost("/");
9. factory.setUsername("admin");//用户名 默认是guest
10. factory.setPassword("123");
11. //3.创建连接
12. Connection connection = factory.newConnection();
13. //4.创建 channel
14. Channel channel = connection.createChannel();
15.
16. //5.创建交换机
17. /**
18. * exchangeDeclare(String exchange, BuiltinExchangeType type, boolean durable, boolean autoDelete, boolean internal, Map<String, Object> arguments)
19. * exchange:交换机名称
20. * type:交换机类型 是一个枚举类型
21. * durable:是否持久化
22. * autoDelete:是否自动删除
23. * internal:内部使用,一般设为false
24. * arguments:参数,设为null
25. */
26.
27. String exchangeName = "test_fanout";
28. channel.exchangeDeclare(exchangeName, BuiltinExchangeType.FANOUT,true,false,false,null);
29. //6.创建队列
30. String queueName1 = "queue1";
31. String queueName2 = "queue2";
32. channel.queueDeclare(queueName1,true,false,false,null);
33. channel.queueDeclare(queueName2,true,false,false,null);
34. //7.绑定队列和交换机
35. /**
36. * queueBind(String queue, String exchange, String routingKey)
37. * queue:队列名称
38. * exchange:交换机名称
39. * routingKey:路由键,绑定规则
40. * 如果交换机类型为FANOUT类型,则routingKey设为“” 说明交换机会绑定每一个queue
41. */
42. channel.queueBind(queueName1,exchangeName,"");
43. channel.queueBind(queueName2,exchangeName,"");
44. //8.发送消息
45. String body = "日志信息:数据库被删除";
46. channel.basicPublish(exchangeName,"",null,body.getBytes());
47. //9.释放资源
48. channel.close();
49. connection.close();
50. }
51. }

Consumer code:
2. public class Consumer_PubSub1 {
3. public static void main(String[] args) throws IOException, TimeoutException {
4. //1.创建连接工厂
5. ConnectionFactory factory = new ConnectionFactory();
6. //2.设置参数
7. factory.setHost("123.207.72.43");//ip 默认值是localhost
8. factory.setPort(5672);
9. factory.setVirtualHost("/");
10. factory.setUsername("admin");//用户名 默认是guest
11. factory.setPassword("123");
12. //3.创建连接
13. Connection connection = factory.newConnection();
14. //4.创建 channel
15. Channel channel = connection.createChannel();
16.
17. String queueName1 = "queue1";
18. String queueName2 = "queue2";
19.
20. //6.接收消息
21. Consumer consumer = new DefaultConsumer(channel) {
22. /**
23. * 回调方法,当收到消息后会执行这个方法
24. * @param consumerTag
25. * @throws IOException
26. */
27. @Override
28. public void handleDelivery(String consumerTag, Envelope envelope, AMQP.BasicProperties properties, byte[] body) throws IOException {
29. // System.out.println("consumerTag: " + consumerTag);
30. // System.out.println("Exchange: " + envelope.getExchange());
31. // System.out.println("RoutingKey: " + envelope.getRoutingKey());
32. // System.out.println("properties: " + properties);
33. System.out.println("body: " + new String(body));
34. System.out.println("将日志信息打印到控制台..");
35. }
36. };
37. channel.basicConsume(queueName1,true,consumer);
38. }
39. }
40.
41. //消费者2
42. public class Consumer_PubSub2 {
43. public static void main(String[] args) throws IOException, TimeoutException {
44. //1.创建连接工厂
45. ConnectionFactory factory = new ConnectionFactory();
46. //2.设置参数
47. factory.setHost("123.207.72.43");//ip 默认值是localhost
48. factory.setPort(5672);
49. factory.setVirtualHost("/");
50. factory.setUsername("admin");//用户名 默认是guest
51. factory.setPassword("123");
52. //3.创建连接
53. Connection connection = factory.newConnection();
54. //4.创建 channel
55. Channel channel = connection.createChannel();
56.
57. String queueName1 = "queue1";
58. String queueName2 = "queue2";
59.
60. //6.接收消息
61. Consumer consumer = new DefaultConsumer(channel) {
62. /**
63. * 回调方法,当收到消息后会执行这个方法
64. * @param consumerTag
65. * @throws IOException
66. */
67. @Override
68. public void handleDelivery(String consumerTag, Envelope envelope, AMQP.BasicProperties properties, byte[] body) throws IOException {
69. // System.out.println("consumerTag: " + consumerTag);
70. // System.out.println("Exchange: " + envelope.getExchange());
71. // System.out.println("RoutingKey: " + envelope.getRoutingKey());
72. // System.out.println("properties: " + properties);
73. System.out.println("body: " + new String(body));
74. System.out.println("将日志信息保存数据库..");
75. }
76. };
77. channel.basicConsume(queueName2,true,consumer);
78. }
79. }

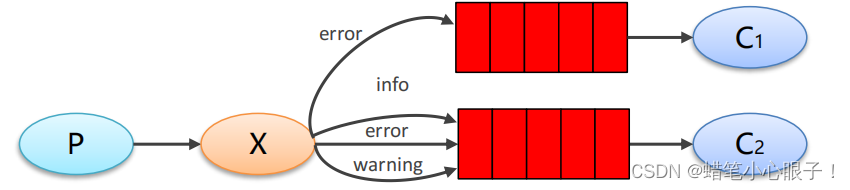
4. Routing mode
Routing routing mode: The producer publishes the message to an exchange, and the exchange routes the message to the target queue according to the rules.
Producer code:
2. public static void main(String[] args) throws IOException, TimeoutException {
3. //1.创建连接工厂
4. ConnectionFactory factory = new ConnectionFactory();
5. //2.设置参数
6. factory.setHost("123.207.72.43");//ip 默认值是localhost
7. factory.setPort(5672);
8. factory.setVirtualHost("/");
9. factory.setUsername("admin");//用户名 默认是guest
10. factory.setPassword("123");
11. //3.创建连接
12. Connection connection = factory.newConnection();
13. //4.创建 channel
14. Channel channel = connection.createChannel();
15.
16. //5.创建交换机
17. /**
18. * exchangeDeclare(String exchange, BuiltinExchangeType type, boolean durable, boolean autoDelete, boolean internal, Map<String, Object> arguments)
19. * exchange:交换机名称
20. * type:交换机类型 是一个枚举类型
21. * durable:是否持久化
22. * autoDelete:是否自动删除
23. * internal:内部使用,一般设为false
24. * arguments:参数,设为null
25. */
26.
27. String exchangeName = "test_direct";
28. channel.exchangeDeclare(exchangeName, BuiltinExchangeType.DIRECT,true,false,false,null);
29. //6.创建队列
30. String queueName1 = "queue1_direct";
31. String queueName2 = "queue2_direct";
32. channel.queueDeclare(queueName1,true,false,false,null);
33. channel.queueDeclare(queueName2,true,false,false,null);
34. //7.绑定队列和交换机
35. /**
36. * queueBind(String queue, String exchange, String routingKey)
37. * queue:队列名称
38. * exchange:交换机名称
39. * routingKey:路由键,绑定规则
40. * 如果交换机类型为FANOUT类型,则routingKey设为“” 说明交换机会绑定每一个queue
41. */
42. //队列1的绑定 error
43. channel.queueBind(queueName1,exchangeName,"error");
44. //队列2的绑定 error info
45. channel.queueBind(queueName2,exchangeName,"info");
46. channel.queueBind(queueName2,exchangeName,"error");
47. //8.发送消息
48. String body = "日志信息:数据库被删除";
49. channel.basicPublish(exchangeName,"error",null,body.getBytes());
50. //9.释放资源
51. channel.close();
52. connection.close();
53. }
54. }

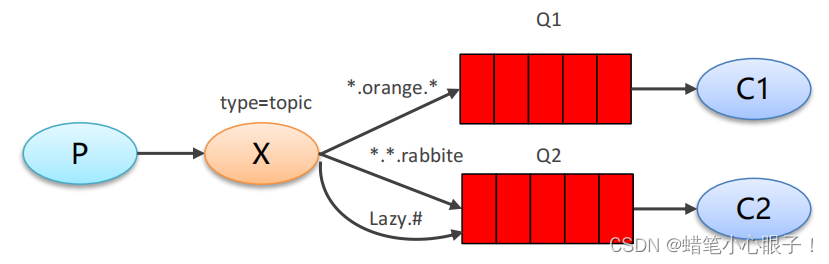
5.Wildcard mode
Topic wildcard mode: producers publish messages to a topic, and consumers subscribe to the topic and obtain messages
Producer code:
2. public static void main(String[] args) throws IOException, TimeoutException {
3. //1.创建连接工厂
4. ConnectionFactory factory = new ConnectionFactory();
5. //2.设置参数
6. factory.setHost("123.207.72.43");//ip 默认值是localhost
7. factory.setPort(5672);
8. factory.setVirtualHost("/");
9. factory.setUsername("admin");//用户名 默认是guest
10. factory.setPassword("123");
11. //3.创�建连接
12. Connection connection = factory.newConnection();
13. //4.创建 channel
14. Channel channel = connection.createChannel();
15.
16. //5.创建交换机
17. /**
18. * exchangeDeclare(String exchange, BuiltinExchangeType type, boolean durable, boolean autoDelete, boolean internal, Map<String, Object> arguments)
19. * exchange:交换机名称
20. * type:交换机类型 是一个枚举类型
21. * durable:是否持久化
22. * autoDelete:是否自动删除
23. * internal:内部使用,一般设为false
24. * arguments:参数,设为null
25. */
26.
27. String exchangeName = "test_topic";
28. channel.exchangeDeclare(exchangeName, BuiltinExchangeType.TOPIC,true,false,false,null);
29. //6.创建队列
30. String queueName1 = "queue1_topic";
31. String queueName2 = "queue2_topic";
32. channel.queueDeclare(queueName1,true,false,false,null);
33. channel.queueDeclare(queueName2,true,false,false,null);
34. //7.绑定队列和交换机
35. //需求:所有error级别的日志打印控制台和存入数据库,所有order系统的日志存入数据库
36. /**
37. * queueBind(String queue, String exchange, String routingKey)
38. * queue:队列名称
39. * exchange:交换机名称
40. * routingKey:路由键,绑定规则
41. * 如果交换机类型为FANOUT类型,则routingKey设为“” 说明交换机会绑定每一个queue
42. */
43. //队列1的绑定
44. channel.queueBind(queueName1,exchangeName,"#.error");
45. channel.queueBind(queueName1,exchangeName,"order.*");
46. channel.queueBind(queueName2,exchangeName,"*.*");
47. //8.发送消息
48. String body = "日志信息:数据库被删除";
49. channel.basicPublish(exchangeName,"order.info",null,body.getBytes());
50. //9.释放资源
51. channel.close();
52. connection.close();
53. }
54. }

Consumer code:
2. public class Consumer_Topic1 {
3. public static void main(String[] args) throws IOException, TimeoutException {
4. //1.创建连接工厂
5. ConnectionFactory factory = new ConnectionFactory();
6. //2.设置参数
7. factory.setHost("123.207.72.43");//ip 默认值是localhost
8. factory.setPort(5672);
9. factory.setVirtualHost("/");
10. factory.setUsername("admin");//用户名 默认是guest
11. factory.setPassword("123");
12. //3.创建连接
13. Connection connection = factory.newConnection();
14. //4.创建 channel
15. Channel channel = connection.createChannel();
16.
17. String queueName1 = "queue1_topic";
18. String queueName2 = "queue2_topic";
19.
20. //6.接收消息
21. Consumer consumer = new DefaultConsumer(channel) {
22. /**
23. * 回调方法,当收到消息后会执行这个方法
24. * @param consumerTag
25. * @throws IOException
26. */
27. @Override
28. public void handleDelivery(String consumerTag, Envelope envelope, AMQP.BasicProperties properties, byte[] body) throws IOException {
29. // System.out.println("consumerTag: " + consumerTag);
30. // System.out.println("Exchange: " + envelope.getExchange());
31. // System.out.println("RoutingKey: " + envelope.getRoutingKey());
32. // System.out.println("properties: " + properties);
33. System.out.println("body: " + new String(body));
34. System.out.println("将日志信息打印到控制台..");
35. }
36. };
37. channel.basicConsume(queueName1,true,consumer);
38. }
39. }
40.
41. //消费者2
42. public class Consumer_Topic2 {
43. public static void main(String[] args) throws IOException, TimeoutException {
44. //1.创建连接工厂
45. ConnectionFactory factory = new ConnectionFactory();
46. //2.设置参数
47. factory.setHost("123.207.72.43");//ip 默认值是localhost
48. factory.setPort(5672);
49. factory.setVirtualHost("/");
50. factory.setUsername("admin");//用户名 默认是guest
51. factory.setPassword("123");
52. //3.创建连接
53. Connection connection = factory.newConnection();
54. //4.创建 channel
55. Channel channel = connection.createChannel();
56.
57. String queueName1 = "queue1_topic";
58. String queueName2 = "queue2_topic";
59.
60. //6.接收消息
61. Consumer consumer = new DefaultConsumer(channel) {
62. /**
63. * 回调方法,当收到消息后会执行这个方法
64. * @param consumerTag
65. * @throws IOException
66. */
67. @Override
68. public void handleDelivery(String consumerTag, Envelope envelope, AMQP.BasicProperties properties, byte[] body) throws IOException {
69. // System.out.println("consumerTag: " + consumerTag);
70. // System.out.println("Exchange: " + envelope.getExchange());
71. // System.out.println("RoutingKey: " + envelope.getRoutingKey());
72. // System.out.println("properties: " + properties);
73. System.out.println("body: " + new String(body));
74. System.out.println("将日志信息存入数据库..");
75. }
76. };
77. channel.basicConsume(queueName2,true,consumer);
78. }
79. }

2. SpringBoot integrates RabbitMQ
Producer-side integration
step:
- Create a producer project ;
- Add dependencies (you can also add dependencies when creating Spring Boot);
- Add configuration information;
- Write code to send messages.
Basic information for configuring rabbitMQ:
      2. spring:

      3.   rabbitmq:

      4.     host: 123.207.72.43

      5.     port: 5672

      6.     username: admin

      7.     password: 123

      8.     virtual-host: /
Configuration information (create a RabbitMQConfig class):
2. * 该类用来创建交换机和队列的 同时将交换机和队列进行绑定
3. */
4.
5. @Configuration
6. public class RabbitMQConfig {
7.
8. //交换机名称
9. public static final String EXCHANGE_NAME = "topic_exchange";
10. //队列名称
11. public static final String QUEUE_NAME = "topic_queue";
12.
13. //创建交换机
14. @Bean("bootExchange")
15. public Exchange bootExchange() {
16. return ExchangeBuilder.topicExchange(EXCHANGE_NAME).durable(true).build();
17. }
18.
19. //创建队列
20. @Bean("bootQueue")
21. public Queue bootQueue() {
22. return QueueBuilder.durable(QUEUE_NAME).build();
23. }
24.
25. //将交换机和队列进行绑定
26.
27. /**
28. * 1.知道哪个队列
29. * 2.知道哪个交换机
30. * 3.routing key
31. * @param queue
32. * @param exchange
33. * @return
34. */
35. @Bean
36. public Binding bindExchangeQueue(@Qualifier("bootQueue") Queue queue,@Qualifier("bootExchange") Exchange exchange) {
37. return BindingBuilder.bind(queue).to(exchange).with("boot.#").noargs();
38. }
39. }

Write test code to send messages:
      2. @RunWith(SpringRunner.class)

      3. public class ProducerTest {

      4.

      5.     @Resource

      6.     private RabbitTemplate rabbitTemplate;

      7.

      8.     @Test

      9.     public void send() {

      10.         rabbitTemplate.convertAndSend(RabbitMQConfig.EXCHANGE_NAME,"boot.haha","hello rabbitmq");

      11.         System.out.println("消息发送成功!");

      12.     }

      13. }
Consumer integration
step:
- Create a producer project;
- Add dependencies (you can also add dependencies when creating Spring Boot);
- configuration integration;
- Write a message listener.
Basic information for configuring rabbitMQ:
      2. spring:

      3.   rabbitmq:

      4.     host: 123.207.72.43

      5.     port: 5672

      6.     username: admin

      7.     password: 123

      8.     virtual-host: /
Write a message listener:
      2. public class RabbitMQListener {

      3.     @RabbitListener(queues = "topic_queue")

      4.     //这里的message对象就是接收到的消息

      5.     public void listenQueue(Message message) {

      6.         System.out.println("message: " + message);

      7.     }

      8. }