RabbitMQ related deployment
RabbitMQ related deployment
1. Ordinary cluster preparation environment
Note that the three servers here are all connected to the Internet, and the RabbitMQ cluster nodes must be in the same network segment. If it is across a wide area network, the effect will be worse.
10.36.192.150 rabbitmq -1
10.36.192.151 rabbitmq-2
10.36.192.152 rabbitmq-3
Turn off the firewall andlinux on all three servers
2. [root@rabbitmq-1 ~]#setenforce 0 && sed -ri 's/SELINUX=enforcing/SELINUX=disabled/g' /etc/sysconfig/selinux
Three node configuration and installation of rabbitmq software
2. [root@rabbitmq-1 ~]# yum install -y epel-release gcc-c++ unixODBC unixODBC-devel openssl-devel ncurses-devel
3.
4. # Download and yum install erlang
5. [root@rabbitmq-1 ~]# wget https://packagecloud.io/rabbitmq/erlang/packages/el/7/erlang-21.3.8.21-1.el7.x86_64.rpm?distro_version_id =140
6. [root@rabbitmq-1 ~]# yum install erlang-21.3.8.21-1.el7.x86_64
7.
8. # download and yum install rabbitmq
9. [root@rabbitmq-1 ~]# wget https://github.com/rabbitmq/rabbitmq-server/releases/tag/v3.7.10
10. [root@rabbitmq-1 ~]# yum install rabbitmq-server-3.7.10-1.el7.noarch.rpm
11. # install rabbitmq-server-3.7.10-1.noarch.rpm
12. # Check for rabbitmq and erlang compatibility.
13. https://www.rabbitmq.com/which-erlang.html
14.
15. # erlang version selection
16. https://packagecloud.io/rabbitmq/erlang
17.
18. # rabbitmq version selection
19. https://www.rabbitmq.com/news.html

Start the RabbitMQ service
method one:
      2. [root@rabbitmq-1 ~]# systemctl start rabbitmq-server

      3. [root@rabbitmq-1 ~]# systemctl enable rabbitmq-server
Method two:
[root@rabbitmq-1 ~]# /sbin/service rabbitmq-server start
Open the web access interface of rabbitmq
[root@rabbitmq-1 ~]# rabbitmq-plugins enable rabbitmq_management
Create a user (note: you can operate the experiment on one machine)
      2. [root@rabbitmq-1 ~]# rabbitmqctl add_user suqin 123456

      3.

      4. #Set the user role

      5. [root@rabbitmq-1 ~]# rabbitmqctl set_user_tags suqin administrator

      6.

      7. # View users

      8. [root@rabbitmq-1 ~]# rabbitmqctl list_users
Setting permissions
When setting permissions here, please note that there needs to be a space between '.'. The three '.' represent conf permissions, read permissions and write permissions respectively. For example: when these three permissions are not set for newrain, there is no permission to query the queue. It can’t be seen in the UI interface either.
[root@rabbitmq-1 ~]# rabbitmqctl set_permissions -p "/" suqin ".*" ".*" ".*"
Enable user remote login
      2. [root@rabbitmq-1 rabbitmq]# ls

      3. enabled_plugins rabbitmq.config

      4. [root@rabbitmq-1 rabbitmq]# vim /etc/rabbitmq/rabbitmq.config +61

      5. {loopback_users, []} # Turn on the comments and delete the , after the .

      6. [root@rabbitmq-1 ~]# systemctl restart rabbitmq-server #restart the service
View port
      2. State       Recv-Q Send-Q Local Address:Port                Peer Address:Port

      3. LISTEN      0      128                *:4369                           *:*                   users:(("epmd",pid=8723,fd=3))

      4. LISTEN      0      128                *:15672                          *:*                   users:(("beam.smp",pid=8525,fd=74))

      5. LISTEN      0      128                *:25672                          *:*                   users:(("beam.smp",pid=8525,fd=62))

      6. LISTEN      0      128             [::]:4369                        [::]:*                   users:(("epmd",pid=8723,fd=4))

      7. LISTEN      0      128             [::]:5672                        [::]:*                   users:(("beam.smp",pid=8525,fd=73))
4369 -- Erlang discovery port
5672 -- Program connection port
15672 -- Management interface ui port
25672 -- Internal communication port between servers
access:
10.36.192.150:15672
rabbitmq default administrator user: guest password: guest
The newly added user is: newrain password: 123456
2.Deploy cluster (three machines)
Repeat the above steps first, then operate the remaining two machines as above and the test is completed!
Then perform the following operations on the three servers:
1. Create and configure the data storage directory and log storage directory
      2. [root@rabbitmq-1 ~]# mkdir -p /data/rabbitmq/data

      3. [root@rabbitmq-1 ~]# mkdir -p /data/rabbitmq/logs

      4.

      5. # Either one of the following will work:

      6. [root@rabbitmq-1 ~]# chmod 777 -R /data/rabbitmq

      7. [root@rabbitmq-1 ~]# chown rabbitmq.rabbitmq /data/ -R

      8.

      9. # Create the configuration file.

      10. [root@rabbitmq-1 ~]# vim /etc/rabbitmq/rabbitmq-env.conf

      11. # Add the following information:

      12. RABBITMQ_MNESIA_BASE=/data/rabbitmq/data

      13. RABBITMQ_LOG_BASE=/data/rabbitmq/logs

      14.

      15. Restart the service.

      16. [root@rabbitmq-1 ~]# systemctl restart rabbitmq-server
![]()
2.Copy erlang.cookie
erlang.cookie generally has these two addresses:
the first is home/.erlang.cookie (the location where installation packages such as rpm are installed)
The second place is /var/lib/rabbitmq/.erlang.cookie (the location where the decompression method is installed and deployed)
      2. HOUCUGJDZYTFZDSWXTHJ

      3. # Copy the value of .erlang.cookie from rabbitmq-1 node to the other two nodes using scp.

      4. [root@rabbitmq-1 ~]# scp /var/lib/rabbitmq/.erlang.cookie root@192.168.50.139:/var/lib/rabbitmq/

      5. [root@rabbitmq-1 ~]# scp /var/lib/rabbitmq/.erlang.cookie root@192.168.50.140:/var/lib/rabbitmq/
3. Add mq-2 and mq-3 as memory nodes to the mq-1 node cluster
      2. [root@rabbitmq-2 ~]# systemctl restart rabbitmq-server

      3.

      4. # Stop the node

      5. [root@rabbitmq-2 ~]# rabbitmqctl stop_app

      6.

      7. #Reset if there is data, but not if there is not.

      8. [root@rabbitmq-2 ~]# rabbitmqctl reset

      9.

      10. #Add to disk node

      11. [root@rabbitmq-2 ~]# rabbitmqctl join_cluster --ram rabbit@rabbitmq-1

      12. Clustering node 'rabbit@rabbitmq-2' with 'rabbit@rabbitmq-1' ...

      13.

      14. # Start the node

      15. [root@rabbitmq-2 ~]# rabbitmqctl start_app

      16. Starting node 'rabbit@rabbitmq-2' ...

      17.

      18. [root@rabbitmq-3 ~]# systemctl restart rabbitmq-server

      19. [root@rabbitmq-3 ~]# rabbitmqctl stop_app

      20. [root@rabbitmq-3 ~]# rabbitmqctl reset

      21. [root@rabbitmq-3 ~]# rabbitmqctl join_cluster --ram rabbit@rabbitmq-1

      22. [root@rabbitmq-3 ~]# rabbitmqctl start_app

      23.

      24. # If there is a need to use disk nodes to join the cluster

      25. [root@rabbitmq-2 ~]# rabbitmqctl join_cluster rabbit@rabbitmq-1

      26. [root@rabbitmq-3 ~]# rabbitmqctl join_cluster rabbit@rabbitmq-1
![]() Note:
Note:
(1) By default, rabbitmq is a disk node after startup. Under this cluster command, mq-2 and mq-3 are memory nodes, and
mq-1 is a disk node.
(2) If you want to make mq-2 and mq-3 both disk nodes, remove the --ram parameter.
(3) If you want to change the node type, you can use the command rabbitmqctl change_cluster_node_type
disc(ram), provided that the rabbit application must be stopped.
4. Check cluster status
Execute rabbitmqctl cluster_status on any node of the RabbitMQ cluster to check whether the cluster configuration is successful.
[root@rabbitmq-1 ~]# rabbitmqctl cluster_status
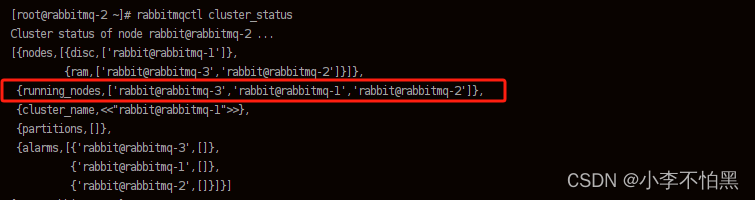
Each machine displays three nodes, indicating that it has been added successfully!
(1) By default, rabbitmq is a disk node after startup. Under this cluster command, mq-2 and mq-3 are memory nodes, and mq-1 is a disk node.
(2) If you want to make mq-2 and mq-3 both disk nodes, remove the --ram parameter.
(3) If you want to change the node type, you can use the command rabbitmqctl change_cluster_node_type disc(ram), provided that it must be stopped.
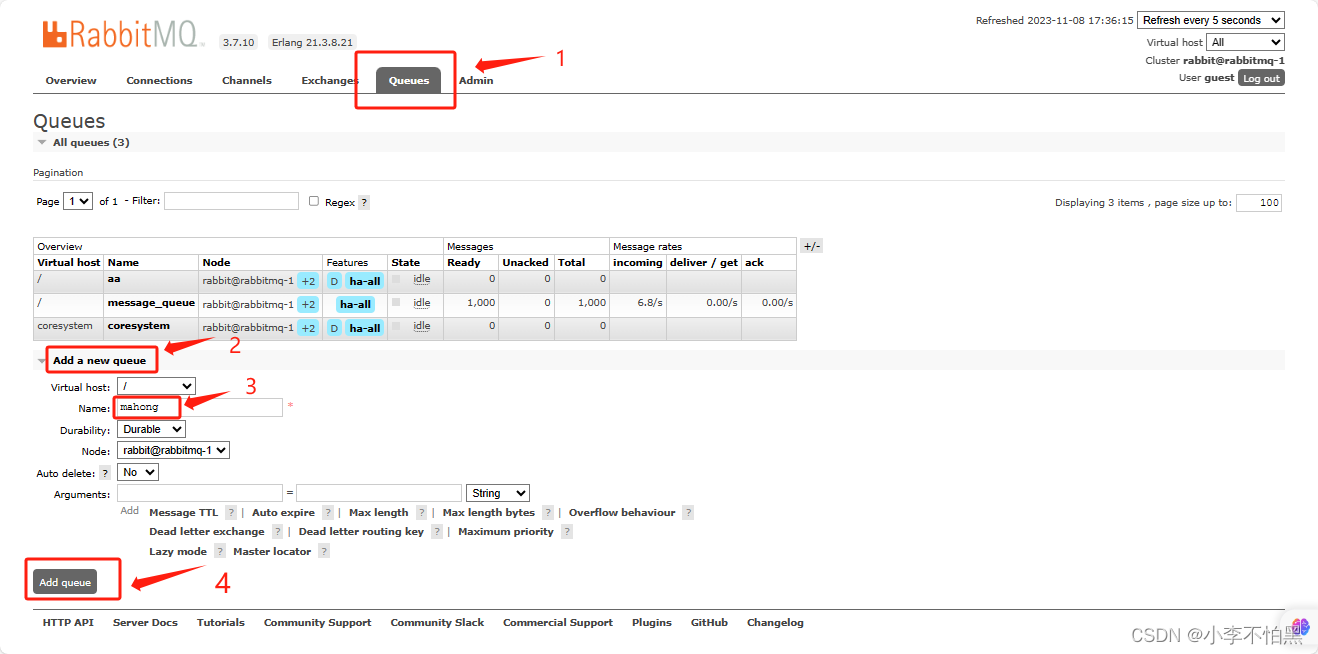
5. Log in to rabbitmq web management console and create a new queue
Open the browser and enter http://10.36.192.150:15672
. Enter the default Username: guest
. Enter the default Password: guest.
Create a queue according to the interface prompts
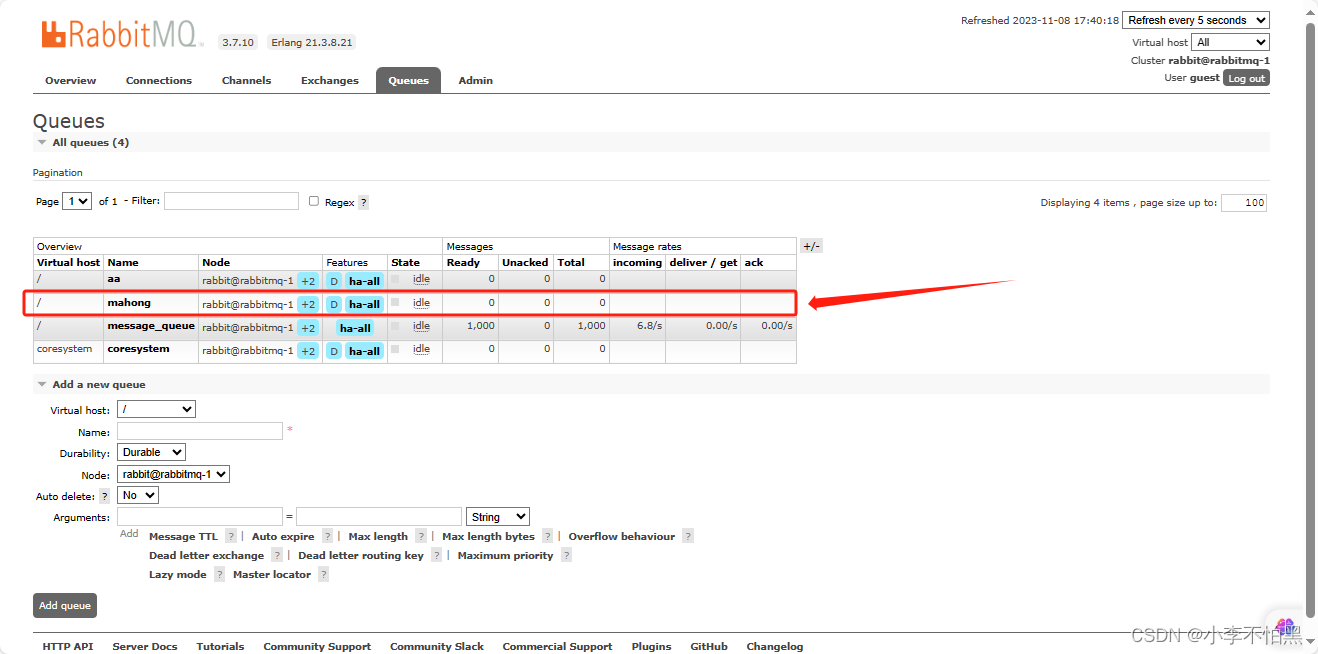
After successful creation, you can see it in Queues
3. RabbitMQ mirror cluster configuration
What has been completed above is the default cluster mode of RabbitMQ, which does not guarantee the high availability of the queue, and the downtime of the queue node will directly cause the queue to be unavailable and can only wait for restart. To solve this problem, it is necessary to copy the queue content to the cluster. For each node, a mirror queue must be created. The mirror queue is based on the ordinary cluster mode, and some policies are added, so you still have to configure the ordinary cluster first, and then you can set up the mirror queue. We will continue with the above cluster. Ensure data synchronization between various nodes.
1.Create a mirror cluster
Granted permission:
rabbitmqctl set_permissions "." "." "." # The last three "" represent that the user has full permissions to configure, write, and read
      2. [root@rabbitmq-2 ~]# rabbitmqctl set_policy  ha-all "^" '{"ha-mode":"all"}'

      3. [root@rabbitmq-3 ~]# rabbitmqctl set_policy  ha-all "^" '{"ha-mode":"all"}'

      4. # The following message is displayed after successful creation

      5. Setting policy "ha-all" for pattern "^" to "{"ha-mode":"all"}" with priority "0" for vhost "/" ...
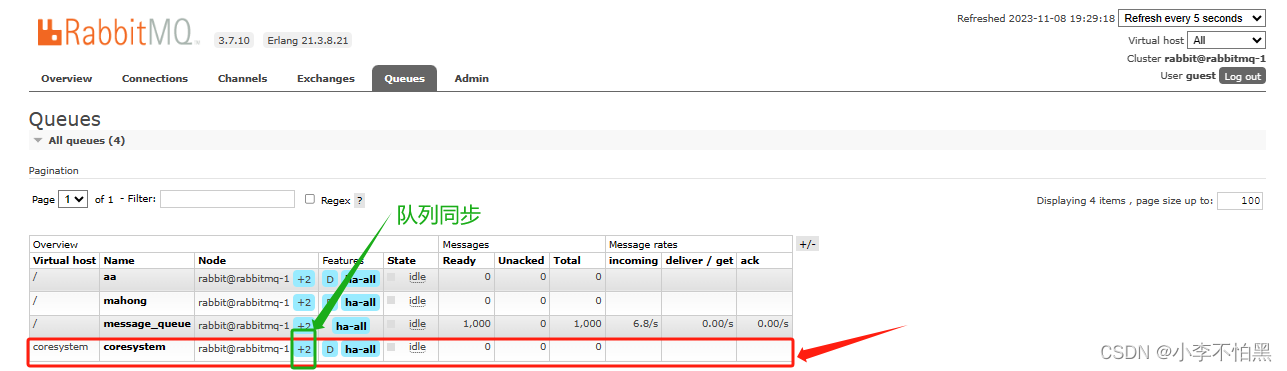
Check that the queue has been synchronized to the other two nodes:
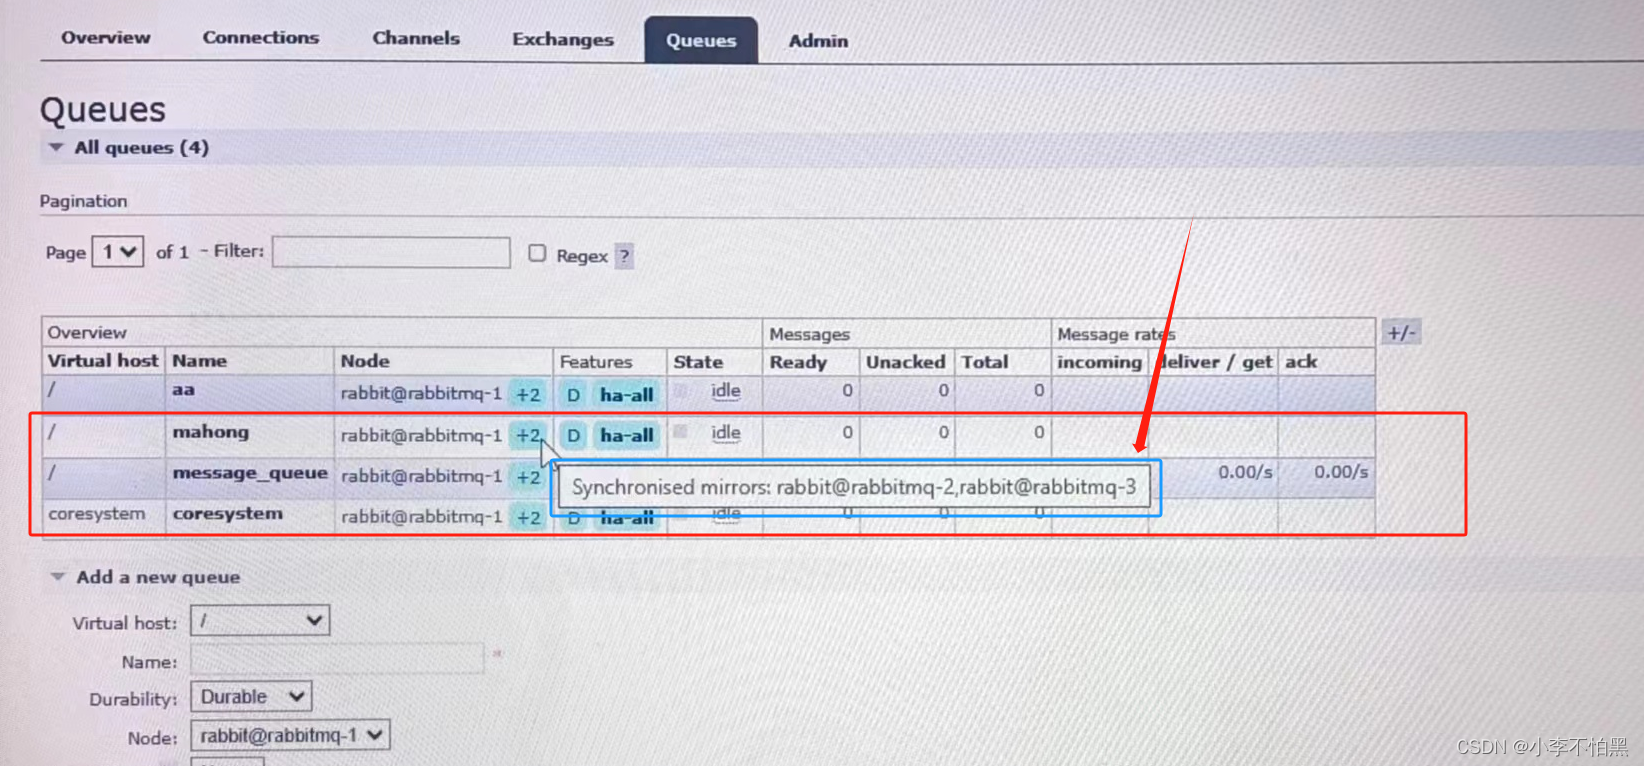
"-p Vhost": vhost name, "^" matches all queues, ha-all policy name is ha-all, '{"ha-mode":"all"}' policy mode is all, which means it is copied to all nodes. If the new node is included, the mirror queue is set up successfully.
Mirror queue policy setting instructions:
rabbitmqctl set_policy [-p Vhost] Name Pattern Definition [Priority]
-p Vhost: Optional parameter, set for the queue under the specified vhost
Name: The name of the policy
Pattern: The matching pattern (regular expression) of the queue
Definition: Mirror definition, including three parts ha-mode, ha-params, ha -sync-mode
ha-mode: Specifies the mode of the mirror queue. The valid value is all/exactly/nodes
all: means mirroring is performed on all nodes in the cluster.
exactly: means mirroring is performed on the specified number of nodes. The number of nodes is The number is specified by ha-params
nodes: indicates mirroring on the specified node, the node name is specified by ha-params
ha-params: the parameters required for ha-mode mode
ha-sync-mode: the synchronization method of messages in the queue , valid values are automatic and manual
priority: optional parameter, priority of policy
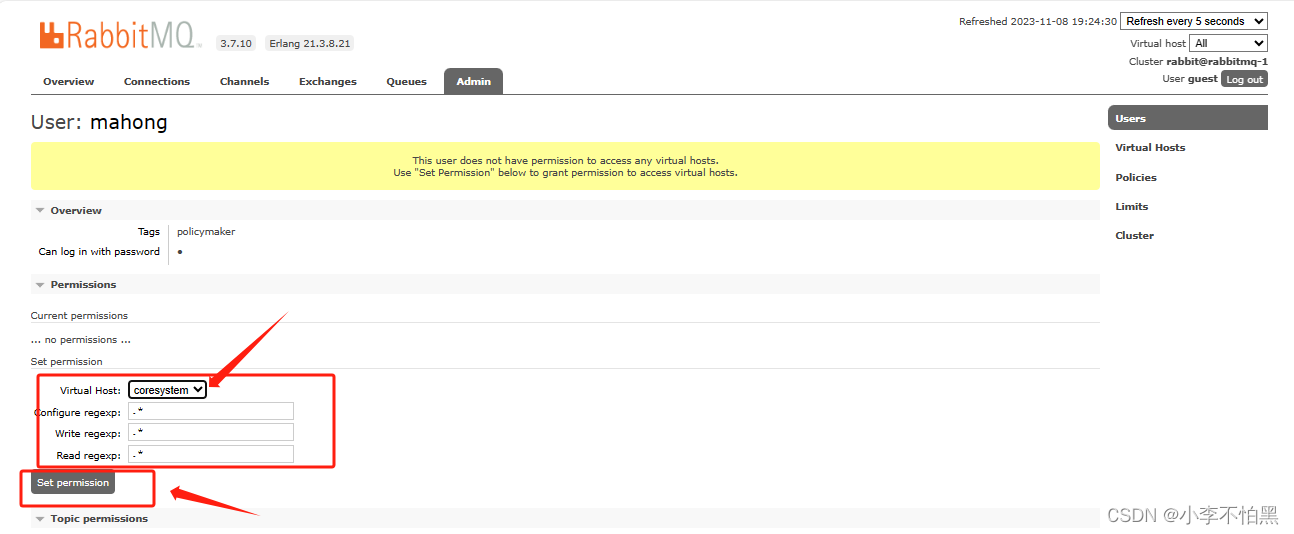
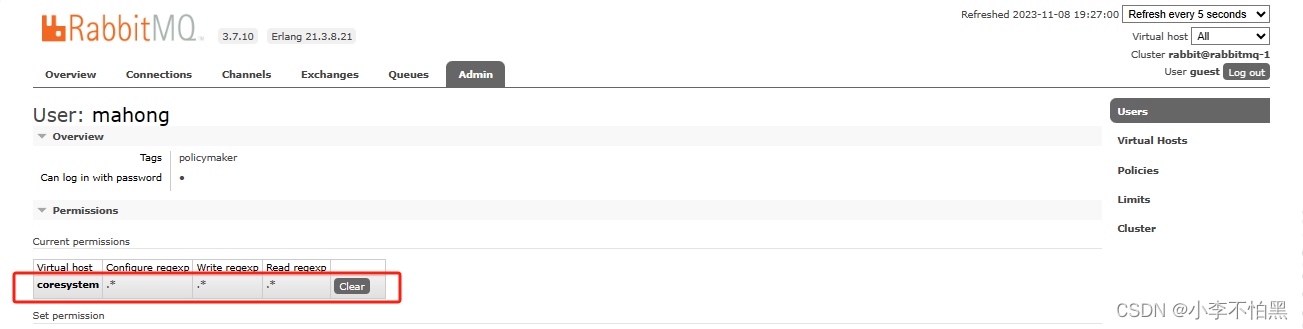
2.Web page experiment
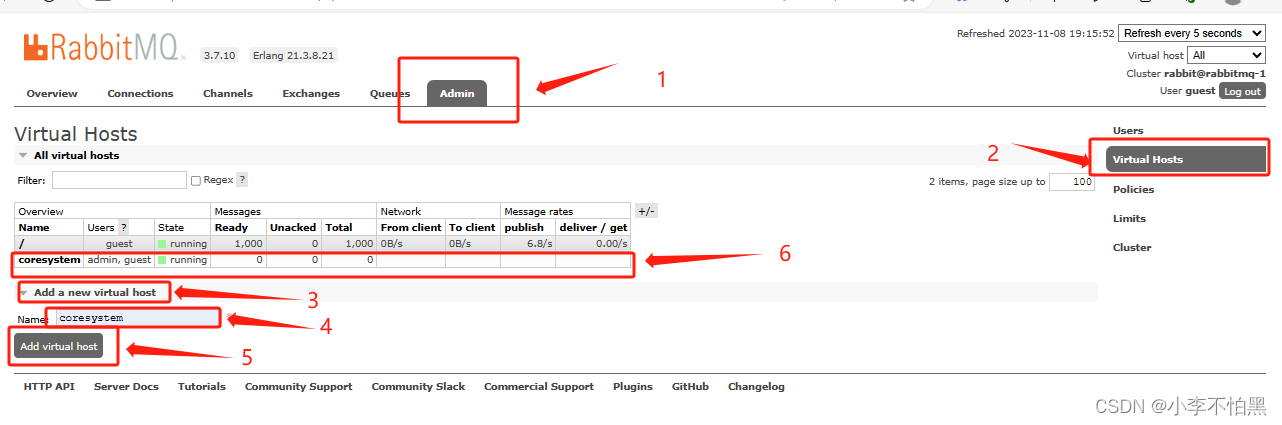
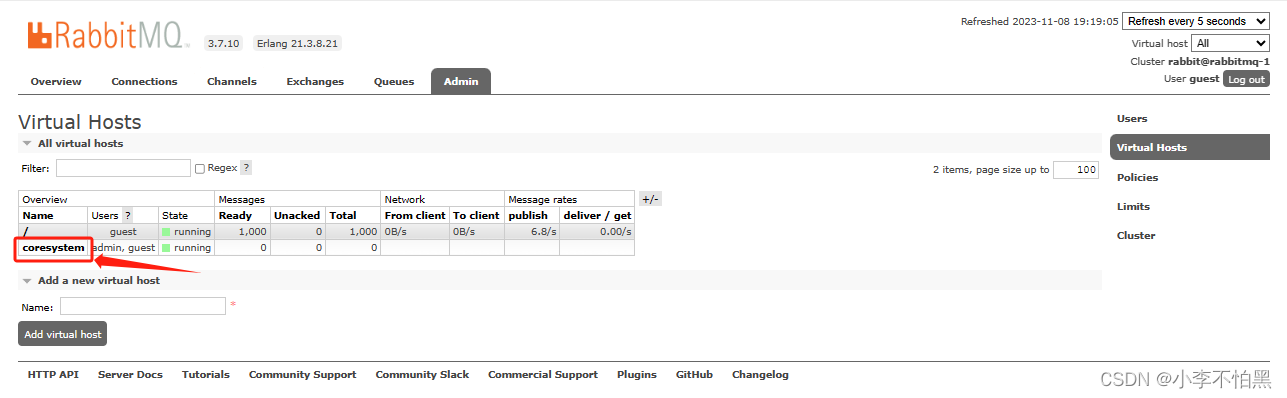
Create a vhost and add queues to user permissions:
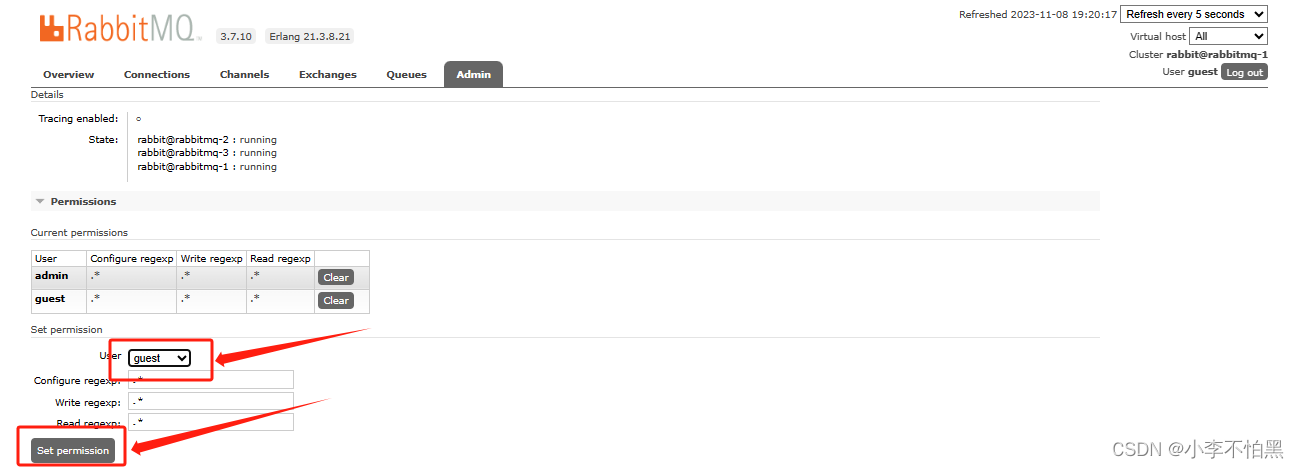
First, in the web interface, after logging in, click "Admin--Virtual Hosts (right side of the page)", add a virtual host coresystem at the bottom of the opened page at "Add a new virtual host", and create the user "admin" " and "guest" are both added with permissions (just set it directly on the page and click)
Create user:
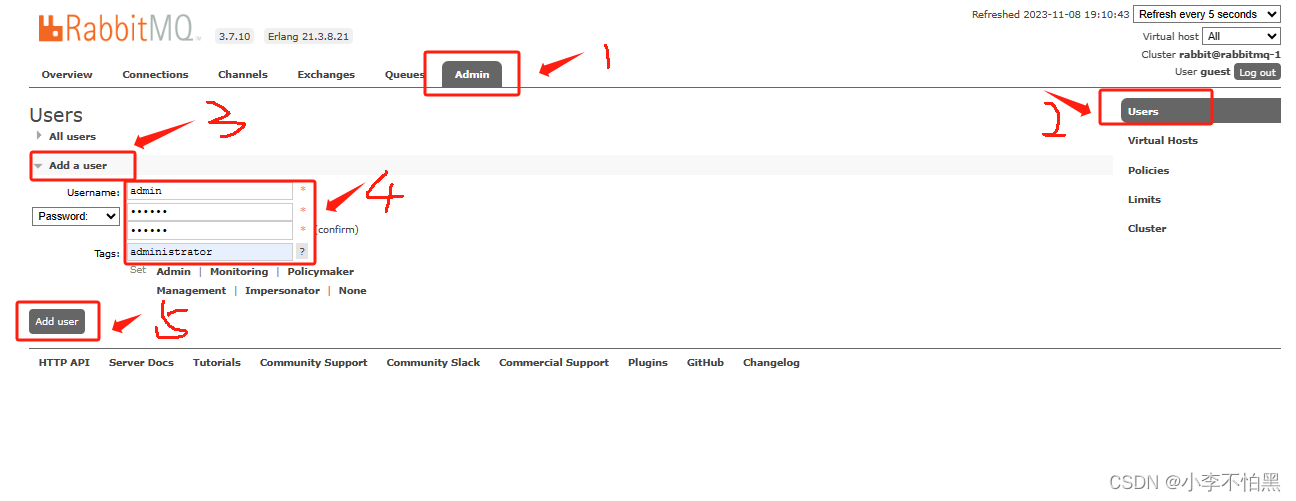
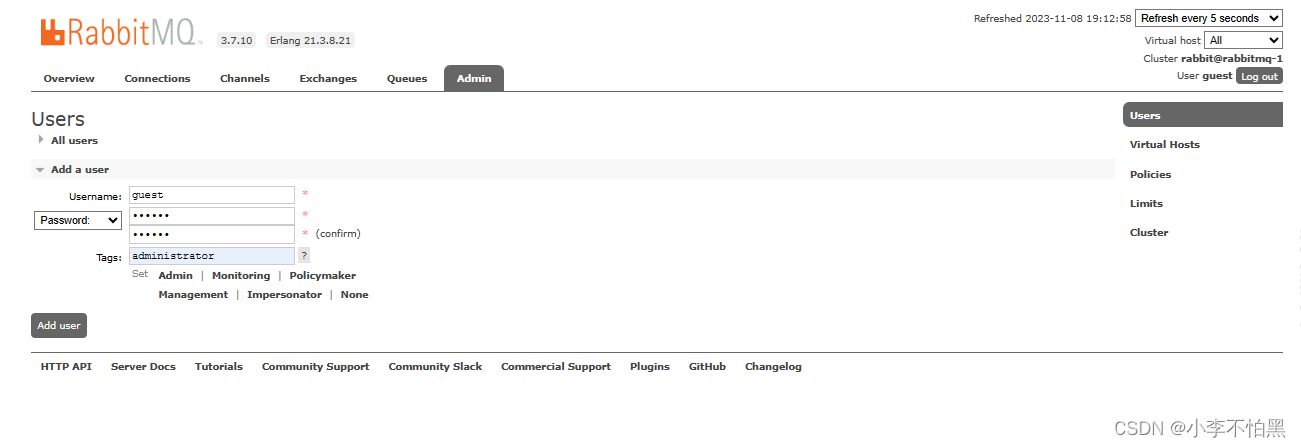
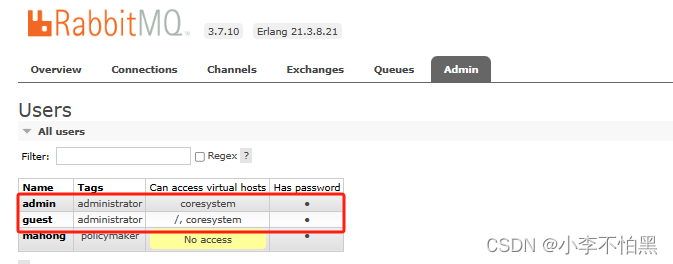
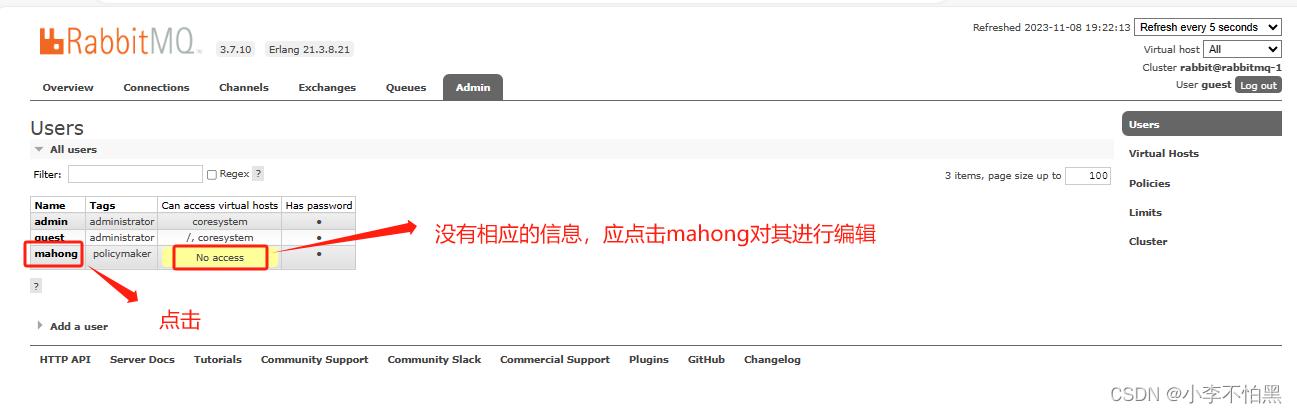
Creating a user is complete.
3. Add a queue in the server
To add a new queue, execute the following command in the first server;
[root@rabbitmq-1 ~]# rabbitmqctl set_policy -p coresystem ha-all "^" '{"ha-mode":"all"}'
Set all the queues as mirror queues, that is, the queues will be copied to each node, and the state of each node will remain the same. After completing these six steps, RabbitMQ high availability cluster construction is complete, the last step is to build the equalizer.
Fourth, **Install and configure the load balancer HA
Note: If you are using AliCloud, you can use AliCloud's intranet slb to achieve load balancing, and you don't need to build your own HA.
Install and configure the load balancer HA*.
Install HAProxy at 10.36.192.150.
[root@rabbitmq-1 ~]# yum -y install haproxy
Modify /etc/haproxy/haproxy.cfg
      2. [root@rabbitmq-1 ~]# vim /etc/haproxy/haproxy.cfg

      3. global

      4.     log         127.0.0.1 local2

      5.

      6.     chroot      /var/lib/haproxy

      7.     pidfile     /var/run/haproxy.pid

      8.     maxconn     4000

      9.     user        haproxy

      10.     group       haproxy

      11.     nbproc      4

      12.     daemon

      13.     # turn on stats unix socket

      14.     stats socket /var/lib/haproxy/stats

      15. #---------------------------------------------------------------------

      16. defaults

      17.     mode                    http

      18.     log                     global

      19.     retries                 3

      20.     timeout connect         10s

      21.     timeout client          1m

      22.     timeout server          1m

      23.     timeout check           10s

      24.     maxconn                 2048

      25. #---------------------------------------------------------------------

      26. ## Monitor to view local status #####

      27. listen admin_stats

      28.         bind *:80

      29.     mode http

      30.     option httplog

      31.     option httpclose

      32.     log 127.0.0.1 local0 err

      33.     stats uri  /haproxy

      34.     stats auth newrain:123456

      35.     stats refresh 30s

      36. ####################################

      37. ### Antigenerational surveillance

      38. frontend server

      39.     bind *:5670

      40.     log global

      41.     mode tcp

      42.     #option forwardfor

      43.     default_backend rabbitmq

      44.     maxconn 3

      45. backend rabbitmq

      46.     mode        tcp

      47.     log         global

      48.     balance     roundrobin

      49.     server      rabbitmq1 10.36.192.150:5672 check inter 2000s rise 2 fall 3

      50.     server      rabbitmq2 10.36.192.151:5672 check inter 2000s rise 2 fall 3

      51.     server      rabbitmq3 10.36.192.152:5672 check inter 2000s rise 2 fall 3

      52.

      53. [root@rabbitmq-1 ~]# systemctl start haproxy        #启动haproxy
![]() Browser input10.36.192.150/haproxyCheck the status of rabbitmq.
Browser input10.36.192.150/haproxyCheck the status of rabbitmq.

V. Installing the MySQL database
For installation, please refer to: http://t.csdnimg.cn/1zslv (yum install) [ http://t.csdnimg.cn/spizv ](http://t .csdnimg.co.uk/spizv " http://t.csdnimg.cn/spizv ") (source code installation)
Log in to the database for authorized remote login operations:
      2. Query OK, 1 row affected (0.00 sec)

      3. Rows matched: 1  Changed: 1  Warnings: 0

      4.

      5. mysql> flush privileges;

      6. Query OK, 0 rows affected (0.00 sec)

      7.

      8. mysql> ^DBye
VI. Installing python and testing it
git the test package and install the python software:
      2. [root@rabbitmq-1 ~]# git clone https://gitea.beyourself.org.cn/newrain001/rabbitmq-test.git && \

      3. cd rabbitmq-test && yum install -y python3 python3-devel && \

      4. pip3 install -r requirements.txt -i https://mirrors.aliyun.com/pypi/simple
Modify the files related to rabbitmq-test, i.e. mysql database password and port :
      2. # rabbitmq configuration

      3. MQName="message_queue"

      4. mqser="guest"

      5. MQPassword="guest"

      6. MQHost="localhost" 7.

      7. MQPort=5670

      8.

      9. # mysql database configuration

      10. DBHost="localhost" 11.

      11. DBUser="root"

      12. DBPassword="Mawenbao@123"
Set up the environment and start the flask service:
[root@rabbitmq-1 ~]# export FLASK_ENV=development ; flask run --reload -p 80 -h 0.0.0.0

Enter 10.36.192.150 into your browser to view the order page.

Enter 10.36.192.150/read in your browser to view the shipping page.

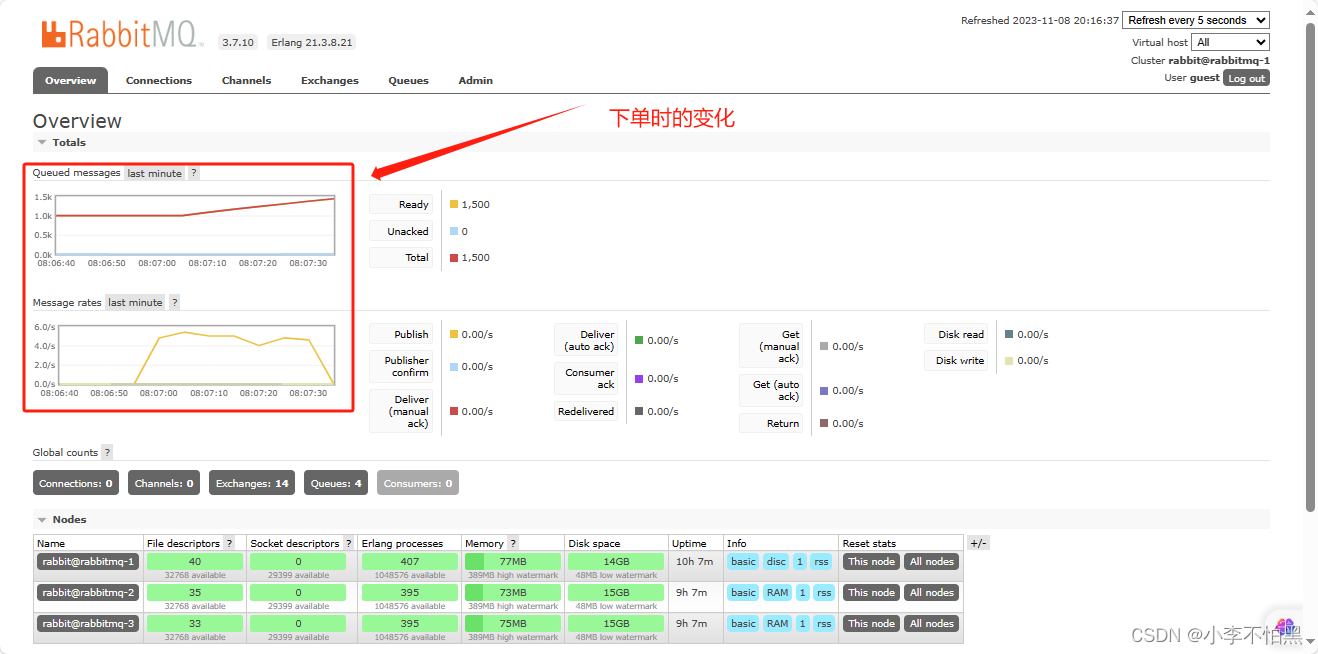
Changes when placing an order:
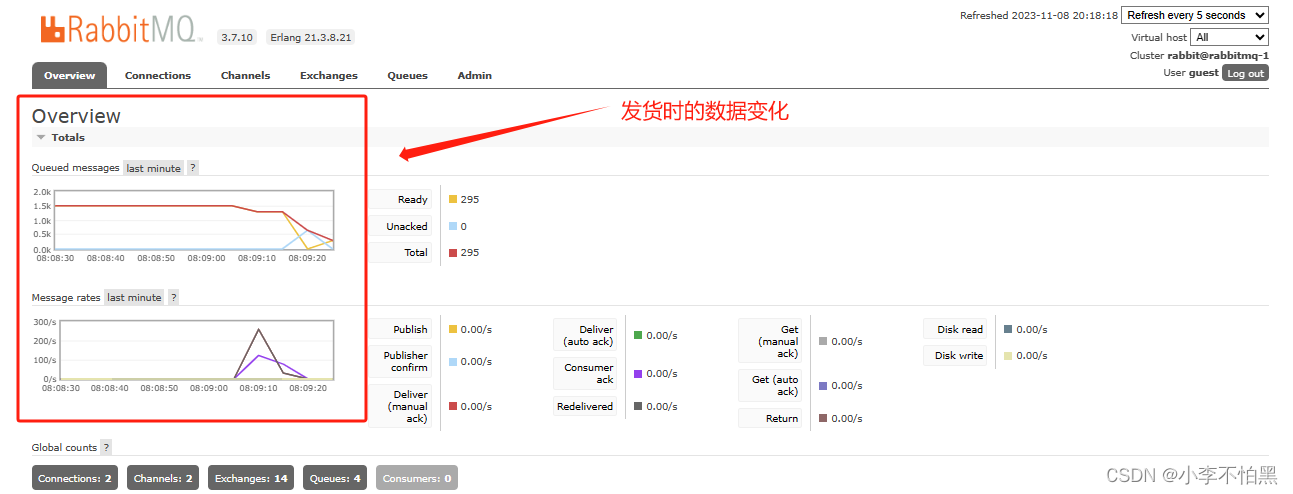
Data changes at the time of shipment:
Common Errors
1、Using rabbitmq-server -detached command to start rabbitmq, the following prompt Warning: PID file not written; -detached was passed, at this time using rabbitmqctl status prompts the service has been started, it can be seen that this problem does not have to be The problem does not need to be solved.
2, due to the change of the hostname file, every time rabbitmqctl stop or rabbitmqctl cluster_status, etc., as long as it is rabbitmq commands will be reported as an error, the prompts are probably as follows
2. Error: unable to connect to node rabbit@web2: nodedown
3.
4. DIAGNOSTICS
5. ===========
6.
7. attempted to contact: [rabbit@web2]
8.
9. rabbit@web2:
10. * connected to epmd (port 4369) on web2
11. * epmd reports node 'rabbit' running on port 25672
12. * TCP connection succeeded but Erlang distribution failed
13.
14. * Hostname mismatch: node "rabbit@mq2" believes its host is different. Please ensure that hostnames resolve the same way locally and on "rabbit@mq2"
15.
16.
17. current node details:
18. - node name: 'rabbitmq-cli-11@web2'
19. - home dir: /root
20. - cookie hash: SGwxMdJ3PjEXG1asIEFpBg==

In this case, ps aux | grep mq, then kill -9 the process, then rabbitmq-server -detached will solve the problem. (i.e., force kill the process first, then restart)
3、Use rabbitmqctl stop, rabbitmq-server -detached restart, originally added the user admin, virtual host coresystem and so on are lost, also need to re-add.
4, the use of scripts to start, write in the script to start a good need to load the configuration items (create admin user and authorization, create a virtual host and authorization, configure the mirror queue).
5, RabbitMQ error handling
Error: returned an error: shutdown: failed to start child: Logger.ErrorHandler
Reason: Erlang version does not correspond to the version of RabbitMQ.
Solution: Check the version according to RabbitMQ Erlang Version Requirements page https://www.rabbitmq.com/which-erlang.html
6、Port conflict problem
You need to modify the corresponding conflicting ports, usually in the configuration file.