High concurrency projects (Part 2)
High concurrency projects (Part 2)
RabbitMQ software
A popular messaging middleware that implements advanced queuing protocols and provides reliable, asynchronous messaging mechanisms for distributed applications. It can deliver messages between multiple processes and multiple hosts . Core concepts: producers, consumers and queues.
Producer: publishes messages to the queue
Consumer: Gets messages from the queue and processes them
PS: This software is installed on Linux and requires the Erlang language environment, then install RabiitMQ
Configure RabbitMQ
Configure the firewall and open port 15627
	firewall-cmd --zone=public --add-port=15672/tcp --permanent


     // Restart the firewall

     firewall-cmd --reload
Modify RabbitMQ login configuration
     vi rabbitmq.config        //Modify the configuration


     加入 [{rabbit,[{loopback_users,[]}]}].


     /sbin/service rabbittmq-server stop        // Restart rabbit

     /sbin/service rabbittmq-server start
Enter the RabbitMQ web page
Account password are guest
Now integrating RabbitMQ in SpringBoot
     P      ||||||       C


         P:message sender


         C:Message Recipient


         The center represents the queue
pom.xml introduces the dependencies required by rabbitMQ
spring-boot-starter-amqp
Configure in application.yml
       host:192.168.198.135        //ip address

       username: guest

       password: guest

       virtual-host: /            // Virtual host to be operated

       port: 5672                //Port 15672 is the port for RabbitMQ web pages


       listener:

         simple:

          concurrency: 10                 //Minimum number of consumers


          max-concurrency:10              // Maximum


          perfetch: 1                     // Limit consumers to one message at a time, processing it before moving on to the next one


          auto-startup:true               // Default Startup Container


          default-requeue-rejected: true    //whether the message re-enters the queue after being rejected


          template:

            retry:

              enabled:true                  //whether to retry if message processing failed default false

              initial-interval: 1000ms      //Initialize the retry interval, i.e., retry after 1s after the first processing message failure

              max-attempts: 3                //Maximum 3 retries

              max-interval: 10000ms          //Retry max. time interval 10s

              motiplier: 1                   //Retry interval multiplier 2, the first wait 1s, the second is 1 * 2s
Create the RabbitMQConfig class (can create queues and switches)
     public class RabbitMQConfig{


       private static final String QUEUE = "queue";     // Define the queue name


       @Bean

       public Queue queue(){                        //create a queue


         return new Queue(QUEUE,true);    //true means the queue is persistent.


       }


     }
Simple simulation
Create message producer
     public class MQSender{


         @Resource

         private RabbitTemplate rabbitTemplate;    //Assembling it to operate RabbitMQ


         //Methods:Send message

         public void send(Object msg){


             rabbitTemplate.convertAndSend("queue",msg);    // Add message to queue


         }


     }
Create message consumer
     public class MQReceiver{


     @Resource

         private RabbitTemplate rabbitTemplate;


         //Methods:Receive messages

         @RabbitListener(queues="queue")      // Listen to those queues

         public void receive(Object msg){


             log.info("receive a message",msg);


         }


     }
control layer control
     RabbitMQHandler{


       @Resource

       private MQSender mqSender;


       @RequestMapping("/mq")

       @ResoponseBody

       public void mq(){


          mqSender.send("hello");


       }

     }
RabbitMQ usage patterns
Fanout mode
Broadcast mode is to send messages in the exchange to all queues bound to the exchange, ignoring routing.
		1.consumers

	 Producer switches


                                         consumers
Example: The producer sends the message to the exchange, and the exchange sends it to two queues bound to it.
Modify RabbitMQConfig
          private static final String QUEUE1 = "queue1";        //Two queue names

          private static final String QUEUE2 = "queue2";

          private static final String EXCHANGE = "exchange";    //Switch name


          @Bean

          public Queue queue1(){


             return new Queue(QUEUE1,true);


          }


          @Bean

          public Queue queue2(){


             return new Queue(QUEUE2,true);


          }


          @Bean

          public FanoutExchange exchange(){                //Creating a switch


             return new FanoutExchange(EXCHANGE);

          }


          // Then bind the two queues to the switch

         @Bean

         public Binding binding01(){


           return BindingBuilder.bind(queue1()).to(EXCHANGE);


         }


         @Bean

         public Binding binding02(){


           return BindingBuilder.bind(queue2()).to(EXCHANGE);


         }


     }
Modify MQSender
         public void sendFanout(Object msg){


             rabbitTemplate.convertAndSend("exchange","",msg)    //Message to switch

                                                                   A space is an ignore route


         }

     }
Modify MQRecevier
@RabbitListener(queues="queue1") //Listening queue 1
public void receive(Object msg){
log.info("接收消息",msg);
}
@RabbitListener(queues="queue2") //Listening queue 2
public void receive(Object msg){
log.info("receive a message",msg);
}
}

ModifyController
       @RequestMapping("/mq/findout")

       @ResoponseBody

       public void findout(){            // Now it's just sending it to the switch.


          mqSender.send("hello");


       }


     }
Direct mode
Routing mode, while using the switch, the producer specifies the route to send data, and the consumer binds the route to receive data. When the producer sends data to the switch, it will declare the route under the switch. Only when the consumer queue is bound to the switch and declares the route, the data will be received.
     P         X    info/error/     |||||    queue4   queue.green route


     producers queues

     switches consumers

     this is routing
Example: The switch specifies different routes to send to different consumers when sending messages.
Modify RabbitMQConfig
 private static final String QUEUE4 = "queue4"; //And the names of the two queues.

 private static final String EXCHANGE_DIRECT = "exchange_direct"; //Switch name


 private static final String ROUNTING1 = "queue.red"; //Define the route, write the content yourself.

 private static final String ROUNTING2 = "queue.green"; //Define the route, write the content yourself.


 ...
 return new Queue(QUEUE3,true);
 return new Queue(QUEUE3,true); //create two queues as well

 return new Queue(QUEUE4,true); //Create two queues as well.
 return new Queue(QUEUE4,true).
 return BindingBuilder.bind(queue3()).to(EXCHANGE_DIRECT).wiht(ROUNTING1); //associate routes

 return BindingBuilder.bind(queue4()).to(EXCHANGE_DIRECT).wiht(ROUNTING2);
Modify MQSender
 //Method:Send to switch and specify route.

 public void sendDirect1(Object msg){


 rabbitTemplate.convertAndSend("exchange", "queue.red",msg); // Specify the route at this point.


 }


 public void sendDirect2(Object msg){


 rabbitTemplate.convertAndSend("exchange", "queue.green",msg); // Specify the route at this point.


 }


 }
 MQRecevier{


 @RabbitListener(queues="queue3") // Listen on queue 1.

 public void queue_direct1(Object msg){


 public void queue_direct1(Object msg){
 log.info("Receiving message",msg);


 }


 @RabbitListener(queues="queue4") //Listening to queue 1

 public void queue_direct2(Object msg){


 public void queue_direct2(Object msg){
 log.info("Receiving message",msg);


 }


 }
Modify RabbitMQHandler
 @RequestMapping("/mq/direct03")

 @ResoponseBody

 public void direct03(){ // Now it's sending to the switch.


 mqSender.sendDirect1("hello")
 mqSender.sendDirect1("hello03");


 }


 @RequestMapping("/mq/direct04")

 @ResoponseBody
 @ResoponseBody
 public void direct04(){ // Now it's sending to the switch.


 mqSender.sendDirect2("hello04");


 }
Topic mode
Direct mode may cause too many RoutingKeys. In fact, routing matching is often performed according to a certain rule. Topic is an expansion/overlay of direct mode, a fuzzy routing matching mode.
*: Can (can only) match one word
#: Can match multiple words (or zero)
 For example

 *.orange.* Q1 C1


 P X


 *. *>rabbit Q2 C2
>Q2 C2


 A quick.orange.rabbit--HEllo will be sent to Q1,Q2 at the same time.


 lazy.orange.elephant will only send to C1.


 lazy.orange.elephant matches lazy.
For example: if you send red, only Q1 will receive it; if you send green, Q1, both Q2 will receive it.
Create a new RabbitMQTopicConfig (because the previous one has too much code)
 private static final String QUEUE1 = "queue_topic1"; // Two queue names.
 private static final String QUEUE1 = "queue_topic1"; //Name of both queues
 private static final String QUEUE2 = "queue_topic2"; //Contains the names of the two queues.

 private static final String EXCHANGE = "TopicExchanget"; //name of the switch


 private static final String ROUNTING1 = "#.queue.#"; //Define the route, write the content yourself.
 private static final String ROUNTING1 = "#.queue.
 private static final String ROUNTING2 = "*.queue.#"; //Define the route, write the content yourself.


 ...
 return new Queue(QUEUE1,true);
 return new Queue(QUEUE1,true); //create two queues as well

 return new Queue(QUEUE2,true); //Create two queues as well.


 return new Queue(QUEUE2,true);
 return BindingBuilder.bind(queue_topic1).to(EXCHANGE).wiht(ROUNTING1); //associate routes

 return BindingBuilder.bind(queue_topic2).to(EXCHANGE).wiht(ROUNTING2);
Modify MQSender
 public void sendTotic3(Object msg){


 rabbitTemplate.convertAndSend
 rabbitTemplate.convertAndSend
 ("topicExchange", "queue.red.message",msg); // Specify the route at this point.
 ("topicExchange", "queue.red.message",msg)
 can only match to Q1


 }


 public void sendTopic4(Object msg){


 rabbitTemplate.convertAndSend
 rabbitTemplate.convertAndSend
 ("topicExchange", "green.queue.green.message",msg); // Specify the route at this point.

 Match to Q1, Q2.


 }
Modify MQReceiver
 @RabbitListener(queues="queue_topic1") //Listen to queue 1.
 @RabbitListener(queues="queue_topic1")
 public void queue_topic1(Object msg){


 public void queue_topic1(Object msg){
 log.info("Receiving message",msg);


 }


 @RabbitListener(queues="queue_topic2") //Listening to queue 1

 public void queue_topic2(Object msg){


 log.info("Receiving message",msg);


 }
Modify MQHandler
     @RequestMapping("/mq/topic1")

       @ResoponseBody

       public void topic1(){            //现在就是发送到交换机


          mqSender.sendTopic3("hello red");


       }


     @RequestMapping("/mq/topic2")

       @ResoponseBody

       public void topic2(){            //现在就是发送到交换机


          mqSender.sendTopic4("hello green");


       }
Headers pattern
It is rarely used, relatively rare and complex. It does not care whether the routing key matches, but only cares whether the key-value pair of the header matches.
Now solve the previous problem
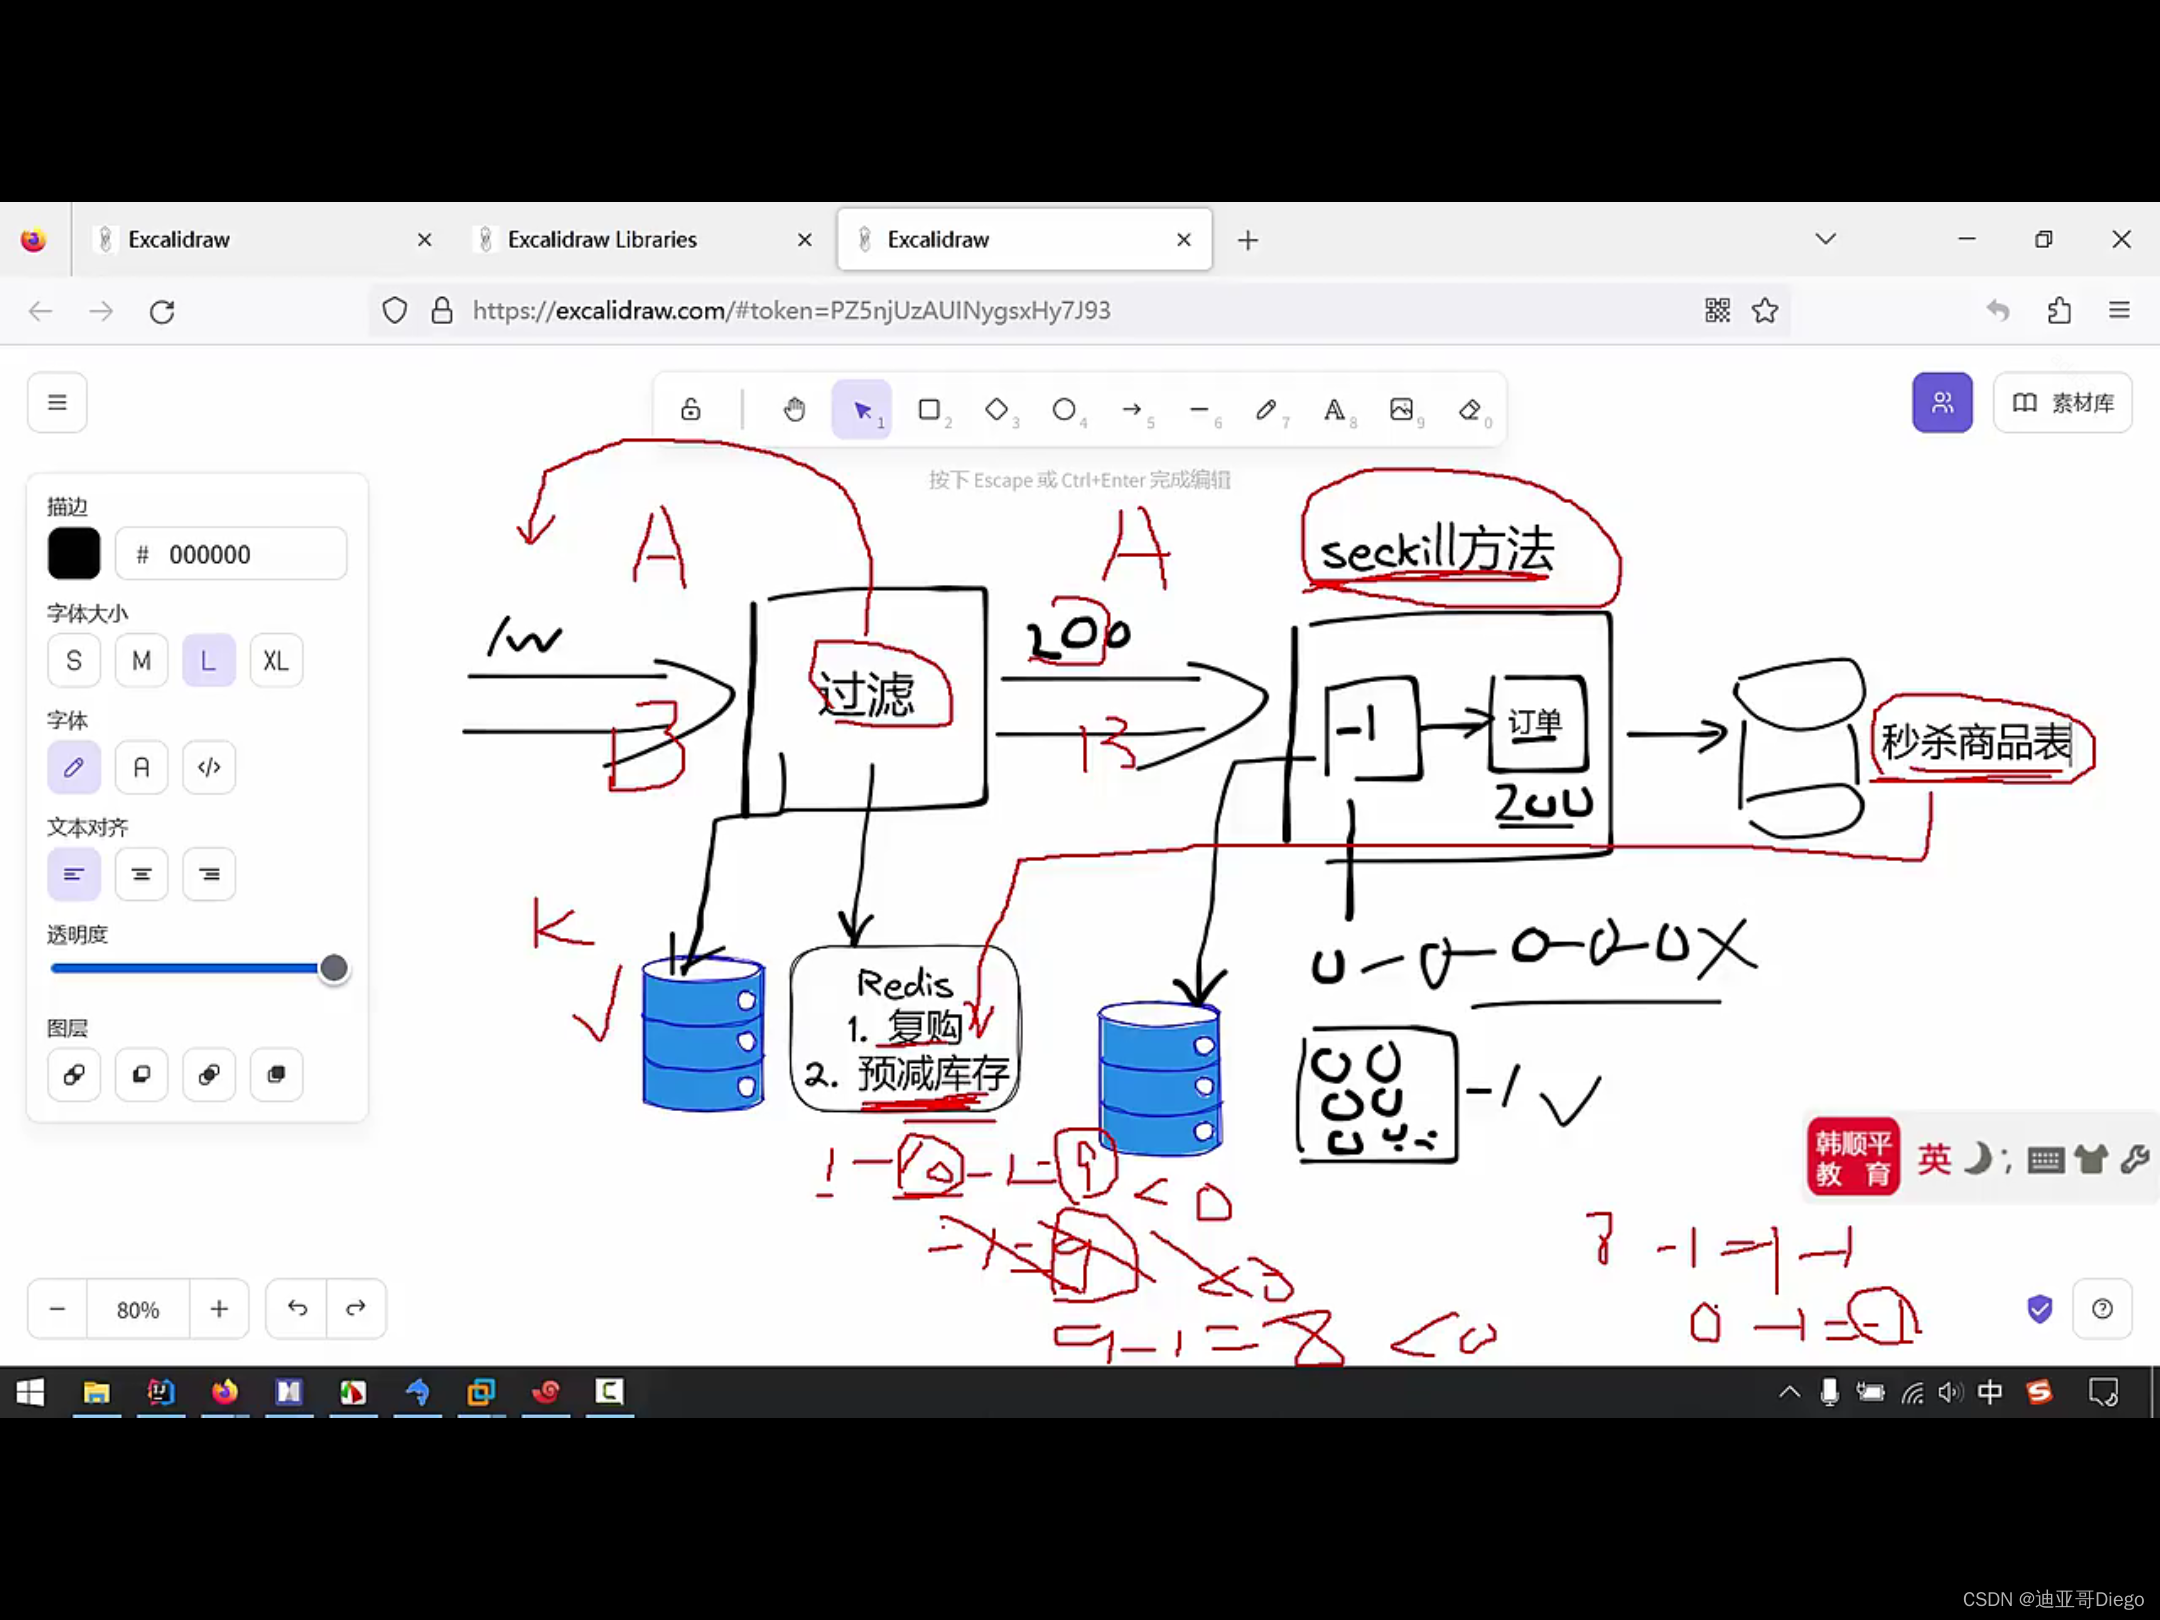
When the seckill system starts, if a large number of threads come to request, it will put a lot of pressure on the database, so Redis needs to be shared, and the inventory will be reduced in advance during the filtering process. In this way, there will be fewer threads calling the seckill method, and the database will be decompressed.
Modify SeckillController
public class SeckillController implements InitilaizingBean{
...
//This method is executed automatically after all properties of the SeckillController class have been initialized, so that the number of seckill items can be loaded into Redis.
@Override
public void afterProperties
public void afterPropertiesSet() throws Exception{
// Query all the seconds.
List<GoodsVolist = goodsService.findGoodsVo();
// Iterate through the List and put the seconds inventory into Redis.
if(CollectionUtils.isEmpty(list)){ // determine if it is empty
return; //Check if the list is empty.
return;
}
list.forEach(goodsVo -{
//Seckill goods inventory corresponding to key:seckillGoods:goodsid
redisTemplate.opsForValue().
set("seckillGoods: "+goodsVo.getId(),goodsVo.getStockCount());
});
}
}

Then modify the doSeckill method of SeckillController
 doSeckill(...) {

 ...


 //Inventory pre-decrease, if you pre-decrease the inventory in Redis and find that the item is gone, you will return directly

 // This reduces the number of orderService.fill() requests and prevents thread stacking.


 // derement is atomic in nature, when executing the decrease method, it is done one by one instead of rushing into many threads at once.

 Long decrement = redisTemplate.opsForValue().
 decrement("se") = redisTemplate.
 decrement("seckillGoods: "+goodsId);


 if(derement < 0){ //Indicate that the item is out of stock.


 redisTemplate.opsForValue.

 increment("seckillGoods: "+goodsId);//restore looking comfortable


 return "secKillFail"; //return to error page
 return "secKillFail"; // return to the error page.
 }


 }
Continue to optimize
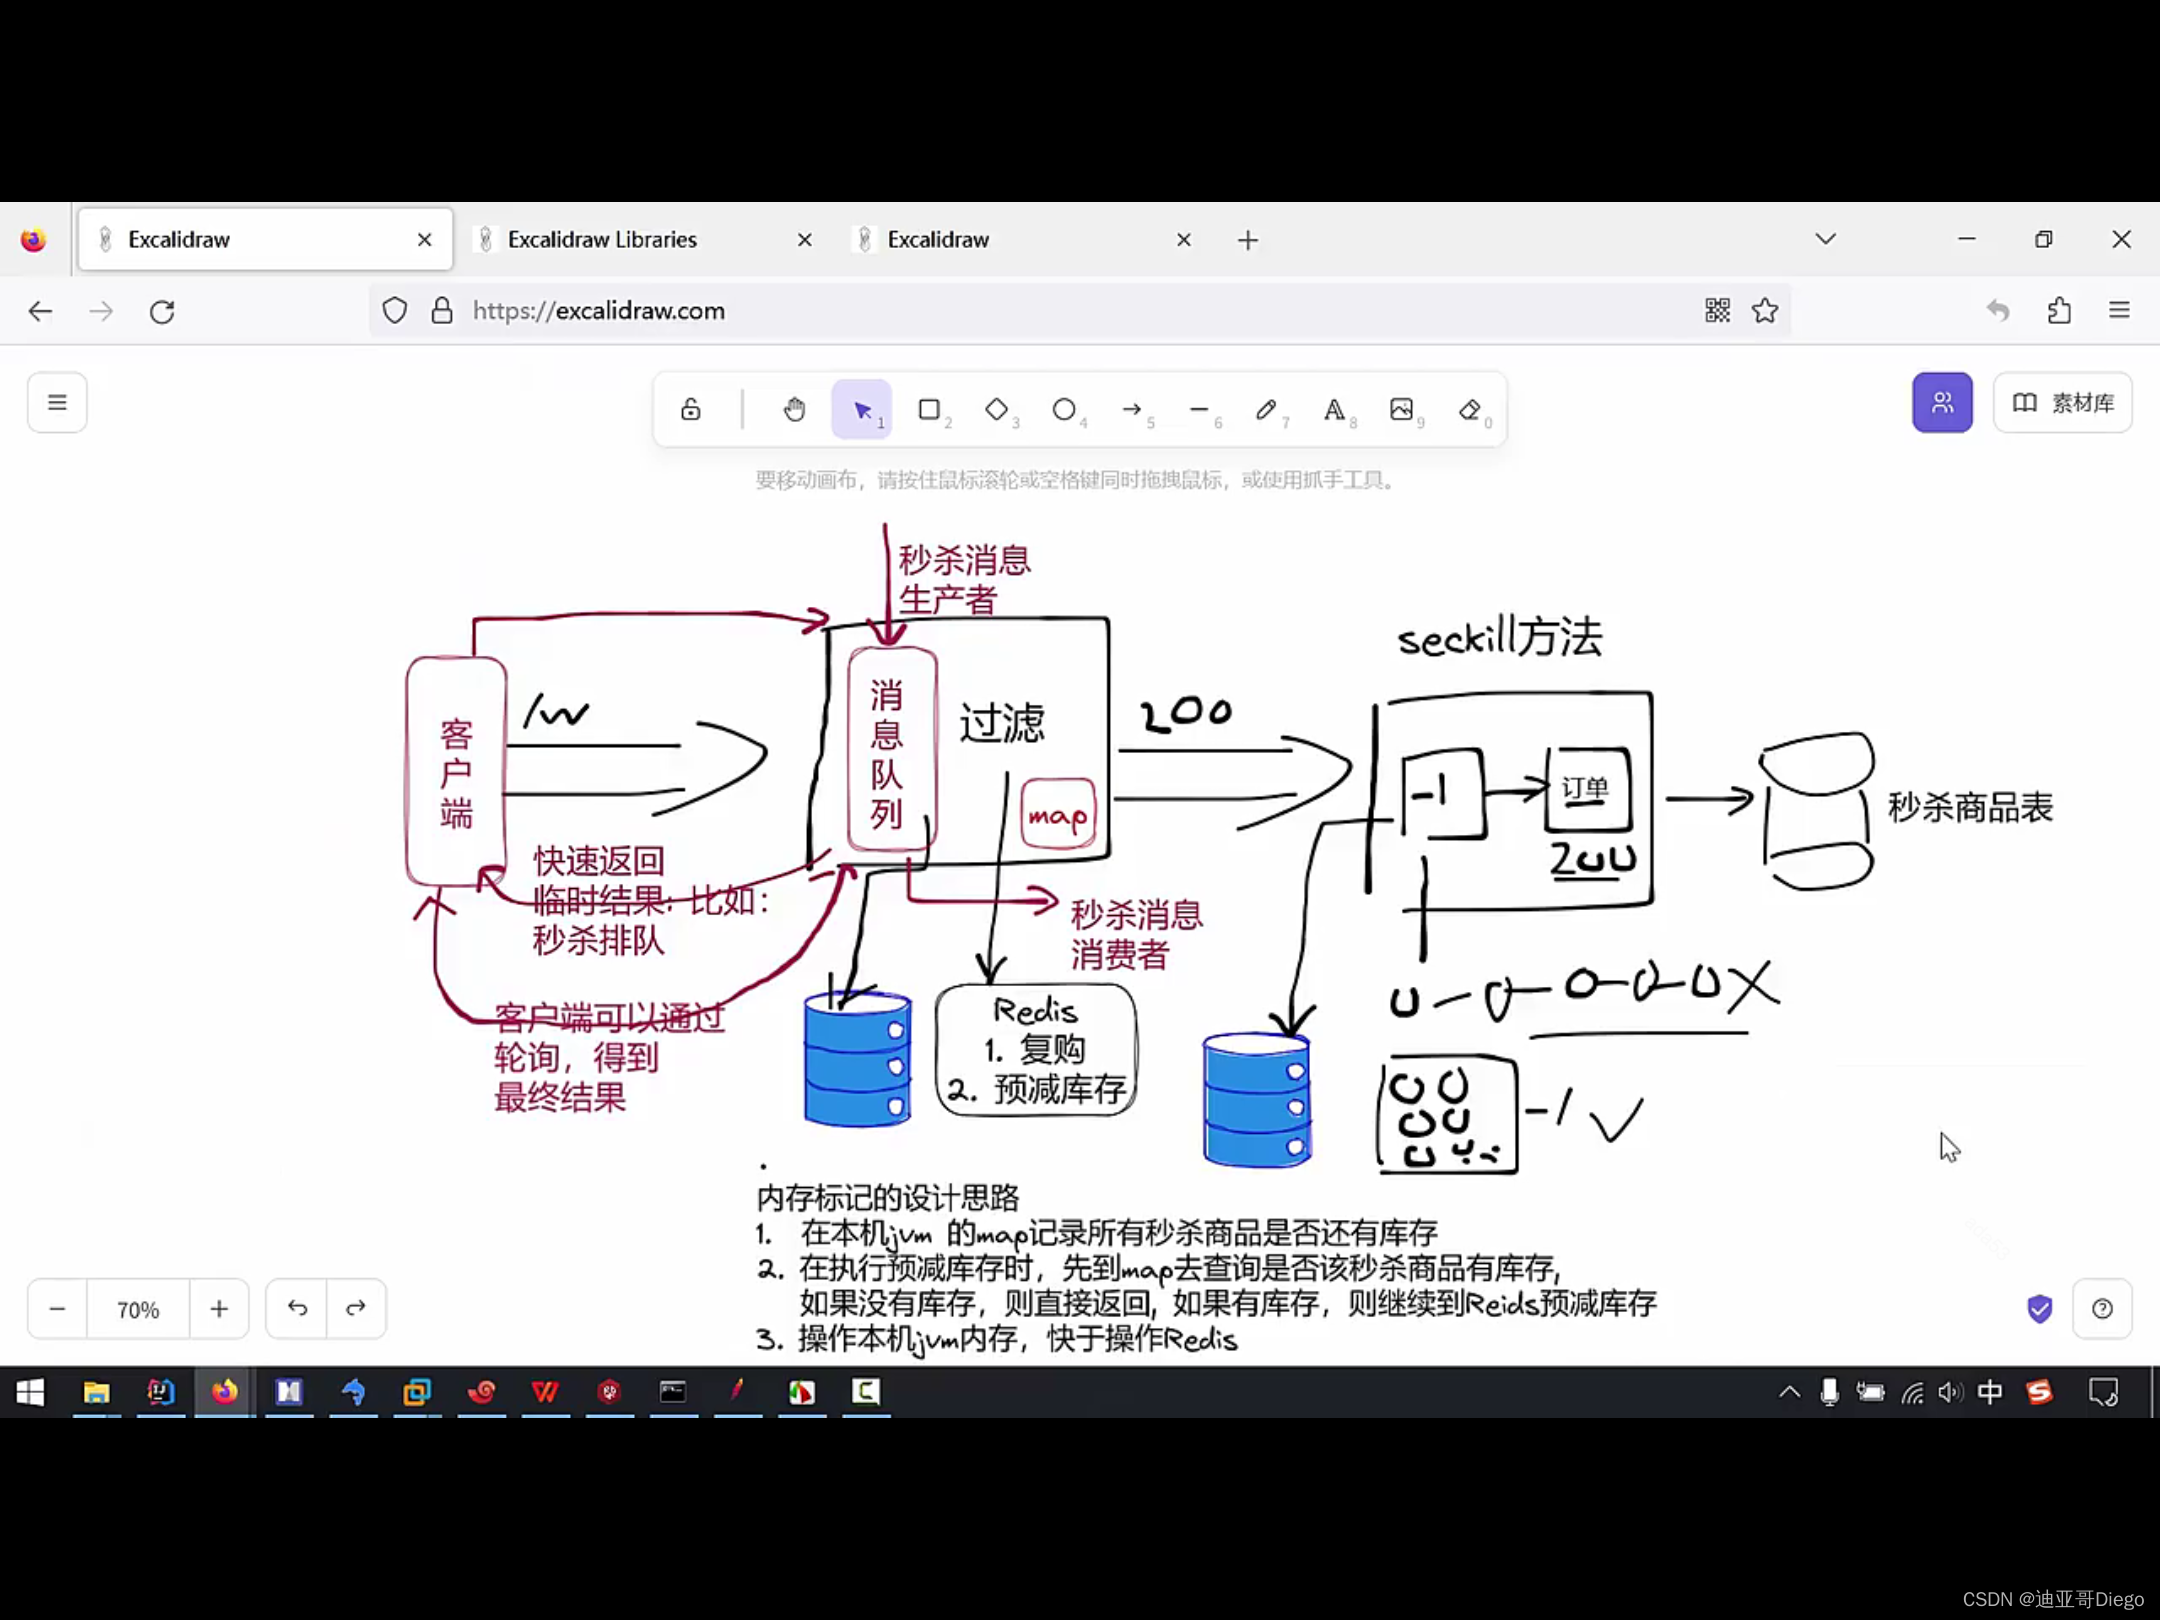
When pre-decreasing the Redis inventory, you can determine whether the inventory is 0. If so, it will no longer be reduced by 1 to prevent 0 and -1 from being cycled and wasting memory. It is operated directly in the local jvm, which is faster than operating in Redis.
 SeckillController{


 // Define a map to record if a seckill item is still in stock.
//Define a map to record whether a spike item is still in stock.
 private HashMap<Long,BooleanentryStockMap = new HashMap();


 @Override
 public void afterPropertiesSet()
 public void afterPropertiesSet() throws Exception{


 List<GoodsVolist = goodsService.findGoodsVo();


 if(CollectionUtils.isEmpty(list)){

 return;

 }

 list.forEach(goodsVo -{

 redisTemplate.opsForValue().
 redisTemplate.opsForValue().
 set("seckillGoods: "+goodsVo.getId(),goodsVo.getStockCount());


 //Initialize map, false means there is still stock, true means there is no stock.
 entryStockMap.
 entryStockMap.put(goodsVo.getId(),false);


 entryStockMap.
 });

 }


 doSeckill(...);
 doSeckill(...) {

 ...

 // Judge the Map, if there is nothing left, return it directly, no need to Redis pre-decrement.
 if(entryStockMap.get(goodsId))
 if(entryStockMap.get(goodsId)){

 return "secKillFail"; // return the error message.

 }


 Long decrement = redisTemplate.opsForValue().

 decrement("seckillGoods: "+goodsId);


 if(derement.opsForValue);
 if(derement < 0){


 // This means that the number of seconds is no longer available.
 entryStockMap.put(goodsId,true)
 entryStockMap.put(goodsId,true);


 redisTemplate.opsForValue.

 increment("seckillGoods: "+goodsId);


 return "secKillFail";

 }


 }

 }
Join the message queue to implement asynchronous requests for flash sales
The previous flash kill does not implement an asynchronous mechanism. It returns after completing the order. When there are large concurrent requests for order operations, the database has no time to respond, which easily causes thread accumulation. The flash kill asynchronous request can be implemented through the message queue.
Create a new SeckillMessage
     //Seconds message object

     @Data

     @NoArgsConstructor

     @AllArgsConstructor

     public class SeckillMessage{


         private User user;

         private Long goodsId;


     }
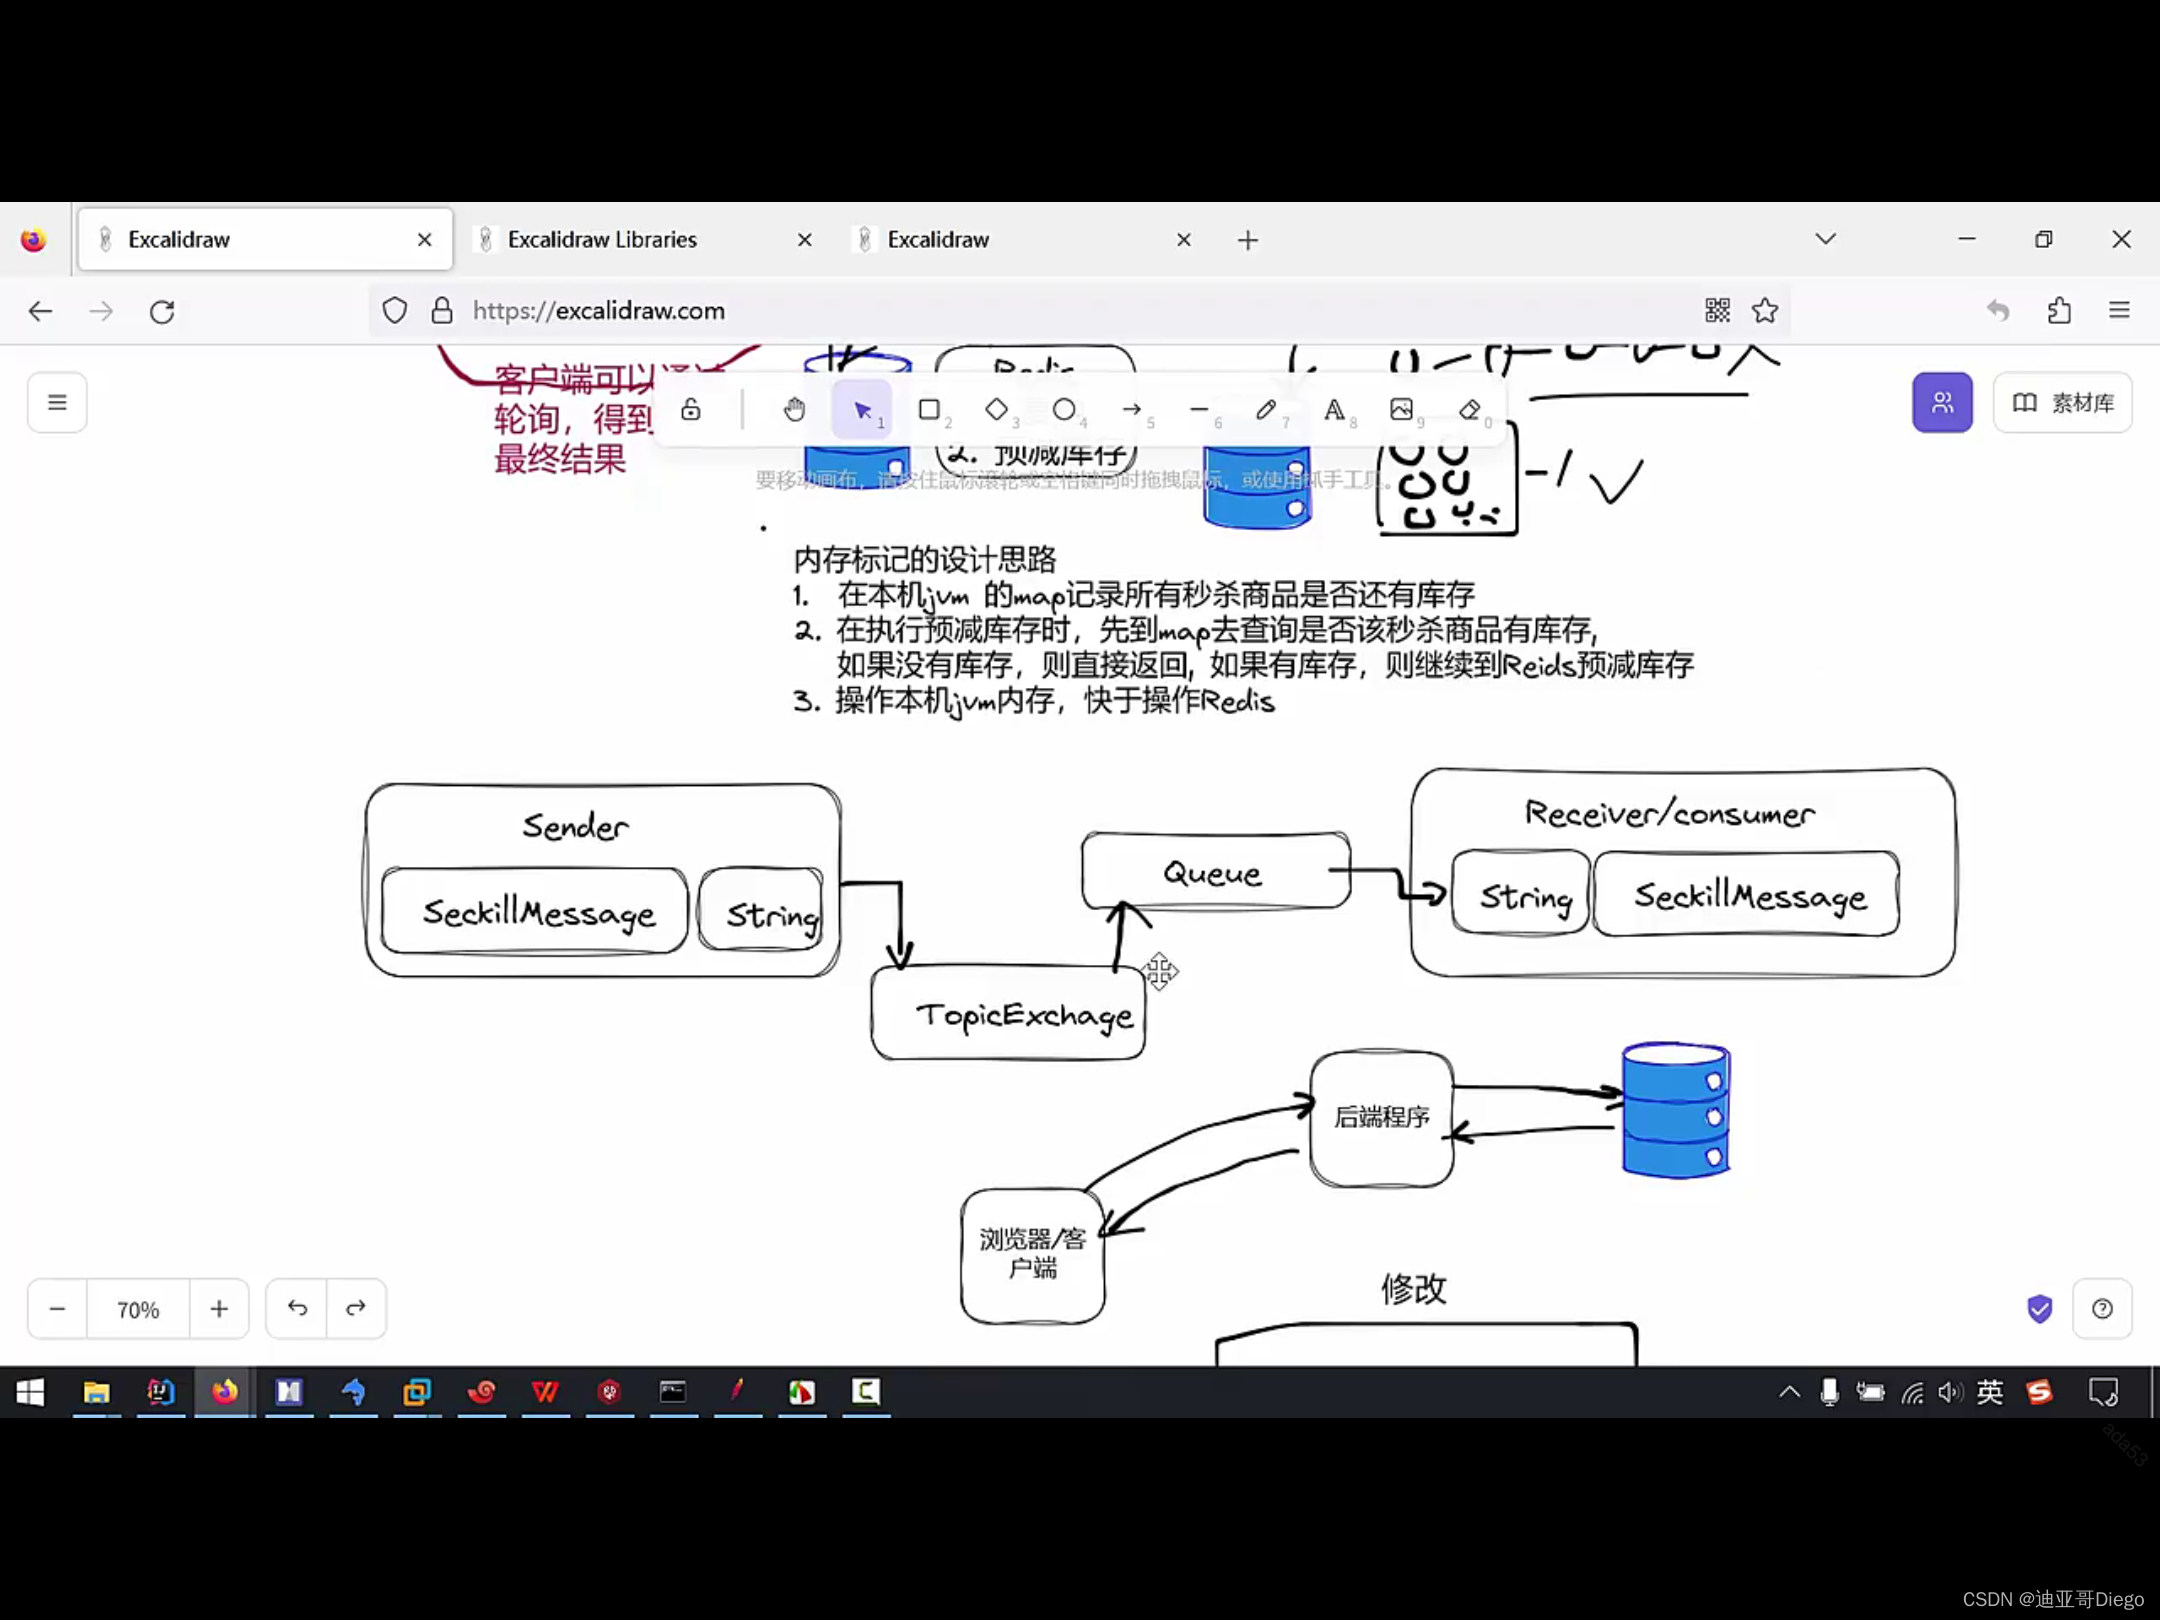
Create RabbitMQSeckillConfig
 @Configuration
 @Configuration
 public class RabbitMQSeckillConfig{


 // Define message queue and switch names.
 private static final String QUEUE = "seq
 private static final String QUEUE = "seckillQueue";

 private static final String EXCHANGE = "seckillExchange";


 // Create queue

 @Bean
 public Queue queue_skill(){ {Queue_skill
 public Queue queue_skill(){


 public Queue queue_skill()
 return new Queue(QUEUE);  public Queue_skill() {


 }


 // Create the switch

 @Bean

 public TopicExchange topicExchange_seckill(){


 public TopicExchange topicExchange_seckill() {
 return new TopicExchange(EXCHANGE);

 }


 // Bind the queue to the switch and specify the routing

 @Bean

 public Binding bingding_seckill(){


 return BingdingBuilder.bind(queue_seckill()).
 return BingdingBuilder.bind(queue_seckill()).

 to(topicExchange_seckill)).with("seckill.#").

 }


 }
Create message consumers and message producers
MQSenderMessage
 @Service

 MQSenderMessage{


@Resource
 @Resource
 private rabbitTemplate; @Resource
 private rabbitTemplate.


 // method:sendSecondsMessage

 public void sendSeckillMessage(String message){


 rabbitTemplate.convertAndSend
 rabbitTemplate.convertAndSend
 ("seckillExchange", "seckill.message",message);


 }


 }
MQReceiverMessage
 @Service

 MQReceiverMessage{


@ResoucreeperMessage{
 @Resoucre
 goodsService;
 goodsService.
 orderService; @Resoucre;
 orderService.


orderService;
 //Receive the message and complete the order.
 @RabbitListener(queues="seckillQueue")
 @RabbitListener(queues="seckillQueue")
 public void queue(queue)
 public void queue(String message){
 public void queue(String message){


 //Here the String is taken out from the queue, but it needs SeckillMessage(get parameter to sec).


 JSONUtil.toBean(message,SeckillMessage.class).var;.


 User user = seckillMessage.getUser(); // get user


 Long goodsId = seckillMessage.getGoodsId(); //Seconds' goods id


 goodService.findGoodsVoByGoodsId(goodsId); //Get GoodsVo from goods id.


 // Make an order.
 orderService.se
 orderService.seckill(user,goodsVo);


 }


 }
Modify SeckillController again
@Resource
MQSenderMessage; //assemble message producer
doSeckill{
// Grab, send second request to message queue, realize second asynchronous request
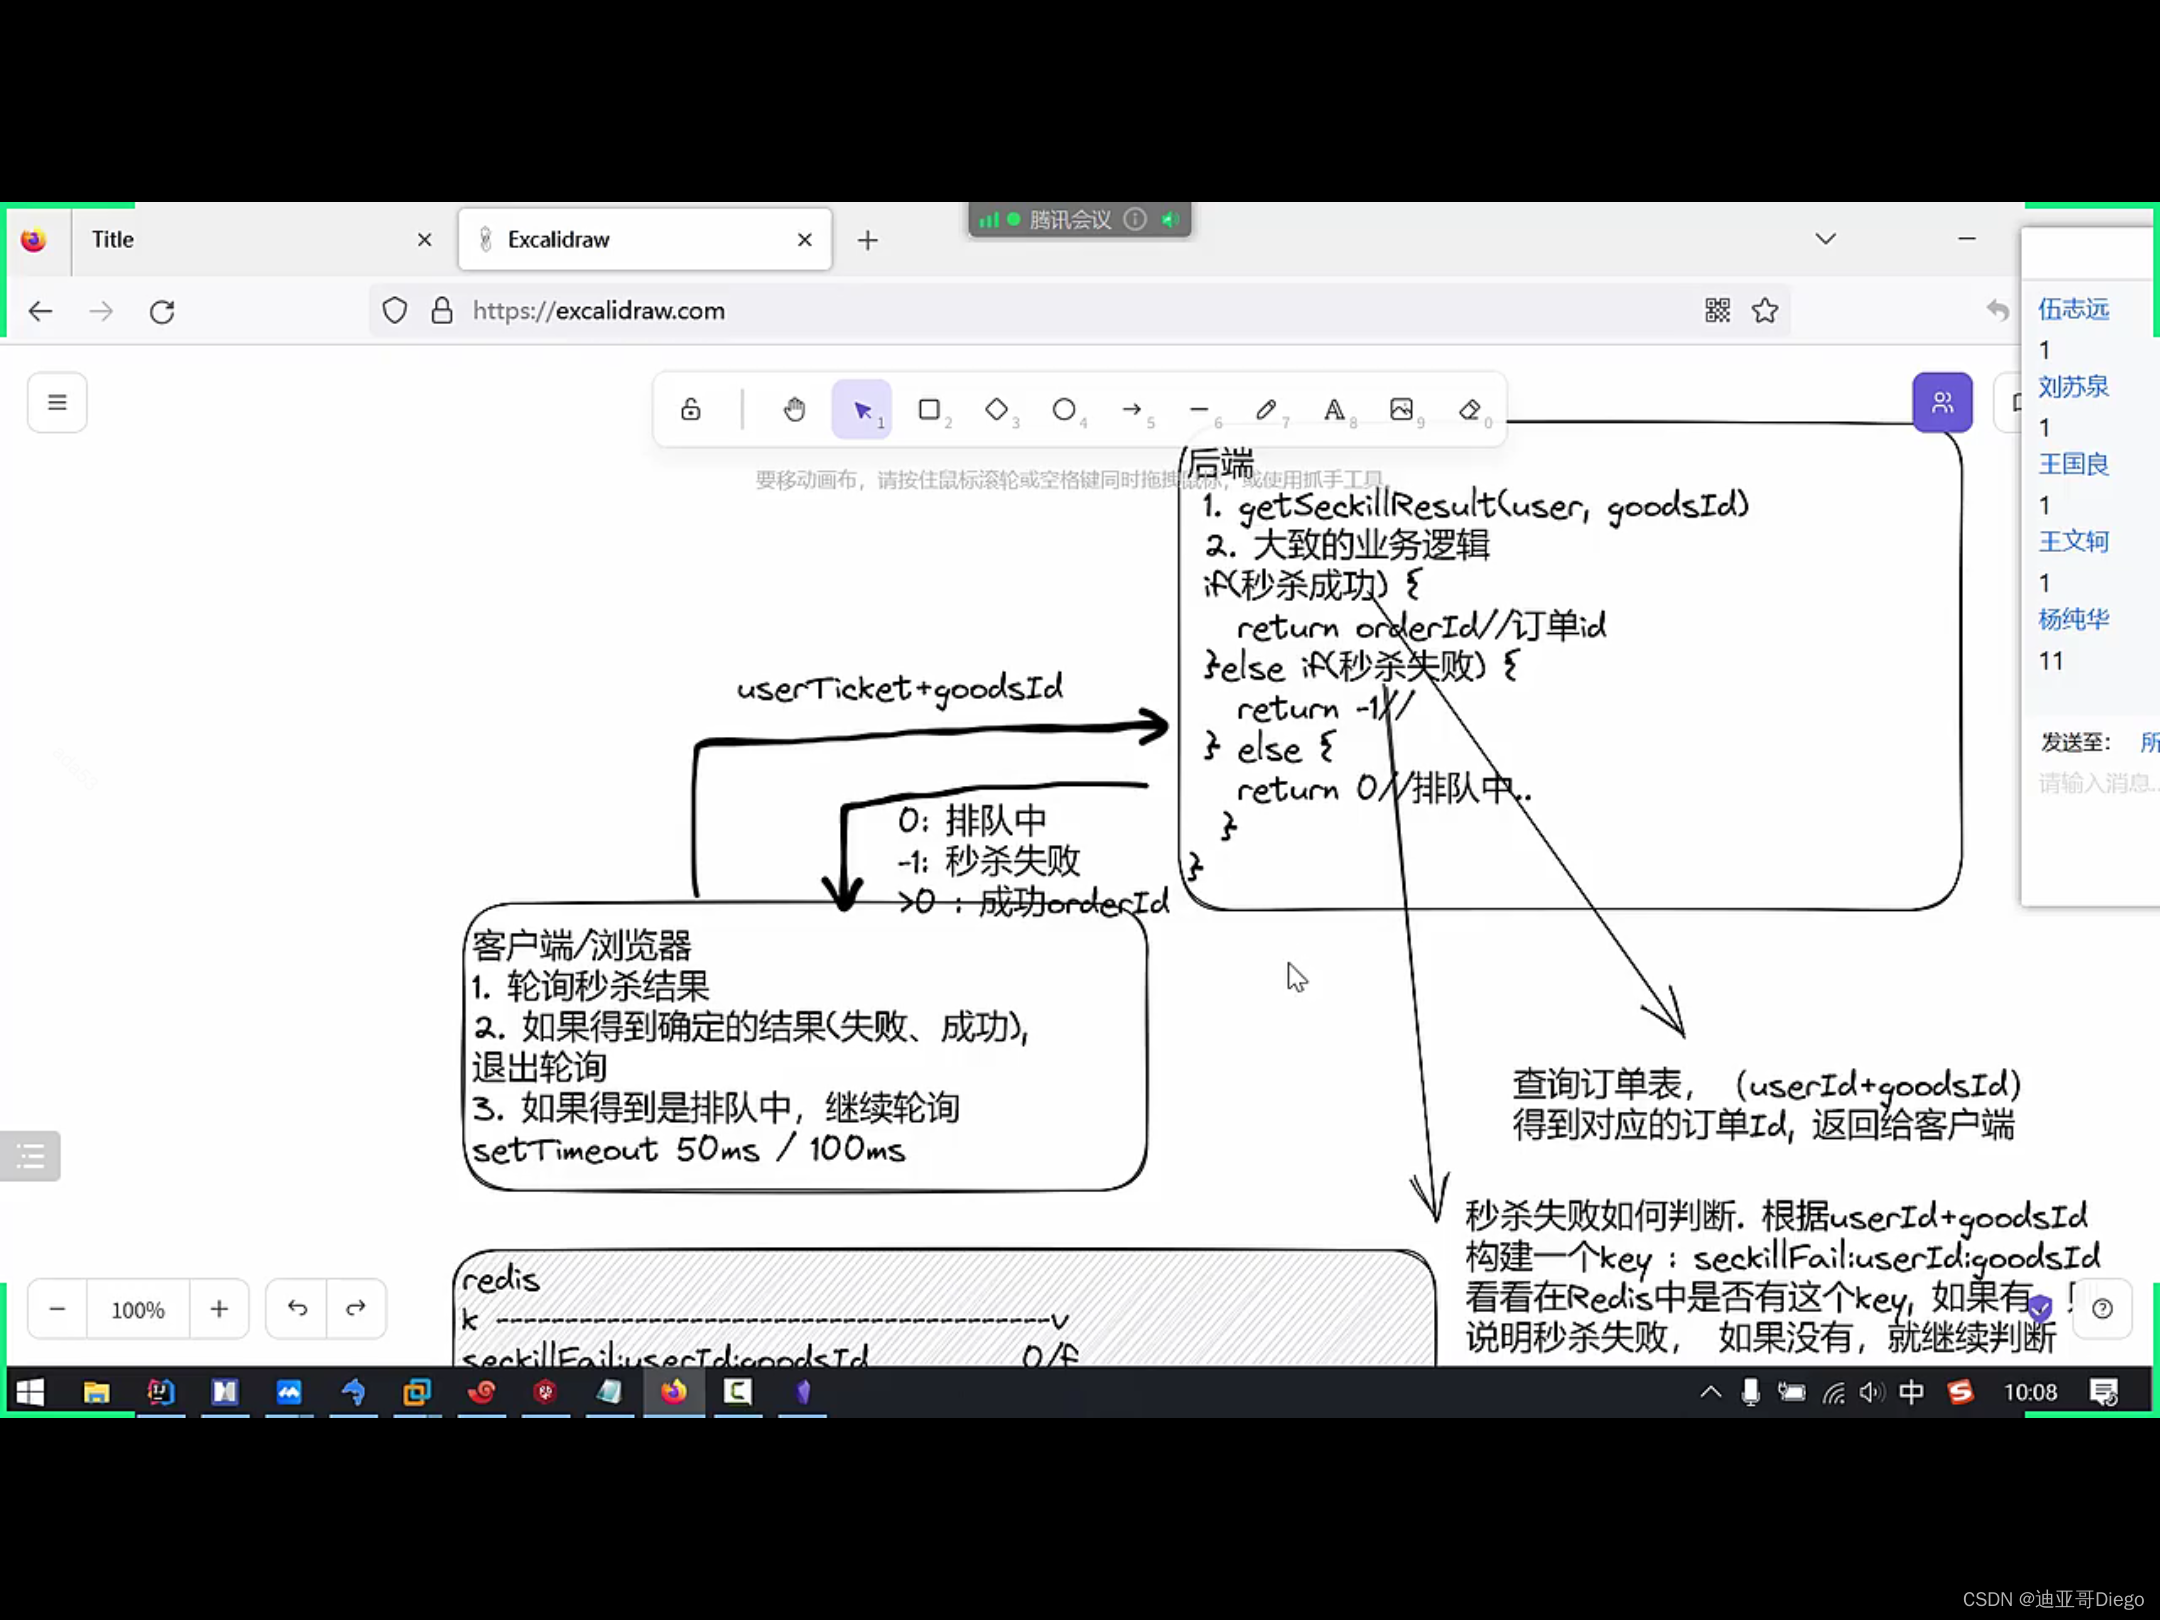
// We send a description message and return the result immediately (temporary), e.g.: in queue.
new SeckillMessage(user,goodid).var
Send the seckillMessage as a string.
mqSenderMessage.sendSeckillMessage(JSONUtil.toJsonStr(seckillMessage));
model.addAttribute("errmsg", "in queue"); >
return "seckillFail";
}
The front end then returns information based on the back end (you can write if you are interested, after all, the front end)
Flash safety
Previously, when we dealt with high concurrency, we handled it according to normal program logic, that is, users rush to buy normally, and the safety of rush buying must also be considered. The current rush buying interface is fixed. If it is leaked, there will be security risks. For example, if the rush buying has not been started or someone has finished using it, Script initiates panic buying
Therefore, it is necessary to hide the rush purchase interface
When the user rushes to buy, he first generates a unique buying path and returns it to the client. When the client rushes to buy, he will carry this buying path. The server will verify it and continue to the next step if it succeeds. Otherwise, it will return directly.

First add error information to ResponseBeanEnum
 REQUEST_ILLEGAL(500502, "Illegal request").

 SESSION_ERROR(500503, "User information is incorrect")

 SEK_KILL_WAIT(500504, "Exclusion in progress"). REQUEST_ILLEGAL(500502, "Illegal request").

 SESSION_ERROR(500503, "User information is incorrect")

 SEK_KILL_WAIT(500504, "Exclusion in progress").
Add methods to OrderService
 interface {


 // Method:Generate sec path (unique).

 String createPat(User user,Long goodsId).


 // Method:Checksum the path of seconds.

 boolean cherckPath(User user,Long goodsId,String path).


 }
Implemented in OrderServiceImpl
 String createPat(User user,Long goodsId){


 String path = MD5Util.md5(UUIDUtil.uuid()); //generate a random unique path


 RedisTemplate.opsForValue().set

 ("seckillPath: "+user.getId()")

 + ": "+goodsId,path,60.TimeUnitSECONDS); // Save to Redis and set the expiration time 60s


 return Path.


 }


 boolean cherckPath(User user,Long goodsId,String path){


 if(user !
 if(user ! = null || goodId <0 || StringUtils.hasText(path)){ //checksum
 return false; if(user !
 return false; //Check.
 return false; return false; return false.
 }


 // Take out the user path and check it again.


 String redisPath = (String) redisTemplate.opsForValue().

 get("seckillPath: "+user.getId())

 +":+"+goodsId,path);


 +": "+goodsId,path);
 return path.equals(redisPath);


 }
 @RequestMaping("/path")

 @ResponseBody
 @ResponseBody
 public RespBean getPath(User user,LOng goodsId){ //Get the path of the sec.


 if(user == null || goodId < 0 ){ //checksum
 return RespBean
 return RespBean.error(RespBeanEnum.SESSION_ERROR);

 }

 String path = orderService.createPath(user,goodsId);

 return RespBean.success(path);


 }
Modify the doSeckill method of SeckillController
 @RequestMapping("/{path}/doSeckill") // bring in path directly for validation

 @ResponseBody
 @ResponseBody
 public RespBean doSeckill(User user,Long goodsId,@PathVariable String path){


 if(user == null){

 reutrn RespBean.error(RespBeanEnum.SESSION_ERROR).

 }


 boolean b = orderService.checkPath(user,goodsId,path); //Here the path is checked.


 if(!b){ // Check failed.
 return RespBean.checkPath(user,goodsId,path)
 return RespBean.error(RespBeanEnum.REQUST_ILLEGAL);

 }


 ... // Change the previous return page to Return Error Message (RespoBeanEnum).


 }
Improve front-end page
Verification code to prevent script attacks
In some rush buying activities, script attacks can be prevented through verification codes, such as 12306
Use verification code happy Captcha
Website: https://gitee.com/ramostear/Happy-Captcha
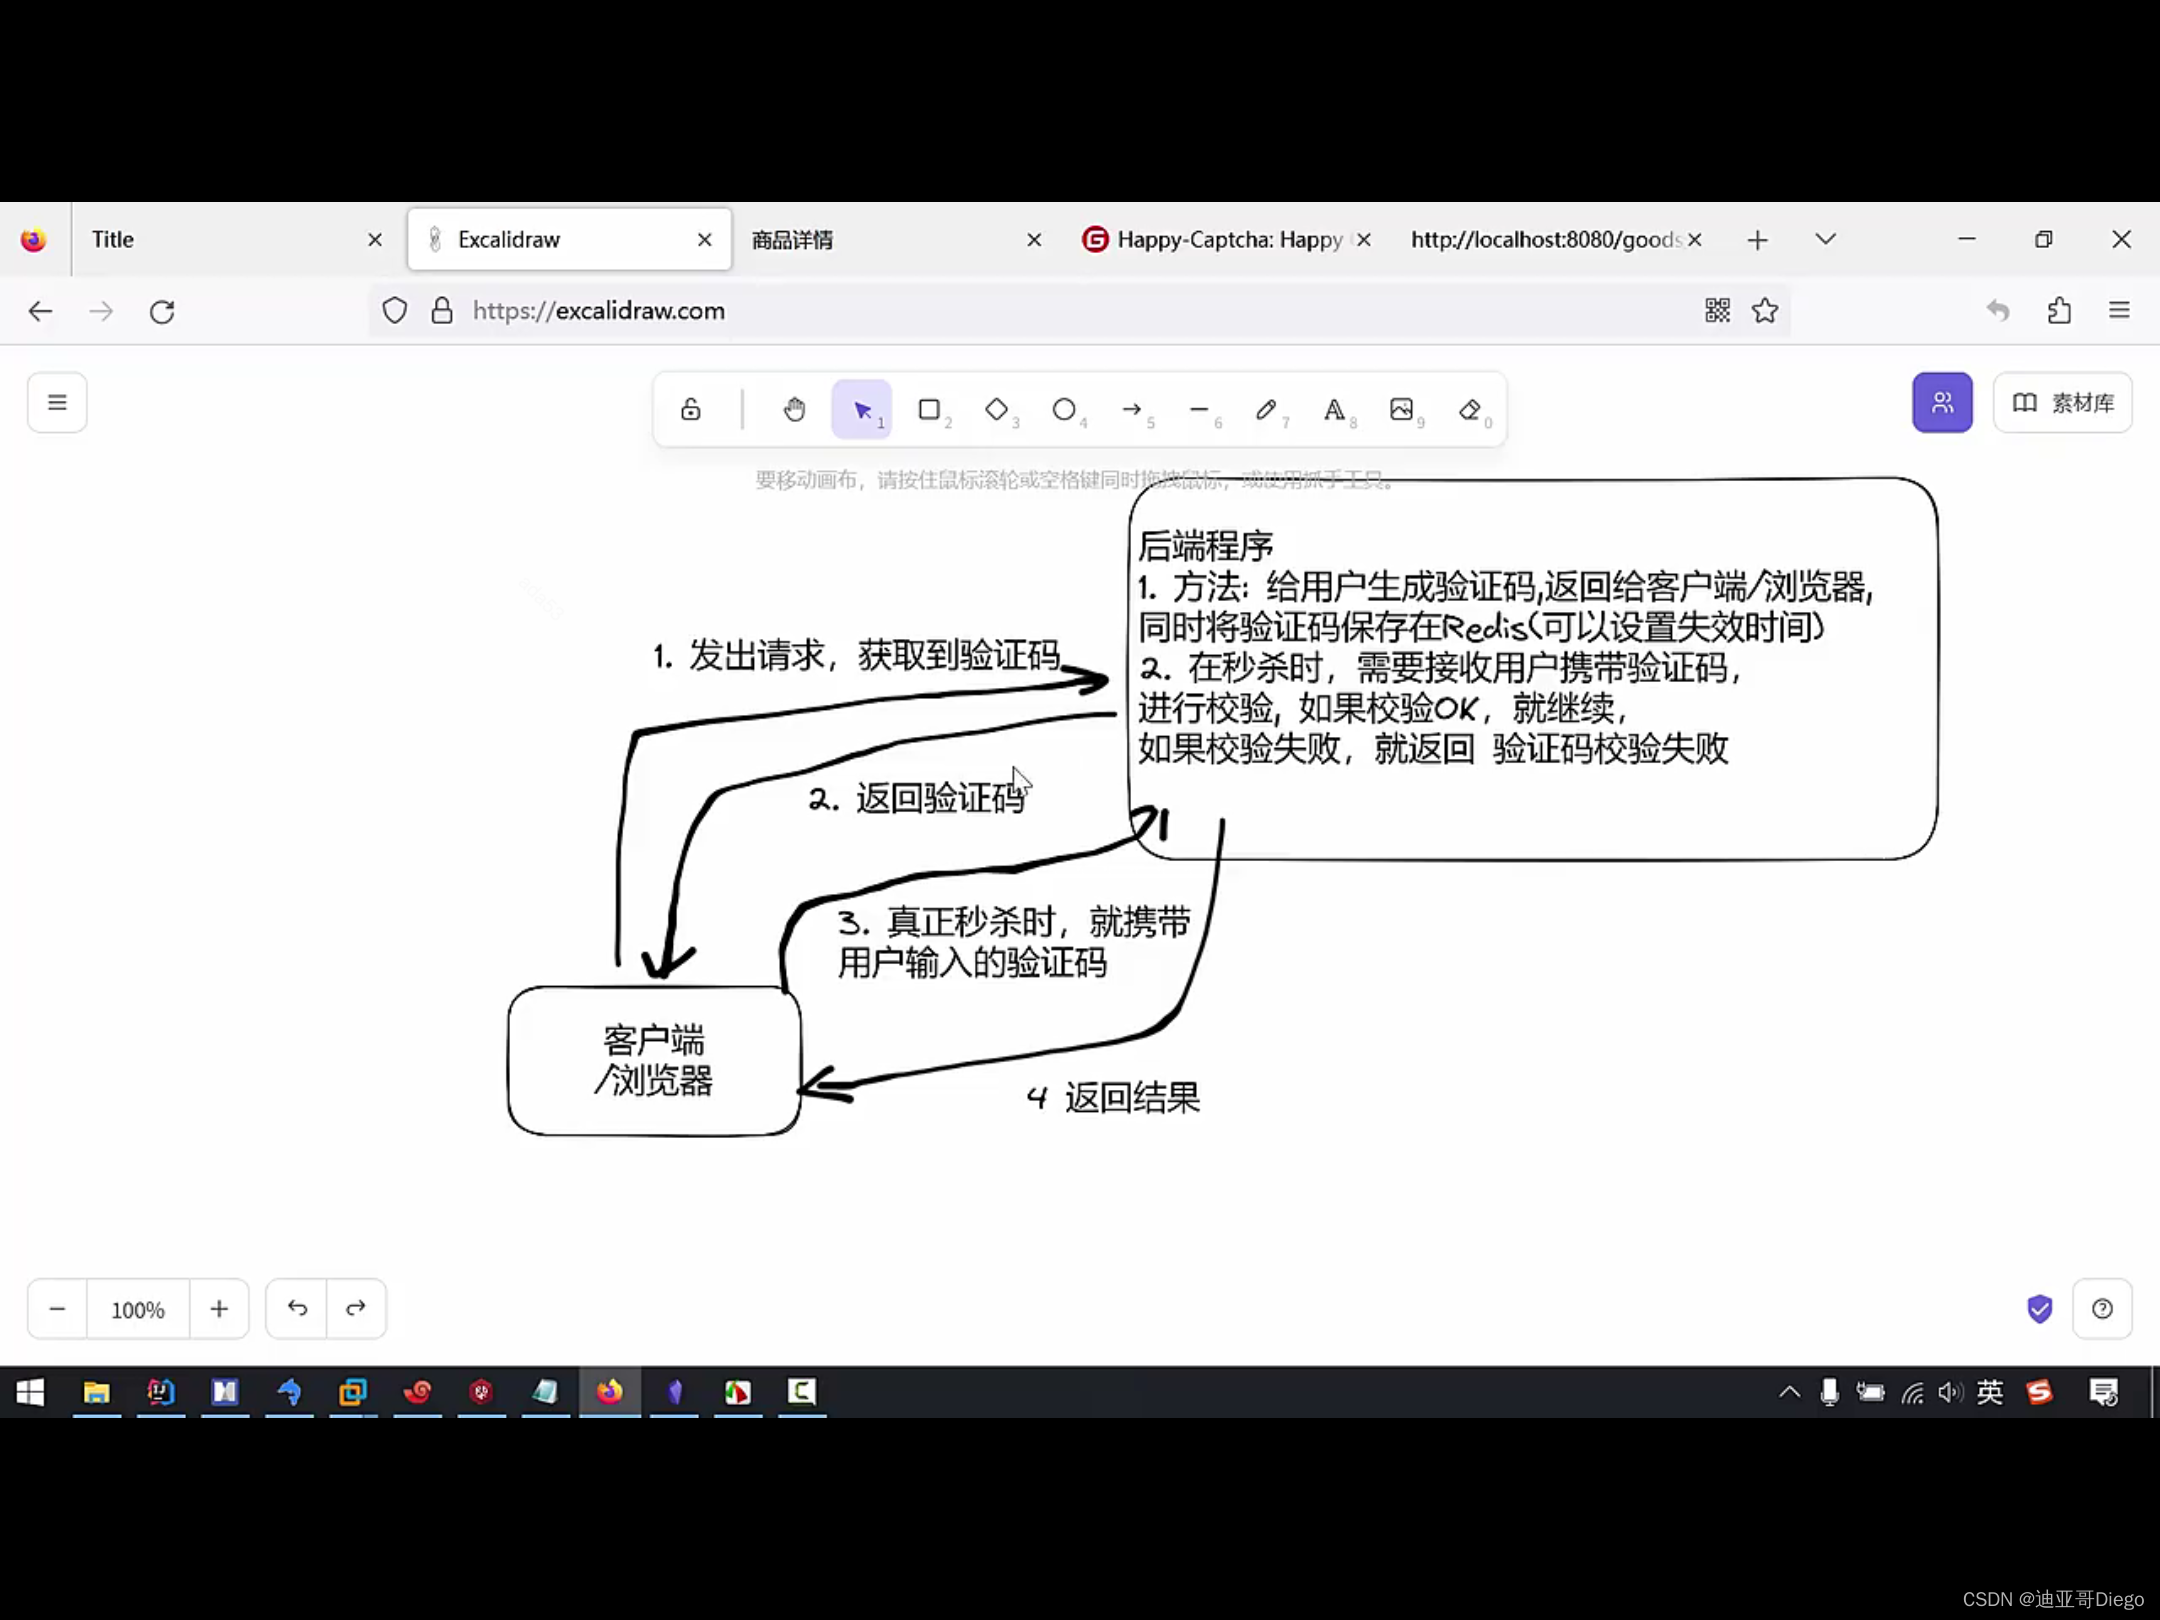
Verification code code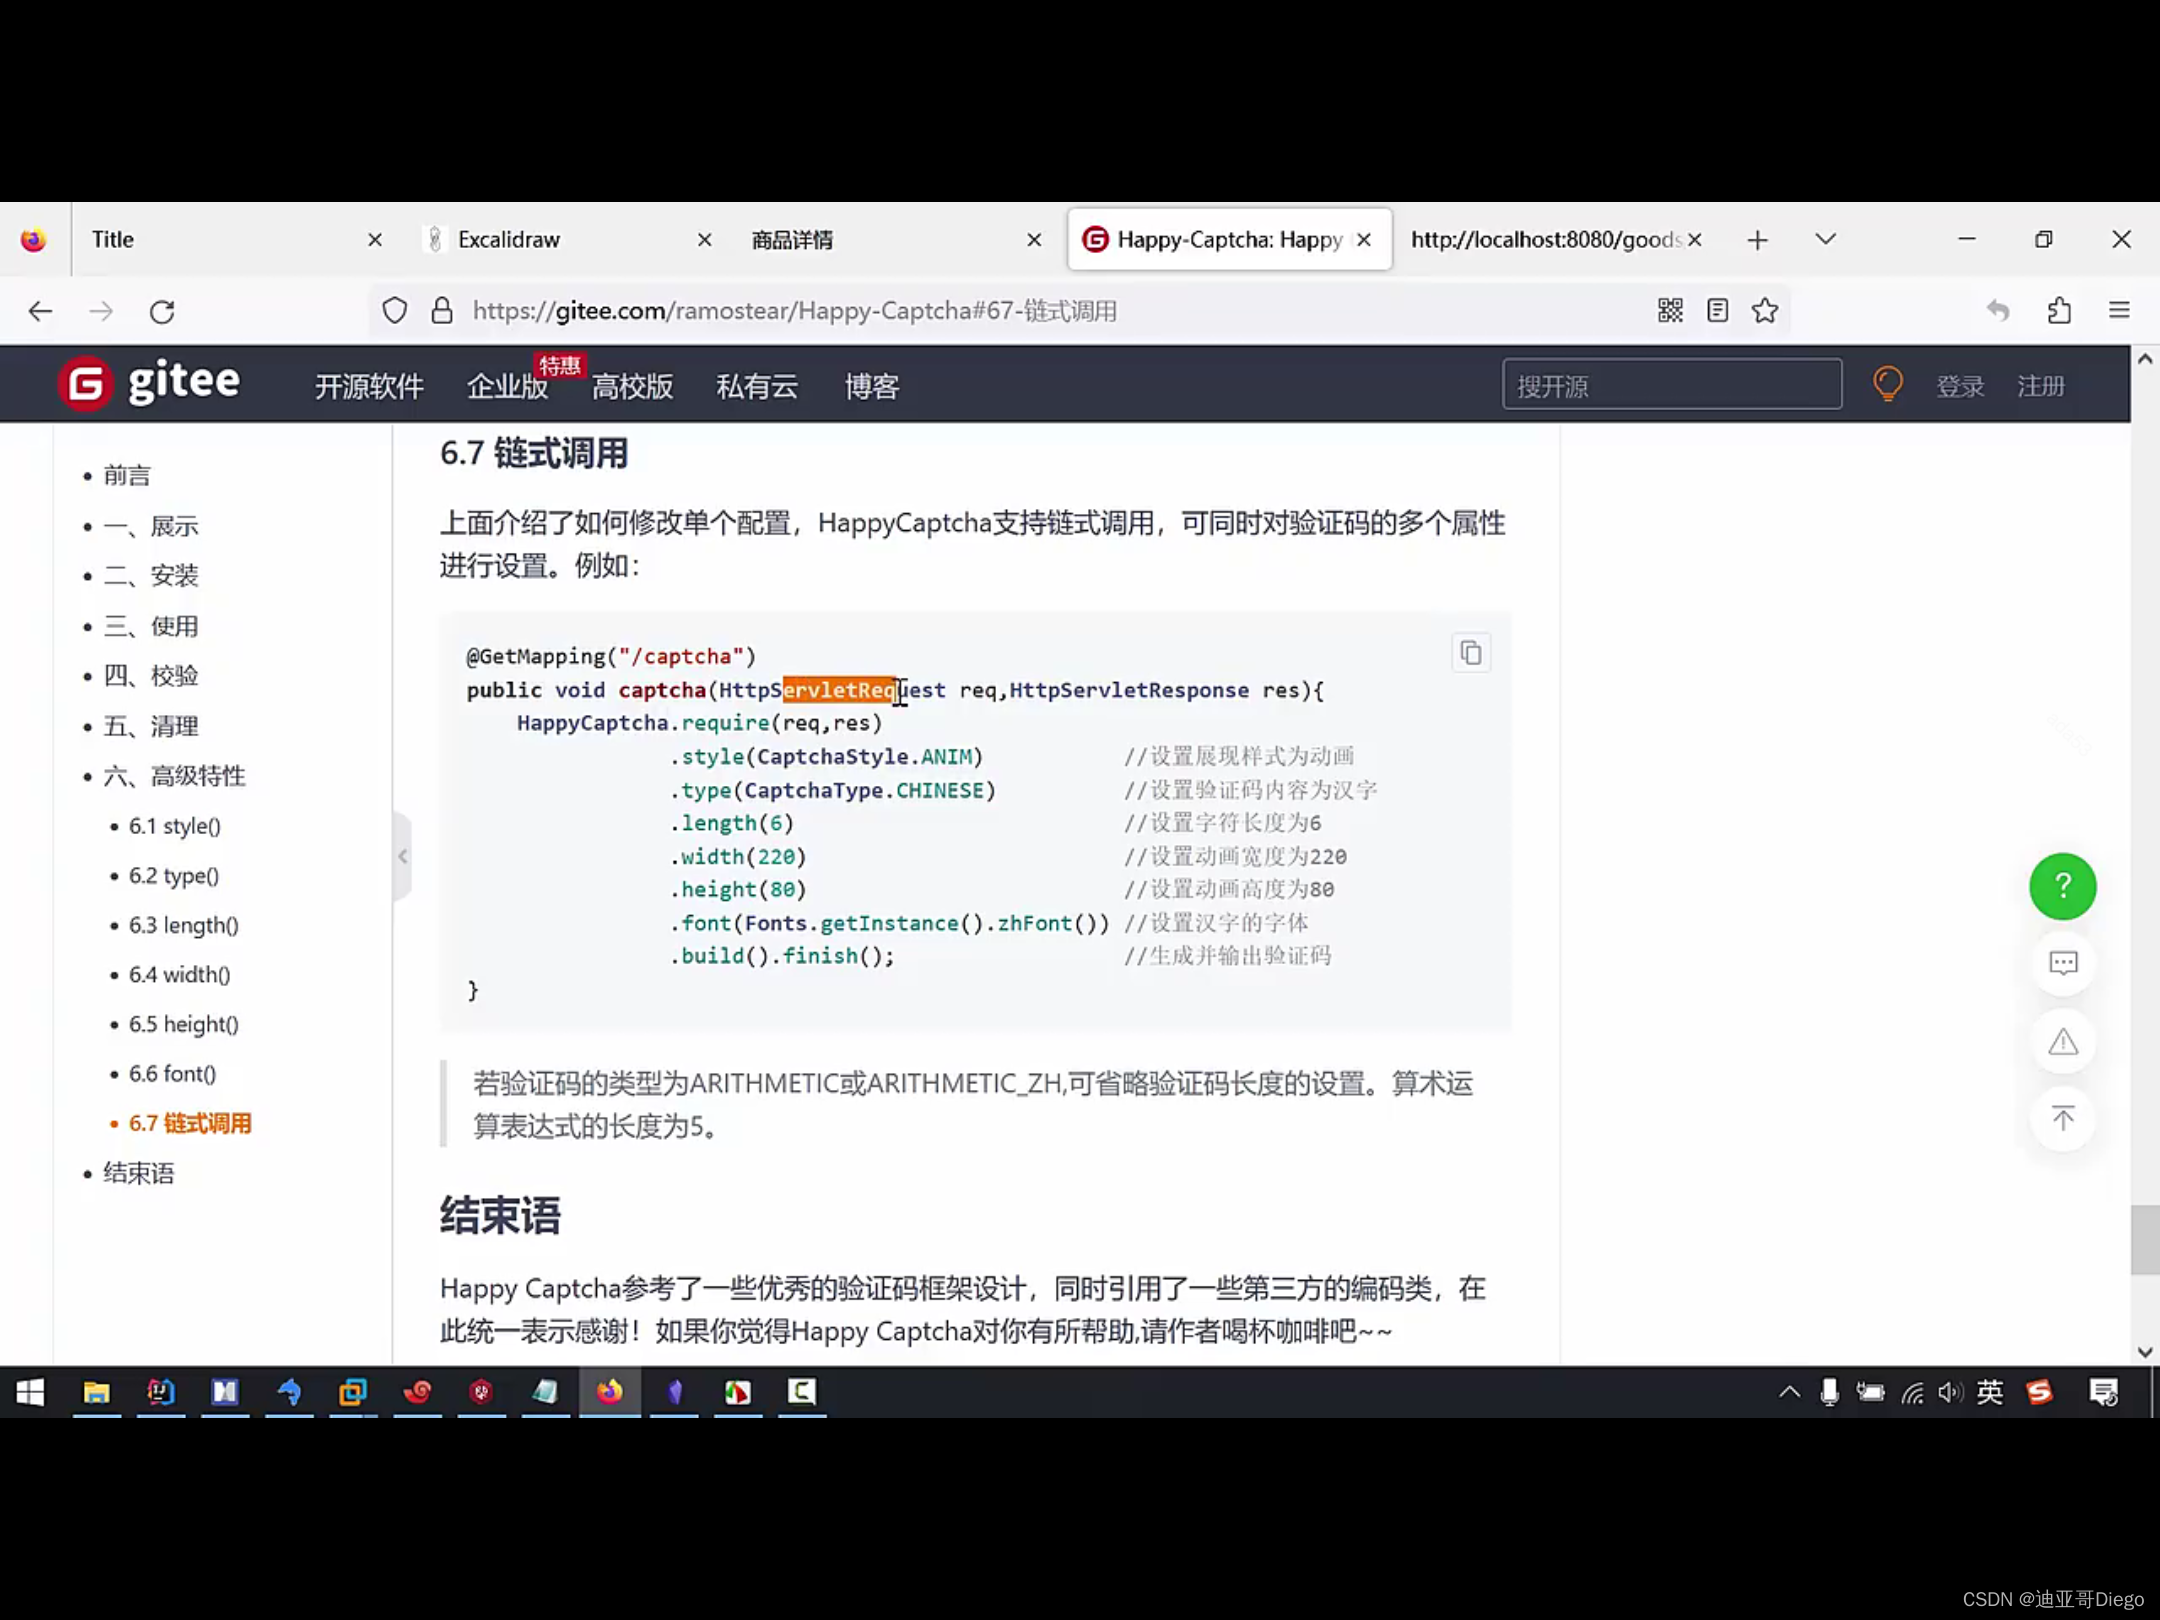
Add in SeckillController
 @RequestMapping("/captcha")
 public void happyCaptcha(request,response,user){
 public void happyCaptcha(request,response,user){


 ... // Generate the code of the captcha, the official website has


 //ps: the code is stored in session by default, the key is happy-captcha.


 redisTemplate.opsForValue().set("captcha: "+user.getId()+": "+goodsId,").

 (String) request.getSession().getAttribute("happy-captcha"),30,Tim...) ;


 // Take the captcha from session and put it into Redis.


 }
Add verification method to OrderService
boolean checkCaptcha(User user,Long goodsId,String captcha);
implemented in impl
     boolean checkCaptcha(User user,Long goodsId,String captcha){


         if(user == null || goodsId <0 || !StringUtils.hasText(captcha)){


                 return false;

         }


         // Fetch CAPTCHA from Redis

         String redisCaptcha= (String) redisTemplate.opsForValue().

                             get("captcha:"+user.getId()+":"+goodsId);


         return captcha.equals(redisCaptch);


     }
//Because a flash sale is required when obtaining the flash sale path (mentioned above), the verification code method can be added there.
In SeckillController
 getPath(... .String captcha){


String captcha){
 if(user == null || goodsId <0){


 ...

 }


 // Add a business logic - verify that the CAPTCHA entered by the user is correct.
 boolean check = orderService.
 boolean check = orderService.checkCaptcha(user,goodsId,captcha);


 if(!check){ //Captcha failed to check.
 if(!check){ //Captcha failed.
 return RespBean.error(RespBeanEnum.CAPTCHA_ERROR);

 }


 // CAPTCHA validation is successful then continue down the validation spike path

 String path = ...


 }
Improve front-end page
Flash Interface Current Limiting-Anti-Brush
That is, if you keep clicking on the rush purchase prompt message "Visit too frequently, please visit again."
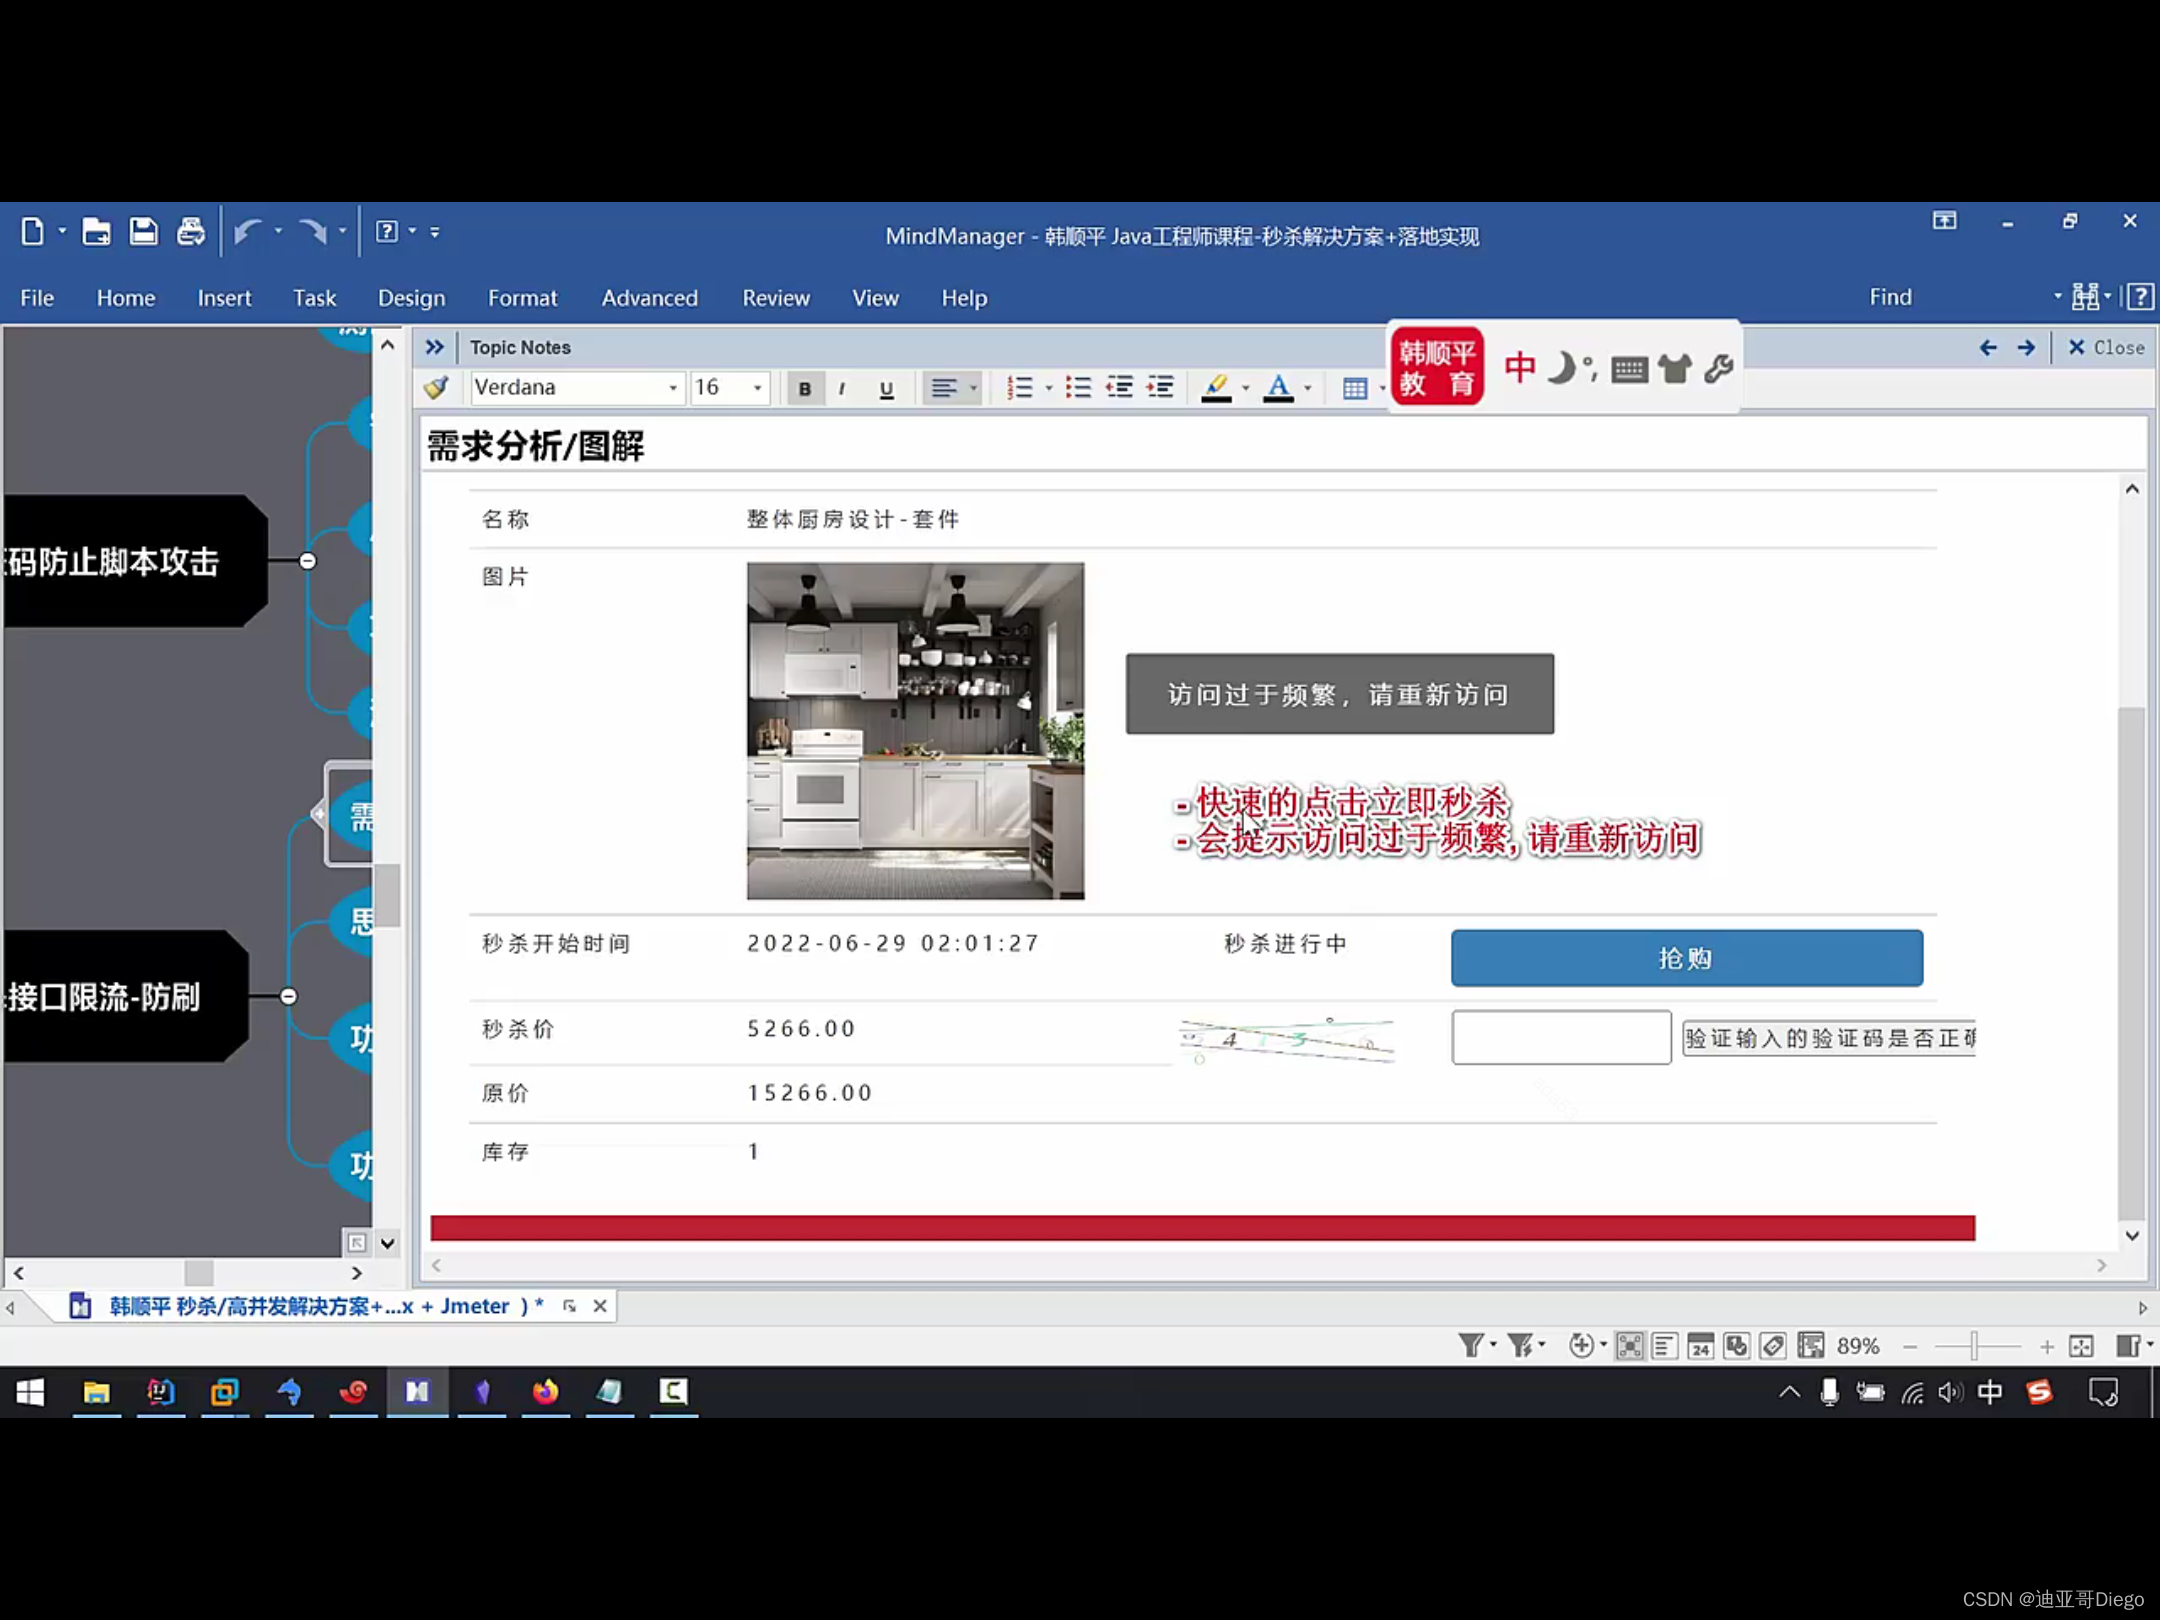
Idea analysis
Because the flash sale path (getPath) must be called first during the flash sale, you can limit the current flow of this method.
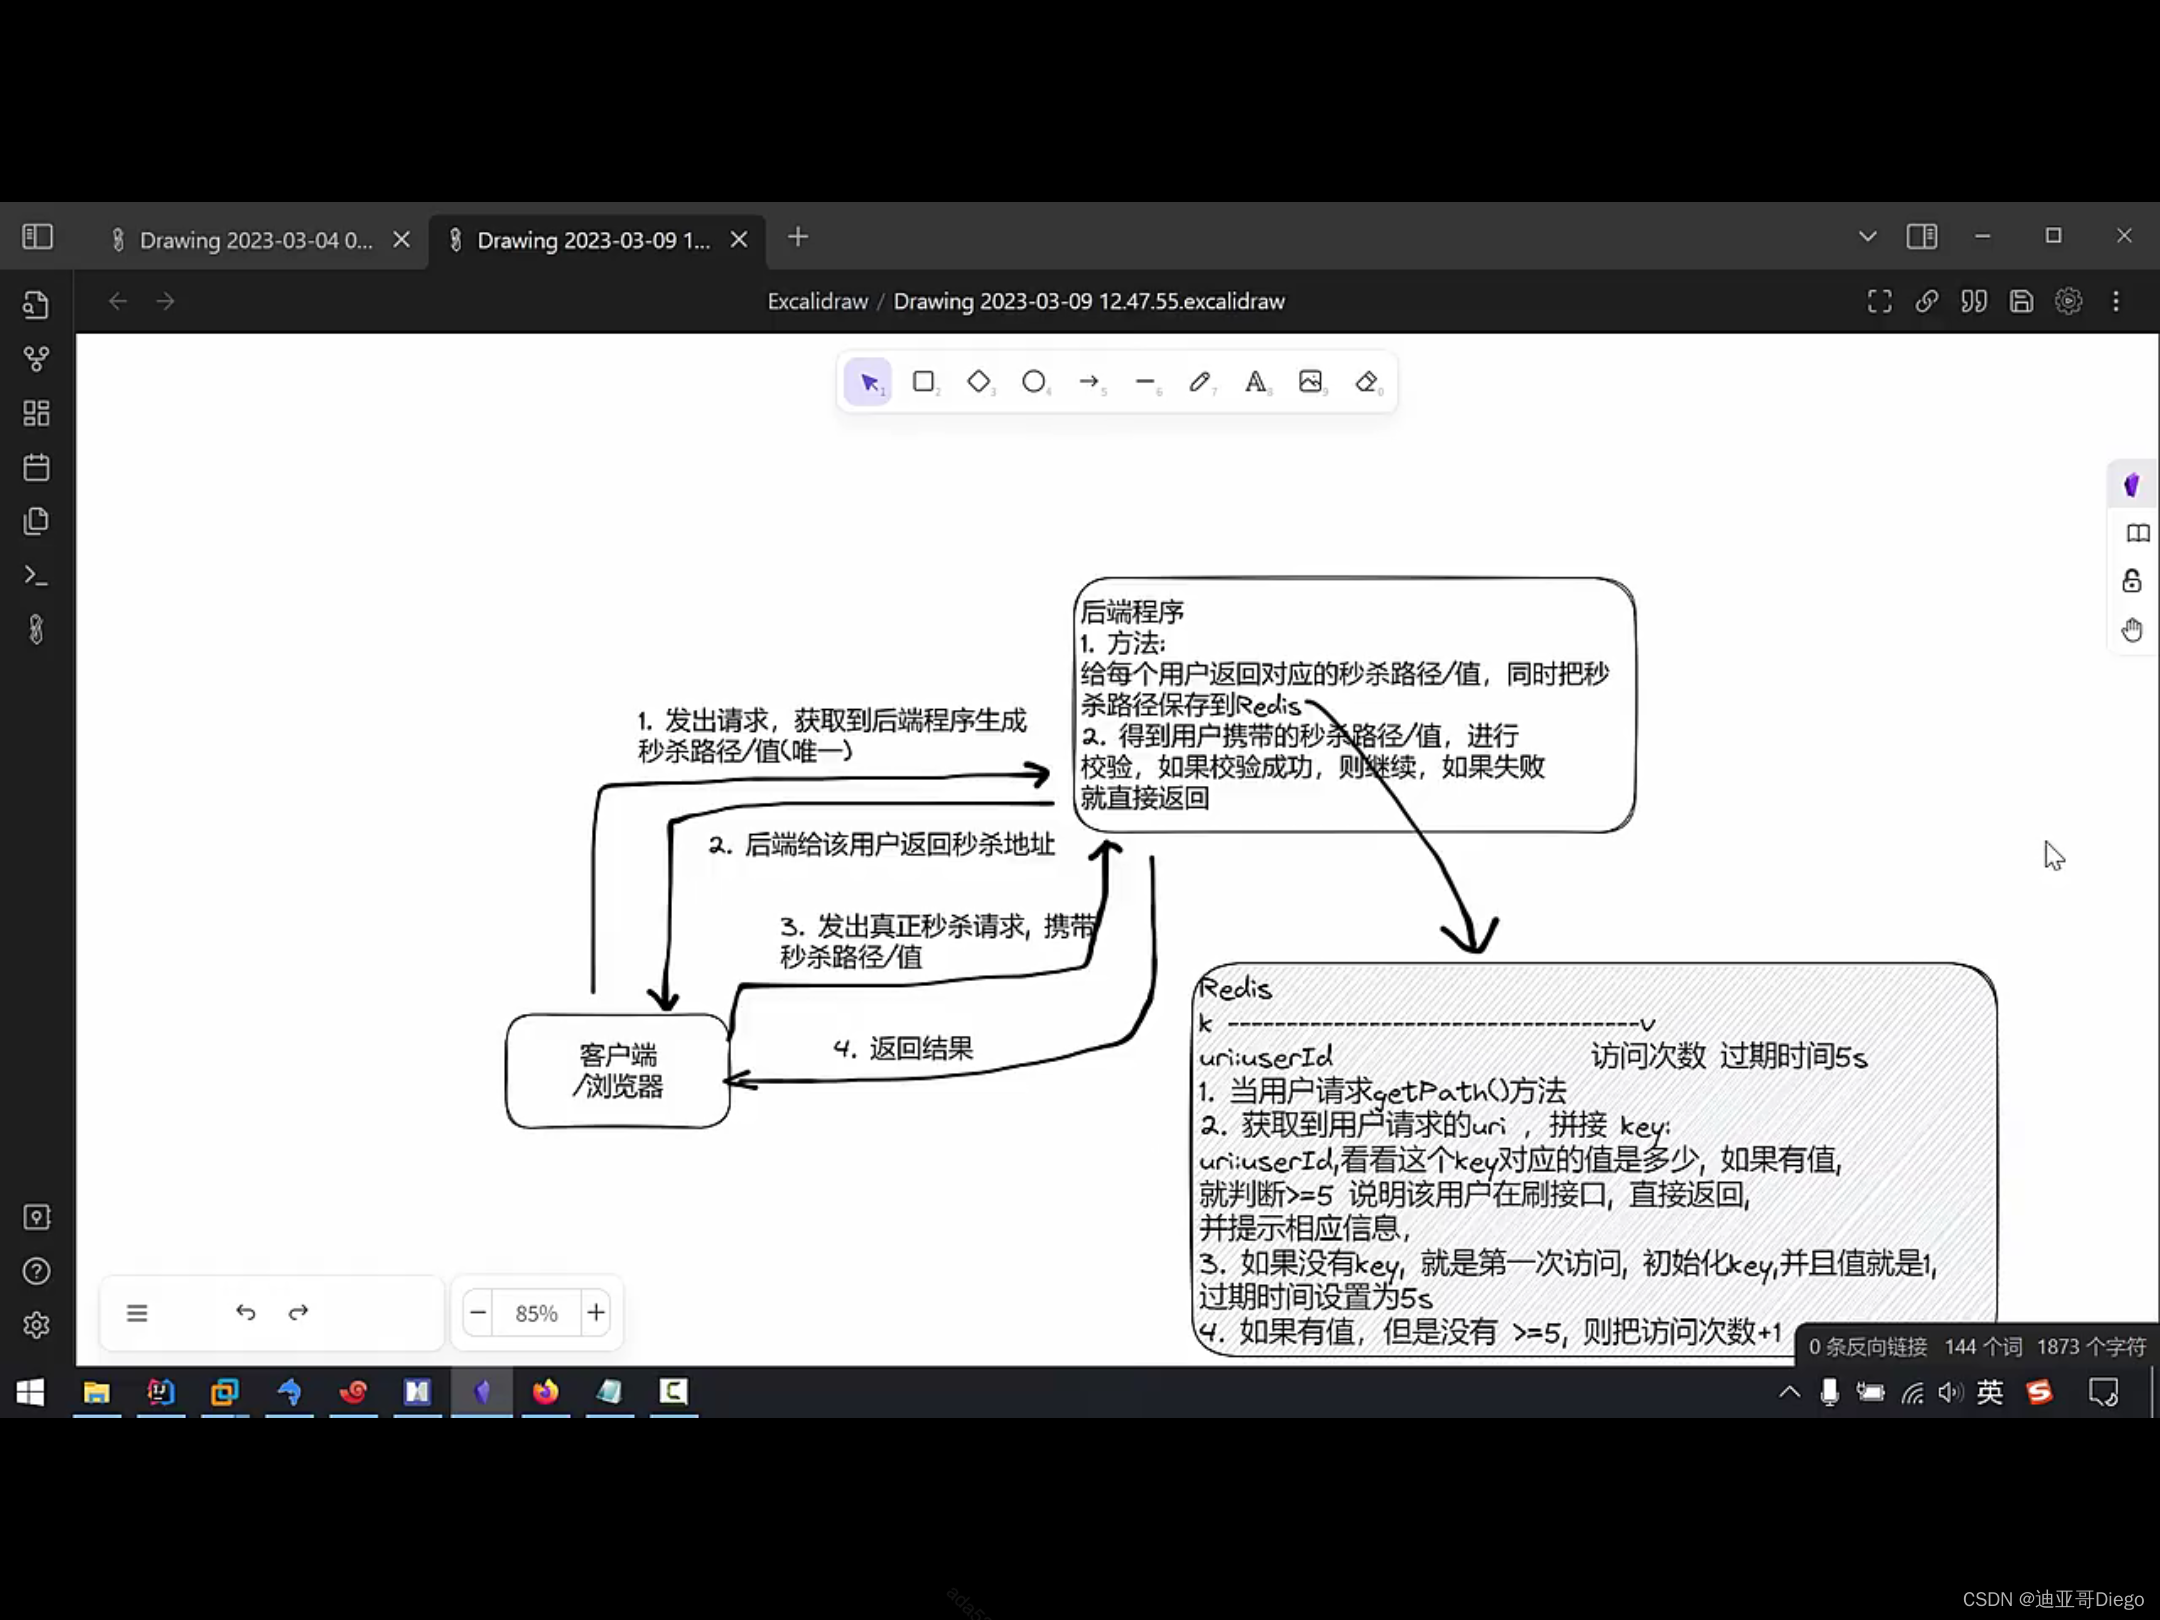
Modify the getPath method of SeckillController
 getPath(...) {


 // Increase the Redis counter to finish limiting the flow to users

 If the number of accesses exceeds 5 in 5s, it is a brushed interface


 String uri = request.getRequestURI(); //Here is /path for localhost:8080/sekill/path


 ValueOperation valueOperations = redisTemplate.opsForValue();


 Integer count = (Integer) valueOperations.get(uri+": "+user.getId());


 if(count == null){ // state that there is no such key


 //Initialize key with value 1 and expire in 5 seconds.
 // Initialize key with value 1 and expire in 5 seconds.
 valueOperations.set(uri+": "+user.getId(),1,5,TimeUnit...) ;


 }else if(count < 5){


 valueOperations.increment(uri+": "+user.getId()); // add 1 if there is and less than 5


 }else{


 return RepBean.error(RespBeanEnum.ACCESS_LIMIT_REACHED); //Error if you swipe the interface.


 }


 }
However, this current limit is not very versatile and needs to be improved. The modified method can be encapsulated into annotations. Annotations can be added wherever needed.
Custom annotation @AccessLimit
 @Retention(RetentionPolicy.RUNTIME) // This annotation specifies that the modified annotation is retained at runtime.

 @Target(ElementType.METHOD) // This annotation specifies that the modified annotation can be applied to the method.

 public @interface AccessLimit{


 public @interface AccessLimit{
 int second(); //time range
 int maxCount(); //AccessMaxCount()
 int maxCount(); //Access maximum value
 boolean needLogin() default true
 boolean needLogin() default true //Whether to log in or not.
 boolean needLogin(); default true //Is logged in.

 boolean needLogin() default true //Is logged in
 }
Then it can be used in getPath()
@RequestMapping("/path")
@AccessLimit(second = 5,maxCount = 5,needLogin = true)
getPath(...){}
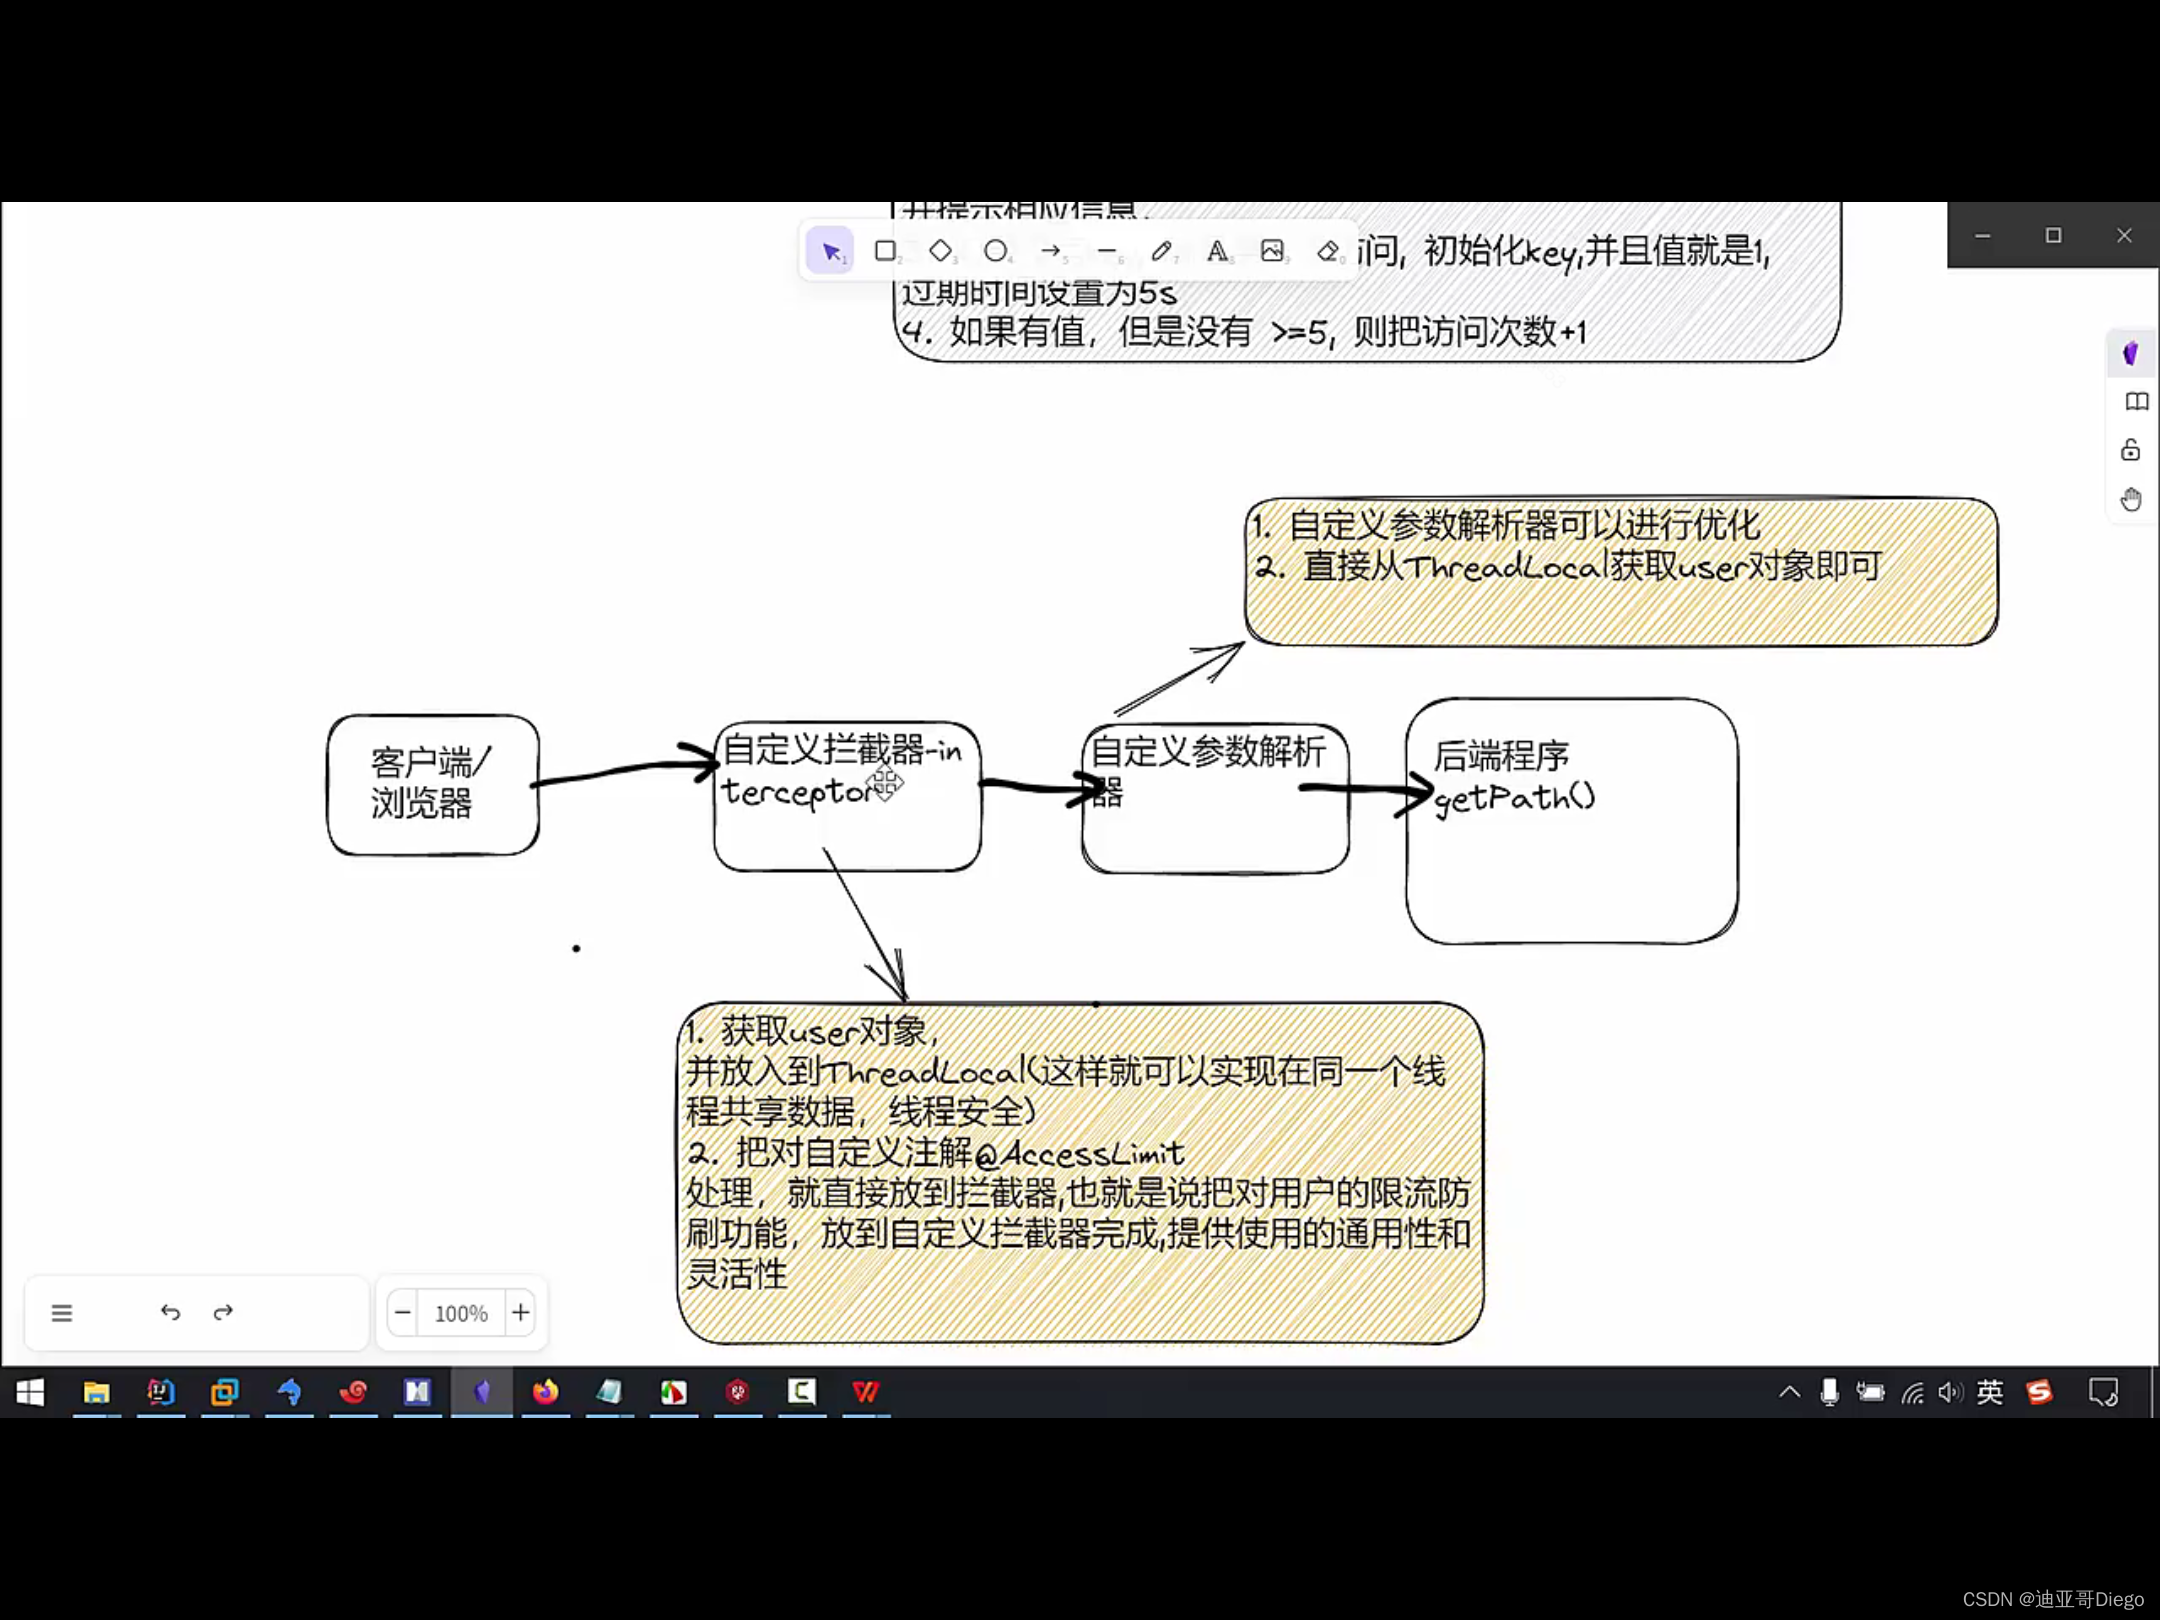
// Use of annotated brushproofing improves versatility and flexibility
This alone is just a comment and has no effect on its own.
Added UserContext similar tool class
     UserContext{


         //Each thread has its own ThreadLocal, where it puts shared data to ensure thread safety.

         private static ThreadLocal<UseruserHolder = new ThreadLocal();


         pulic static void setUser(User user){


             userHolder.set(user);

         }


         pulic static User getUser(){


             return userHolder.get();

         }


     }
Finally, we need a custom interceptor AccessLimitInterceptor
     @Compoent

 AccessLimitInterceptor implements HandlerInterceptor {


 // Assemble the component first
 userService,redisTemplate
 userService,redisTemplate
//Assemble the components first.


 // This method gets the User object and puts it into ThreadLocal to handle the @Accesslimit.


 @Override
 public boolean pre
 public boolean preHandle(request,response){

 if(handler instanceof HandlerMethod){
 if(handler instanceof HandlerMethod){
 User user = getUser(request,response);
 User user = getUser(request,response);
 UserContext.setUser(user); // store to Threadlocal, it says


 // Now handle @Accesslimit

 HandlerMethod hm = (HandlerMethod) handler; //handler to HandlerMethod


 accessLimit accessLimit =

 hm.getMethodAnnotation(AccessLimit.class); // get the annotation of the target method


 hm.getMethodAnnotation(AccessLimit.class)
 if(accessLimit == null){ // If the target method does not have @A... That means the interface doesn't handle flow limiting
 return true; // If the target method does not have @A..
 return true;

 }


 int second = accessLimit.second()
 int second = accessLimit.second(); // get the value of the annotation
 int maxCount = accessLimit.maxCount(); // Get the value of the note.
 int maxCount = accessLimit.maxCount(); // Get the value of the annotation.

 boolean needLogin = accessLimit.needLogin(); >


 if(needLogin){ //State that the user must be logged in to access the target method.
 if(user == user.needLogin)
 if(user == null){
 if(user == null){
 return false; //The process stops here.
 return false; // The process stops here.
 }

 }


 // This is the method from getPath.


 String uri = request.getRequestURI();

 // This is /path for localhost:8080/sekill/path.


 String key = uri+": "+userId();


 ValueOperation valueOperations = redisTemplate.opsForValue();


 Integer count = (Integer) valueOperations.get(key);


 if(count == null){ //Indicate that there is no such key.


 //Initialize key with value 1 and expire in 5 seconds.
 // Initialize key with value 1, expiration time 5 seconds.
 valueOperations.set(key,1,second,TimeUnit...) ;)


 }else if(count < maxCount){


 valueOperations.increment(uri+": "+user.getId()); // add 1 if there is and less than 5


 }else{


 return false //Click the interface to get an error.
 return false //Error if interface is swiped.


 }


 }


 }


 // Write a separate method to get the userTicket of user object (this thing is put in Cookie), convenient to use above.
 private User getUser
 private User getUser(request,response){

 String ticket = CookieUtil.getCookieValue(request, "userTicket");


 if(!StringUtils.hasText(ticket)){ //Indicate that no user is logged in and return null.
 if(!StringUtils.hasText(ticket))
 return null; // If there is no user logged in, return null.
 return null; return null; return null; return null; return null
 }
 return userService.
 return userService.getUserByCookie(ticket,request,response);


 }


 }
Assemble to Webconfig
     WebConfig{


         @Resource

         private AccessLimitInterceptor accessLimitInterceptor;


         @Override

         public void addInterceptors(InterceptorRegistry registry){


             registry/addInterceptor(accessLimitInterceptor);    //Register the interceptor to take effect

         }


     }
Redis distributed lock (discussed in the Redis chapter)
The decrement method of Redis in this project is atomic and isolated, and the update method of Mysql also has the function of locking rows (executing one by one), so it can effectively control rush buying and not oversell, but if the project is complex; if a Redis set operation is required Even if you modify the DB or file, you will need Redis distributed lock to expand the isolation range.
If there is no decrement method
 SeckillController{


 //Get a uuid as the value of the lock

 String uuid = UUID.randomUUID().toString();

 boolean lock = redisTemplate.opsForValue().setIfAbsent("lock",uuid,3,Time...) The following is an example of how to do this.


 if(lock){ // Acquired lock successfully.


 // Perform the minus 1 business operation.

 Long decrement = redisTemplate.opsForValue().decrement(...) ;

 ...


 // Release the lock redis+lua script (written below).

 redistTemplate.execute(redisScript,Arrays.asList("lock"),uuid);


 } else{ // Failed to fetch.


 model.addAttribute("errmsg",RespBeanEnum.SEC_KILL_RETRY.getMessage());


 return "secKillFail"; // return error page


 }


 }
lock.lua script file
	if redis.call('get',KEYS[1]) == ARGV[1] then    // Compare the incoming UUIDs for consistency.

      return redis.call('del',KEYS[1])

     else return 0

     end
RedisConfig
	//Addition of execution scripts

     @Bean

     public DefaultRedisScript<longscript(){


         DefaultRedisScript<longredisScript = new DefaultRedisScript();


         // Set the location of the lua script to be executed, and place the lock.lua file in the resources directory.

         redisScript.setLocation(new ClassPathResource("lock.lua"));

         redisScript.setResultType(Long.class);

         return redisScript;


     }