Getting started with Playwright and how to use it
Getting started with Playwright and how to use it
For introduction to Playwright , please refer to another blog for Playwright usage guide.
This blog is the official website of Playwright : The translation hopes to allow readers to quickly understand what Playwright can be used for and how to use it. Some professional terms may not be translated accurately.
Article directory
- 1. Getting Started
-
- 1.1 Installation
-
- 1.1.1 Add Example Test Add example test
- 1.1.2 Running the Example Test Running the example test
- 1.2 Writing Tests Writing Tests
-
- 1.2.1 Assertions Assertions
- 1.2.2 Locators
- 1.2.3 Test Isolation Test isolation
- 1.2.4 Using Test Hooks Using test hooks
- 1.3 Running Tests Running tests
-
- 1.3.1 Running Tests Running tests
- 1.4 Test Generator Test Generator
-
- 1.4.1 Running Codegen
- 1.5 Trace Viewer Trace Viewer
-
- 1.5.1 Recording a trace Recording trace
- 1.5.2 Opening the trace Opening the trace
- 1.5.3 Viewing the trace Viewing the trace
- 1.6 Pytest plugin reference
-
- 1.6 Examples
- 1.7 Use with unittest.TestCase
1. Getting Started
1.1 Installation
Playwright was created specifically to meet the needs of end-to-end testing. Playwright supports all modern rendering engines, including Chromium, WebKit and Firefox. Test on Windows, Linux and macOS, locally or on CI, headless or using native mobile emulation.
Playwright recommends using the official Playwright Pytest plugin to write end-to-end tests. It provides context isolation and can run on multiple browser configurations out of the box. Alternatively, you can use the library to manually write test infrastructure via your favorite test runner. The Pytest plugin utilizes a synchronous version of Playwright, and there is also an asynchronous version accessible through the library.
Start installing Playwright and run the sample tests to see it in action.
Install the Pytest plugin:
pip install pytest-playwright
Install the required browser:
playwright install
1.1.1 Add Example Test Add example test
test_my_application.pyCreate a file in the current working directory or subdirectory, the code is as follows:
import re
from playwright.sync_api import Page, expect
def test_homepage_has_Playwright_in_title_and_get_started_link_linking_to_the_intro_page(page: Page):
page.goto("https://playwright.dev/")
# Expect a title "to contain" a substring.
expect(page).to_have_title(re.compile("Playwright"))
# create a locator
get_started = page.locator("text=Get Started")
# Expect an attribute "to be strictly equal" to the value.
expect(get_started).to_have_attribute("href", "/docs/intro")
# Click the get started link.
get_started.click()
# Expects the URL to contain intro.
expect(page).to_have_url(re.compile(".*intro"))

1.1.2 Running the Example Test Running the example test
By default, tests will run on Chromium. This can be configured via CLI options. The tests run in headless mode, which means no browser UI is opened while running the tests. Test results and test logs will be displayed in the terminal.
pytest
1.2 Writing Tests Writing Tests
Playwright assertions were created specifically for dynamic networks. The check is automatically retried until the necessary conditions are met. Playwright comes with built-in auto-wait , which means it waits for the element to be operable before performing the operation. Playwright provides an expect function for writing assertions.
Check out the sample test below to learn how to write tests using web-first assertions, locators, and selectors.
import re
from playwright.sync_api import Page, expect
def test_homepage_has_Playwright_in_title_and_get_started_link_linking_to_the_intro_page(page: Page):
page.goto("https://playwright.dev/")
# Expect a title "to contain" a substring.
expect(page).to_have_title(re.compile("Playwright"))
# create a locator
get_started = page.locator("text=Get Started")
# Expect an attribute "to be strictly equal" to the value.
expect(get_started).to_have_attribute("href", "/docs/intro")
# Click the get started link.
get_started.click()
# Expects the URL to contain intro.
expect(page).to_have_url(re.compile(".*intro"))

1.2.1 Assertions Assertions
Playwright provides expectfunctionality to wait for expected conditions to be met.
    import re
    from playwright.sync_api import expect

    expect(page).to_have_title(re.compile("Playwright"))
1.2.2 Locators
Locators are a core part of Playwright's automatic wait and retry capabilities. Locators represent a way to find elements on the page at any time and are used to perform operations on elements such as . .click .fillCustom locators can be created using the page.locator(selector, **kwargs) method .
    from playwright.sync_api import expect

    get_started = page.locator("text=Get Started")

    expect(get_started).to_have_attribute("href", "/docs/installation")
    get_started.click()
selector is the string used to create the locator. Playwright supports many different selectors, such as Text, CSS, XPath, and more.
    from playwright.sync_api import expect

    expect(page.locator("text=Installation")).to_be_visible()
1.2.3 Test Isolation Test isolation
Playwright Pytest 插件基于测试夹具的概念,例如built in page fixture内置的页面夹具,它被传递到您的测试中。由于浏览器上下文,页面在测试之间是隔离的,这相当于一个全新的浏览器配置文件,其中每个测试都会获得一个全新的环境,即使在单个浏览器中运行多个测试也是如此。
    from playwright.sync_api import Page

    def test_basic_test(page: Page):
      # ...
1.2.4 Using Test Hooks 使用测试钩子
您可以使用各种fixtures夹具在测试之前或之后执行代码,并在它们之间共享对象。一个function作用域的夹具,例如具有自动使用的行为就像一个 beforeEach/afterEach。具有自动使用的module作用域夹具的行为类似于在所有测试之前和之后运行的 beforeAll/afterAll。
    import pytest
    from playwright.sync_api import Page


    @pytest.fixture(scope="function", autouse=True)
    def before_each_after_each(page: Page):
        print("beforeEach")
        # Go to the starting url before each test.
        page.goto("https://playwright.dev/")
        yield
        print("afterEach")

    def test_main_navigation(page: Page):
        # Assertions use the expect API.
        expect(page).to_have_url("https://playwright.dev/")
1.3 Running Tests 运行测试
您可以运行单个测试、一组测试或所有测试。测试可以在一个浏览器或多个浏览器上运行。默认情况下,测试以无头方式运行,这意味着在运行测试时不会打开浏览器窗口,并且会在终端中看到结果。如果您愿意,可以使用该--headed标志在 headed 模式下运行测试。
- 在 Chromium 上运行测试
- 运行单个测试文件
- 运行一组测试文件
- 使用函数名运行测试
- 以 Headed 模式运行测试
- 在特定浏览器上运行测试
- 在多个浏览器上运行测试
- 并行运行测试
(这假定pytest-xdist已安装。有关更多信息,请参见官方文档。)
1.3.1 Running Tests 运行测试
由于 Playwright 在 Python 中运行,您可以使用您选择的调试器进行调试,例如 Visual Studio Code 中的[Python 扩展]。Playwright 附带了 Playwright Inspector,它允许您单步执行 Playwright API 调用,查看他们的调试日志并探索选择器。
Bash
PWDEBUG=1 pytest -s
PowerShell
    $env:PWDEBUG=1
    pytest -s
Batch
    set PWDEBUG=1
    pytest -s
1.4 Test Generator 测试生成器
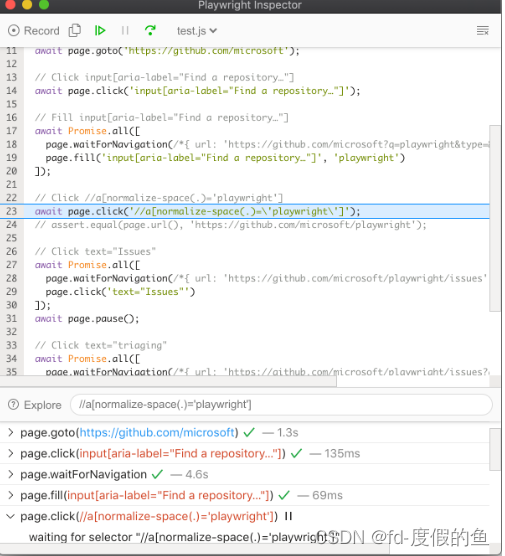
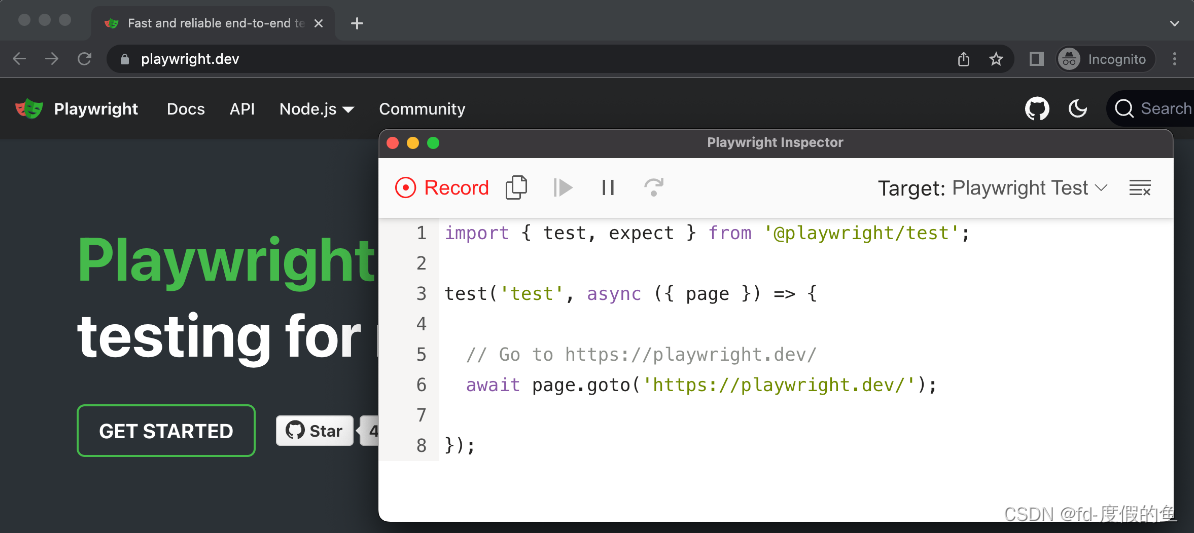
Playwright 具有开箱即用生成测试的能力,是快速开始测试的好方法。它将打开两个窗口,一个�是浏览器窗口,您可以在其中与您希望测试的网站进行交互,另一个是 Playwright Inspector 窗口,您可以在其中记录您的测试、复制测试、清除测试以及更改测试的语言。
1.4.1 Running Codegen 运行
playwright codegen playwright.dev
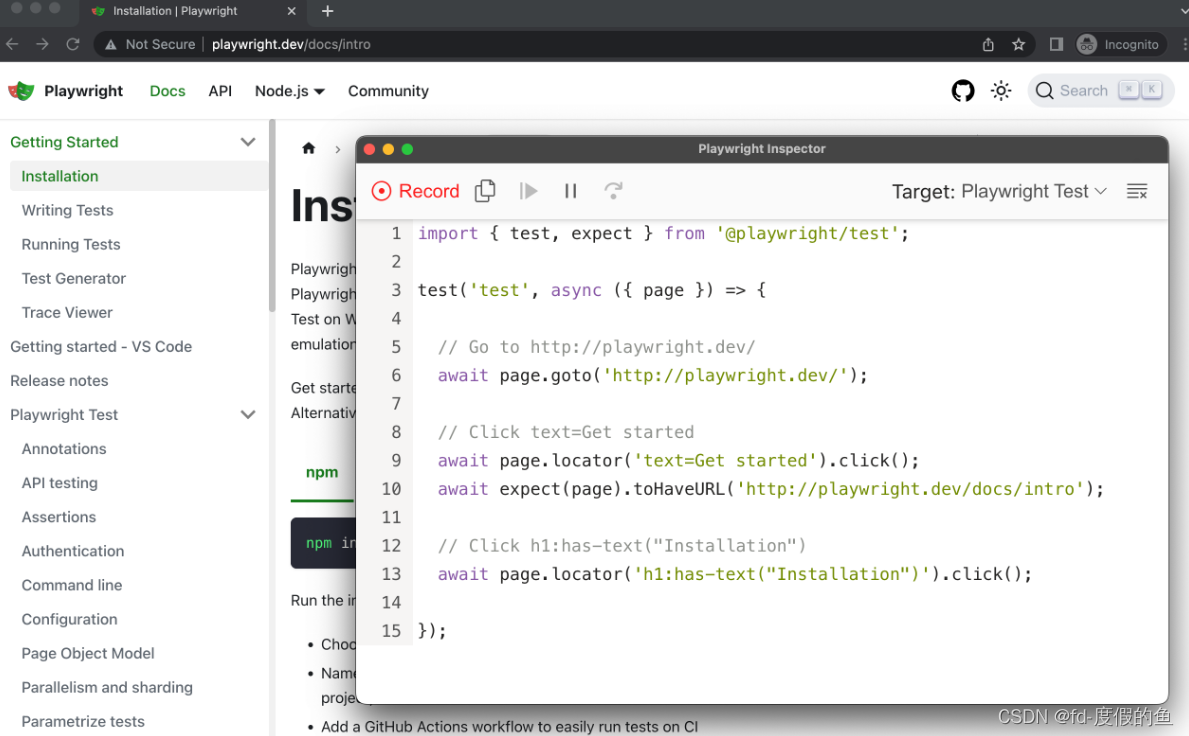
在浏览器中运行codegen和执行操作。Playwright 将为用户交互生成代码。Codegen将尝试生成有弹性的基于文本的选择器。
当您完成与页面的交互后,按下录制 按钮停止录制并使用复制 按钮将生成的代码复制到您的编辑器。
使用清除 按钮清除代码以重新开始录制。完成后关闭 Playwright 检查器窗口或停止终端命令。
要了解有关生成测试的更多信息,请查看官网详细指南。
1.5 Trace Viewer 跟踪查看器
Playwright Trace Viewer 是一个 GUI 工具,可让您探索记录的 Playwright 测试跟踪,这意味着您可以在测试的每个动作中前后移动,并直观地查看每个动作期间发生的情况。
你将学习
- 如何记录轨迹
- 如何打开 HTML 报告
- 如何打开跟踪查看器
1.5.1 Recording a trace 记录轨迹
可以使用browser_context.tracingAPI 记录跟踪,如下所示:
Sync 同步
    browser = chromium.launch()
    context = browser.new_context()

    # Start tracing before creating / navigating a page.
    context.tracing.start(screenshots=True, snapshots=True, sources=True)

    page.goto("https://playwright.dev")

    # Stop tracing and export it into a zip archive.
    context.tracing.stop(path = "trace.zip")
Async 异步
    browser = await chromium.launch()
    context = await browser.new_context()

    # Start tracing before creating / navigating a page.
    await context.tracing.start(screenshots=True, snapshots=True, sources=True)

    await page.goto("https://playwright.dev")

    # Stop tracing and export it into a zip archive.
    await context.tracing.stop(path = "trace.zip")
这将记录跟踪并将其放入名为trace.zip.
1.5.2 Opening the trace 打开跟踪
您可以使用 Playwright CLI 或在浏览器中打开保存的跟踪trace.playwright.dev。
playwright show-trace trace.zip
1.5.3 Viewing the trace 查看轨迹
通过单击每个操作或使用时间线悬停来查看测试的跟踪,并查看操作之前和之后的页面状态。在测试的每个步骤中检查日志、源和网络。跟踪查看器会创建一个 DOM 快照,以便您可以与其完全交互、打开开发工具等。
[外链图片转存失败,源站可能有防盗链机制,建议将图片保存下来直接上传(img-t0Msq8XP-1663298007245)(Playwright/image-20220916093431785.png)]
要了解更多信息,请查看官方文档。
1.6 Pytest 插件参考
Playwright 提供了一个Pytest插件来编写端到端测试。要开始使用它,请参阅本文入门指南。
Usage用途
要运行测试,请使用Pytest CLI。
pytest --browser webkit --headed
如果要自动添加 CLI 参数而不指定它们,可以使用[pytest.ini]文件:
CLI arguments CLI参数
--headed:在有头模式下运行测试(默认:无头)。--browser:在不同的浏览器中运行测试chromium,firefox或webkit。可以多次指定(默认:所有浏览器)。--browser-channel要使用的[浏览器频道--slowmo以慢动作运行测试。--device要模拟的设备--output测试产生的工件目录(默认值:)test-results。--tracing是否为每个测试记录跟踪。on,off, 或retain-on-failure(默认值:off)。--video是否为每次测试录制视频。on,off, 或retain-on-failure(默认值:off)。--screenshot每次测试后是否自动截屏。on,off, 或only-on-failure(默认值:off)。
Fixtures 夹具
此插件为 pytest配置特定于 Playwright 的装置。要使用这些夹具,请使用夹具名称作为测试函数的参数。
    def test_my_app_is_working(fixture_name):
        # Test using fixture_name
        # ...
Function scope功能范围 :这些夹具在测试功能中请求时创建,并在测试结束时销毁。
context:用于测试的新浏览器上下文。page:用于测试的新浏览器页面。
Session scope 会话范围 :这些夹具在测试函数中请求时创建,并在所有测试结束时销毁。
playwright:Pyaywright实例。browser_type:当前浏览器的BrowserType实例。browser: Playwright 启动的浏览器实例。browser_name:浏览器名称作为字符串。browser_channel: 浏览器频道作为字符串。is_chromium,is_webkit,is_firefox: 相应浏览器类型的布尔值。
Customizing fixture options Customizing fixture options : For browserand contextfixtures, use the following fixtures to define custom startup options.
browser_type_launch_args: Override the launch parameters of browser_type.launch(**kwargs). It should return a dictionary.browser_context_args: Override options of browser.new_context(**kwargs). It should return a dictionary.
**Parallelism: Running Multiple Tests at Once Parallelism: **Running multiple tests at once
pytest-xdistIf your tests are running on a machine with a lot of CPUs, you can speed up the overall execution time of your test suite by running multiple tests at once:
    # install dependency
    pip install pytest-xdist
    # use the --numprocesses flag
    pytest --numprocesses auto
numprocessesDepending on the hardware and nature of the test, you can set this to anywhere from the number of CPUs on the machine . 2If set too high, you may notice unexpected behavior.
For general information about options, seepytest
1.6 Examples
**Configure Mypy typings for auto-completion **Configure Mypy typings for auto-completion
    # test_my_application.py
    from playwright.sync_api import Page

    def test_visit_admin_dashboard(page: Page):
        page.goto("/admin")
        # ...
**Configure slow mo **Configure cache
Use parameters to run tests slowly --slowmo.
pytest --slowmo 100
Skip test by browser Skip test by browser
    # test_my_application.py
    import pytest

    @pytest.mark.skip_browser("firefox")
    def test_visit_example(page):
        page.goto("https://example.com")
        # ...
Run on a specific browser Run on a specific browser
    # conftest.py
    import pytest

    @pytest.mark.only_browser("chromium")
    def test_visit_example(page):
        page.goto("https://example.com")
        # ...
Run with a custom browser channel like Google Chrome or Microsoft Edge
pytest --browser-channel chrome
    # test_my_application.py
    def test_example(page):
        page.goto("https://example.com")
Configure base-url configure base-url
Start Pytest with parameters base-url. This pytest-base-urplugin is used to allow you to set the base url from the configuration, CLI arg or as a fixture.
pytest --base-url http://localhost:8080
    # test_my_application.py
    def test_visit_example(page):
        page.goto("/admin")
        # -> Will result in http://localhost:8080/admin
Ignore HTTPS errorsIgnore HTTPS errors
    # conftest.py
    import pytest

    @pytest.fixture(scope="session")
    def browser_context_args(browser_context_args):
        return {
            **browser_context_args,
            "ignore_https_errors": True
        }
Use custom viewport sizeUse custom window size
    # conftest.py
    import pytest

    @pytest.fixture(scope="session")
    def browser_context_args(browser_context_args):
        return {
            **browser_context_args,
            "viewport": {
                "width": 1920,
                "height": 1080,
            }
        }
Device emulationDevice emulation
    # conftest.py
    import pytest

    @pytest.fixture(scope="session")
    def browser_context_args(browser_context_args, playwright):
        iphone_11 = playwright.devices['iPhone 11 Pro']
        return {
            **browser_context_args,
            **iphone_11,
        }
or via CLI--device="iPhone 11 Pro"
Persistent context persistent
# conftest.py
import pytest
from playwright.sync_api import BrowserType
from typing import Dict
@pytest.fixture(scope="session")
def context(
browser_type: BrowserType,
browser_type_launch_args: Dict,
browser_context_args: Dict
):
context = browser_type.launch_persistent_context("./foobar", **{
**browser_type_launch_args,
**browser_context_args,
"locale": "de-DE",
})
yield context
context.close()

When using this test, all pages in the test are created from the persistence context.
1.7 Use with unittest.TestCase
See the example below to compare this to unittest.TestCase. This has the limitation that only one browser can be specified, and a matrix for multiple browsers will not be generated when multiple browsers are specified.
    import pytest
    import unittest

    from playwright.sync_api import Page


    class MyTest(unittest.TestCase):
        @pytest.fixture(autouse=True)
        def setup(self, page: Page):
            self.page = page

        def test_foobar(self):
            self.page.goto("https://microsoft.com")
            self.page.locator("#foobar").click()
            assert self.page.evaluate("1 + 1") == 2
Debugging
Use breakpoint()the statements in the test code to pause execution and get the pdb REPL.
    def test_bing_is_working(page):
        page.goto("https://bing.com")
        breakpoint()
        # ...
Deploy to CI Deploy to CI
Please refer to the official documentation to deploy your tests to CI/CD.