Docker usage records
Docker usage records
Article directory
- Basic use of Docker
-
- Docker configuration
-
- View status
- uninstall
- Install
-
- Install using apt repository
- Install Docker Desktop on Ubuntu (optional)
- Docker instance
-
- Use existing image
-
- Find an image
- Drag image
- List images
- Update image
- Export image
- Delete image
- Import image
- Clean image
- View container
- export container
- Import container - as image
- Create container
- Restart container
- Enter the container
- Stop & close container
- Delete container
- Dockerfile
- Dockerfile switches domestic sources
- buildx
- Docker usage examples
-
-
- PostgreSQL
-
- python+redis
Basic use of Docker
Reference article: https://www.runoob.com/[docker](/search?q=docker)/docker-tutorial.html
Reference article: https://docs.docker.com/desktop/?_gl=1 1oj7pdo _ga MTY0NDQxMjgwNC4xNjgyMDY2MjM5 _ga_XJWPQMJYHQ*MTY4NTQ5NjQyNi4yLjEuMTY4NTQ5NzA1Ny4z Ni4wLjA.
Reference article: https ://docs.docker.com/engine/Reference
article: https://cloud.tencent.com/developer/article/1885678
Reference article: https://docs.docker.com/get-started/overview/
Docker uses a client-server architecture . The Docker client talks to the Docker daemon, which does the heavy lifting of building, running, and distributing Docker containers. The Docker client and daemon can run on the same system, or you can connect the Docker client to a remote Docker daemon. The Docker client and daemon use the REST API to communicate over UNIX sockets or network interfaces. Another Docker client is Docker Compose, which allows you to work with applications composed of a set of containers.

Image layering in Docker
Docker supports the creation of new images by extending existing images. In fact, 99% of the images in Docker Hub are built by installing and configuring the required software in the base image.
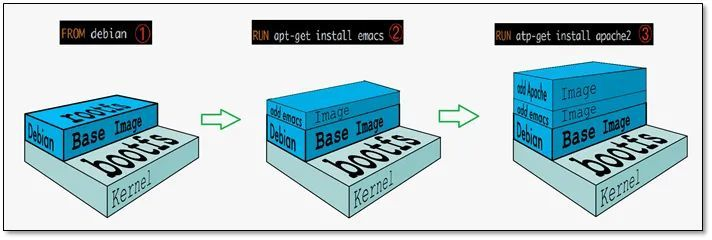
As you can see from the picture above, the new image is generated by superimposing the base image layer by layer. Each time you install a piece of software, you add a layer to the existing image.
Why Docker images are layered?
One of the biggest benefits of image layering is shared resources.
For example, if multiple images are built from the same base image, Docker Host only needs to save one base image on the disk; at the same time, it only needs to load one base image into the memory to serve all containers . And every layer of the image can be shared.
If multiple containers share a base image, when a container modifies the contents of the base image, such as files under /etc, the /etc of other containers will not be modified, and the modification will only be limited to a single container. Inside. This is the container Copy-on-Write feature.
Writable Container Layer
When a container starts, a new writable layer is loaded on top of the image. This layer is usually called the "container layer", and everything below the "container layer" is called the "mirror layer".
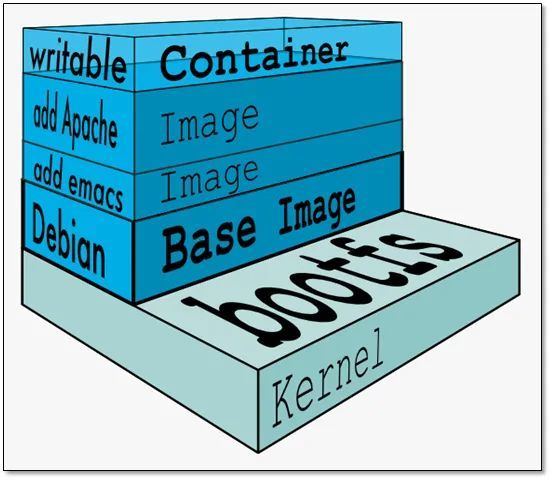
All changes to the container - whether adding, deleting, or modifying files will only occur at the container layer. Only the container layer is writable, and all image layers below the container layer are read-only.
Detailed description of container tiers
The number of mirror layers may be large, and all mirror layers will be joined together to form a unified file system. If there is a file with the same path in different layers, for example, /a, the /a in the upper layer will overwrite the /a in the lower layer, which means that the user can only access the file /a in the upper layer.In the container layer, the user sees a stacked file system.
| File Operations | Description |
|---|---|
| Add File | When a file is created in a container, the new file is added to the container tier. |
| Read File | When reading a file in a container, Docker looks for the file in each image tier, from top to bottom. As soon as it is found, it is copied to the container tier, then opened and read into memory. |
| Modifying a File | When modifying an existing file in a container, Docker looks for the file in each image tier, from top to bottom. Once found, it is copied to the container tier and then modified. |
| Deleting a file | When deleting a file in a container, Docker also looks for the file in the image tier from top to bottom. When it finds it, it records the deletion in the container tier. (Only the deletion is logged.) |
The feature of making a copy of the data only when it needs to be modified is called Copy-on-Write, which means that the container layer saves the changed parts of the image and does not make any changes to the image itself.
This explains our earlier question: the container layer keeps track of changes to the image, and all image layers are read-only and are not modified by containers, so the image can be shared by multiple containers.
Docker configuration
System version: Ubuntu 20.04.4 LTS (GNU/Linux 5.4.0-146-generic x86_64)
Check the status
First of all, you can check if docker has been installed on your system, use the following command to view the docker version number.
    root@qhdata-dev:~# docker -v
    Docker version 20.10.17, build 100c701

    root@qhdata-dev:~# sudo docker run hello-world
    Unable to find image 'hello-world:latest' locally
    latest: Pulling from library/hello-world
    719385e32844: Pull complete
    Digest: sha256:fc6cf906cbfa013e80938cdf0bb199fbdbb86d6e3e013783e5a766f50f5dbce0
    Status: Downloaded newer image for hello-world:latest

    Hello from Docker!
    This message shows that your installation appears to be working correctly.

    To generate this message, Docker took the following steps:
     1. The Docker client contacted the Docker daemon.
     2. The Docker daemon pulled the "hello-world" image from the Docker Hub.
        (amd64)
     3. The Docker daemon created a new container from that image which runs the
        executable that produces the output you are currently reading.
     4. The Docker daemon streamed that output to the Docker client, which sent it
        to your terminal.

    To try something more ambitious, you can run an Ubuntu container with:
     $ docker run -it ubuntu bash

    Share images, automate workflows, and more with a free Docker ID:
     https://hub.docker.com/

    For more examples and ideas, visit:
     https://docs.docker.com/get-started/
Uninstallation
Uninstall the installed docker using the following statement
sudo apt-get purge docker-ce docker-ce-cli containerd.io docker-buildx-plugin docker-compose-plugin docker-ce-rootless-extras
Images, containers, volumes, or custom profiles on the host are not automatically deleted. Delete all images, containers, and volumes:
    sudo rm -rf /var/lib/docker
    sudo rm -rf /var/lib/containerd
You must manually delete any edited profiles.
Installation
- Docker Engine bundled with Docker Desktop for Linux . This is the easiest and quickest way to get started.
- Set up and install the Docker](https://docs.docker.com/engine/install/ubuntu/) Engine from Docker's [apt repository .
- Install manually and manage upgrades manually.
- Easy to use scripts. Recommended for test and development environments only.
Installation using the apt repository
Setting up the repository
Updates the apt package index and installs packages to allow apt to use the repository over HTTPS:
    sudo apt-get update
    sudo apt-get install ca-certificates curl gnupg
Add the official GPG key for Docker:
     sudo install -m 0755 -d /etc/apt/keyrings
     curl -fsSL https://download.docker.com/linux/ubuntu/gpg | sudo gpg --dearmor -o /etc/apt/keyrings/docker.gpg
     sudo chmod a+r /etc/apt/keyrings/docker.gpg
Use the following command to set up the repository:
    echo \
      "deb [arch="$(dpkg --print-architecture)" signed-by=/etc/apt/keyrings/docker.gpg] https://download.docker.com/linux/ubuntu \
      "$(. /etc/os-release && echo "$VERSION_CODENAME")" stable" | \
      sudo tee /etc/apt/sources.list.d/docker.list > /dev/null
Installing the Docker Engine
Update the apt package index:
sudo apt-get update
To install a specific version of Docker Engine, first list the available versions in the repository:
apt-cache madison docker-ce | awk '{ print $3 }'
Select the desired version and install it:
     VERSION_STRING=5:24.0.0-1~ubuntu.20.04~focal
     sudo apt-get install docker-ce=$VERSION_STRING docker-ce-cli=$VERSION_STRING containerd.io docker-buildx-plugin docker-compose-plugin
Or just install the latest version
sudo apt-get install docker-ce docker-ce-cli containerd.io docker-buildx-plugin docker-compose-plugin
Verify that the Docker Engine installation was successful by running the hello-world image
    root@qhdata-dev:~# docker -v
    Docker version 24.0.2, build cb74dfc

    sudo docker run hello-world
Installing a Docker desktop on Ubuntu (not required)
Reference article: https://docs.docker.com/desktop/install/ubuntu/
Prerequisites
To successfully install Docker Desktop, you must:
- Meet the system requirements
- Have a 64-bit version of Ubuntu Jammy Jellyfish 22.04 (LTS) or Ubuntu Impish Indri 21.10. x86_64Docker Desktop is supported amd64 on and/or architecture.
- For non-Gnome desktop environments, gnome-terminal must be installed:
sudo apt install gnome-terminal
Installing Docker Desktop
- Set up Docker's package repository.
- Download the latest DEB packages.
- Install the package using apt as shown below:
    sudo apt-get update
    sudo apt-get install ./docker-desktop-<version>-<arch>.deb
Post-installation scripts:
- Set up the Docker Desktop binaries to map privileged ports and set resource limits.
- Add Kubernetes DNS names to /etc/hosts.
- Create a link from /usr/bin/docker to /usr/local/bin/com.docker.cli
Start the Docker desktop
Docker instance
Reference article: https://www.quanxiaoha.com/docker/docker-look-image.html
Reference article: https://cloud.tencent.com/developer/article/1885678
Reference article: https://www.w3cschool.cn/docker/docker-image-usage.html
docker_hub address: https://hub.docker.com/search?q=
The approximate process of building a base image with docker:
Update the image code
Dockerfile file
Docker build a base image
Creating an image
Importing an image
Using an existing image
Updating Images
Creating containers
Saving a container as a new image
Saving to the hub
Saving locally
Build the new image
docker build
Use an existing image
Finding an image
You can log into Docker Hub to find the image we need.
! Docker usage records
! Docker usage records
Dragging an image
Use the command docker pull to download the image
    root@qhdata-dev:/home/qhdata/docker# docker pull ubuntu:20.04
    20.04: Pulling from library/ubuntu
    ca1778b69356: Pull complete
    Digest: sha256:db8bf6f4fb351aa7a26e27ba2686cf35a6a409f65603e59d4c203e58387dc6b3
    Status: Downloaded newer image for ubuntu:20.04
    docker.io/library/ubuntu:20.04
    root@qhdata-dev:/home/qhdata/docker#
List mirrors
Use docker images to list mirrors on the local host.
    root@qhdata-dev:/home/qhdata/docker# docker images
    REPOSITORY              TAG           IMAGE ID       CREATED         SIZE
    hello-world             latest        9c7a54a9a43c   3 weeks ago     13.3kB
    ubuntu                  20.04         88bd68917189   6 weeks ago     72.8MB
    ...
    alpine                  latest        e66264b98777   12 months ago   5.53MB
    root@qhdata-dev:/home/qhdata/docker#
Updating a Mirror
Before updating the image, we need to create a container using the image.
    root@qhdata-dev:/home/qhdata/docker# docker run -t -i ubuntu:20.04 /bin/bash
    root@7ec56dec1d8e:/#
Use the apt-get update command within the running container to perform the update.
When you are done, exit the container by typing the exit command.
    root@7ec56dec1d8e:/# apt-get update
    Get:1 http://security.ubuntu.com/ubuntu focal-security InRelease [114 kB]
    .....
    Get:18 http://security.ubuntu.com/ubuntu focal-security/main amd64 Packages [2748 kB]
    Fetched 26.8 MB in 15s (1767 kB/s)
    Reading package lists... Done
    root@7ec56dec1d8e:/# exit
    exit
    root@qhdata-dev:/home/qhdata/docker#
At this point the container with ID 7ec56dec1d8e is the one that was changed to our needs. We can commit a copy of the container with the command docker commit.
    root@qhdata-dev:/home/qhdata/docker# docker commit -m="has update" -a="qhdata" 7ec56dec1d8e qhdata/ubuntu:20.04
    sha256:dd4c75bc58d43b6ae59f9afc5c528117ac317d936cfd3219fe1ade1e902c3965
Description of each parameter:
-m:descriptive information about the submission-a:Specify the mirror author- 7ec56dec1d8e : container ID
- qhdata/ubuntu:20.04 :Specify the name of the target image to be created
We can use the docker images command to view our new image qhdata/ubuntu:20.04 :
    root@qhdata-dev:/home/qhdata/docker# docker images
    REPOSITORY              TAG           IMAGE ID       CREATED         SIZE
    qhdata/ubuntu           20.04         dd4c75bc58d4   2 minutes ago   116MB
    hello-world             latest        9c7a54a9a43c   3 weeks ago     13.3kB
    ubuntu                  20.04         88bd68917189   6 weeks ago     72.8MB
    ...
    alpine                  latest        e66264b98777   12 months ago   5.53MB
    root@qhdata-dev:/home/qhdata/docker#
export image
Reference article: https://docs.docker.com/engine/reference/commandline/save/
    root@qhdata-dev:/home/qhdata/docker# docker save -o qhdata_ubuntu_20_04.tar qhdata/ubuntu:20.04
    root@qhdata-dev:/home/qhdata/docker# ls -r
    qhdata_ubuntu_20_04.tar
    root@qhdata-dev:/home/qhdata/docker#
Parameter description.
--output,-o: file to write to, not STDOUT
Delete image
Reference article: https://docs.docker.com/engine/reference/commandline/rmi/
Reference article: https://docs.docker.com/engine/reference/commandline/image_rm/
    docker rmi [image]
    docker rmi [image id]
    docker image rm [image]
Parameter description.
--force , -f: force deletion of images- ::
--no-prune: Do not remove untagged parents
eg:
    root@qhdata-dev:/home/qhdata/docker# docker rmi qhdata/ubuntu:20.04
    Untagged: qhdata/ubuntu:20.04
    Deleted: sha256:dd4c75bc58d43b6ae59f9afc5c528117ac317d936cfd3219fe1ade1e902c3965
    Deleted: sha256:307a3b9484906a84d1b16735fdb6c967692fd0b065985126f54fbeb16eefdf20

    root@qhdata-dev:/home/qhdata/docker# docker images
    REPOSITORY              TAG           IMAGE ID       CREATED         SIZE
    hello-world             latest        9c7a54a9a43c   3 weeks ago     13.3kB
    ubuntu                  20.04         88bd68917189   6 weeks ago     72.8MB
    ...
    alpine                  latest        e66264b98777   12 months ago   5.53MB
    root@qhdata-dev:/home/qhdata/docker#
Importing Images
Reference article: https://docs.docker.com/engine/reference/commandline/load/
Reference article: https://docs.docker.com/engine/reference/commandline/image_load/
Loading images from STDIN
    docker load < qhdata_ubuntu_20_04.tar
    docker image load < qhdata_ubuntu_20_04.tar
Load image from file (-input)
    docker load -i qhdata_ubuntu_20_04.tar
    docker image load -i qhdata_ubuntu_20_04.tar
Parameter description.
--input,-i: read from tar archive instead of STDIN--quiet,-q: Suppress load output.
eg:
    root@qhdata-dev:/home/qhdata/docker# docker load -i qhdata_ubuntu_20_04.tar
    f6ed57753c5f: Loading layer [==================================================>]  43.33MB/43.33MB
    Loaded image: qhdata/ubuntu:20.04

    root@qhdata-dev:/home/qhdata/docker# docker images
    REPOSITORY              TAG           IMAGE ID       CREATED         SIZE
    qhdata/ubuntu           20.04         dd4c75bc58d4   2 hours ago     116MB
    hello-world             latest        9c7a54a9a43c   3 weeks ago     13.3kB
    ubuntu                  20.04         88bd68917189   6 weeks ago     72.8MB
    ...
    alpine                  latest        e66264b98777   12 months ago   5.53MB
    root@qhdata-dev:/home/qhdata/docker#
cleanup mirrors
Reference article: https://docs.docker.com/engine/reference/commandline/image_prune/
    root@qhdata-dev:/home/qhdata/docker# docker image prune
    WARNING! This will remove all dangling images.
    Are you sure you want to continue? [y/N] y
    Total reclaimed space: 0B
    root@qhdata-dev:/home/qhdata/docker#
Parameter description.
--all,-a:Remove all unused images, not just hanging ones.--filter:Provide filter values (e.g.until=<timestamp>)--force,-f:do not prompt for confirmation
**Filter (--filter) **
The filter flag (-filter) is in the format "key=value". If there is more than one filter, pass more than one flag (e.g., --filter "foo=bar" --filter "bif=baz")
The currently supported filters are:
- until (
<timestamp>) - remove only images created before the given timestamp - label (
label=<key>,label=<key>=<value>,label!=<key>, orlabel!=<key>=<value>) - remove only images with (or without, iflabel!=...is used) the image with the specified label.
View Container
docker ps: View running containers;
docker ps -a: View all containers, including running and stopped containers.
docker container ls -a: View all containers, including running and stopped containers.
    root@qhdata-dev:/home/qhdata/docker# docker ps
    CONTAINER ID   IMAGE             COMMAND                  CREATED         STATUS       PORTS                                       NAMES
    7b651a8dfc5c   registry:latest   "/entrypoint.sh /etc…"   11 months ago   Up 7 hours   0.0.0.0:5001->5000/tcp, :::5001->5000/tcp   registry

    root@qhdata-dev:/home/qhdata/docker# docker ps -a
    CONTAINER ID   IMAGE                          COMMAND                  CREATED         STATUS                      PORTS                                                                            NAMES
    7ec56dec1d8e   ubuntu:20.04                   "/bin/bash"              3 minutes ago   Exited (0) 2 minutes ago                                                                                     unruffled_ganguly
    dea79bf486d4   hello-world                    "/hello"                 8 hours ago     Exited (0) 8 hours ago                                                                                       laughing_joliot
    a67c7b72196a   owasp/modsecurity-crs:nginx    "/docker-entrypoint.…"   9 months ago    Exited (255) 5 months ago   0.0.0.0:8080->80/tcp, :::8080->80/tcp, 0.0.0.0:8443->443/tcp, :::8443->443/tcp   wafdemo-waf-1
    d2945582db44   bkimminich/juice-shop:latest   "/nodejs/bin/node /j…"   9 months ago    Exited (255) 5 months ago   0.0.0.0:1003->3000/tcp, :::1003->3000/tcp                                        wafdemo-webapp-1
    c7f605ab3ec9   nginx:latest                   "/docker-entrypoint.…"   9 months ago    Exited (255) 5 months ago   0.0.0.0:8081->80/tcp, :::8081->80/tcp                                            nginx-webapp-1
    7b651a8dfc5c   registry:latest                "/entrypoint.sh /etc…"   11 months ago   Up 7 hours                  0.0.0.0:5001->5000/tcp, :::5001->5000/tcp                                        registry
    root@qhdata-dev:/home/qhdata/docker#
Return field description:
CONTAINER ID: The container ID;IMAGE: The image used to create the container;COMMAND: The last command run by the container;CREATED: The container creation time;STATUS: The container state;PORTS: Port information;NAMES: container name: same as container ID, can identify the uniqueness of the container, the same name is not allowed to exist on the same host, otherwise it will conflict;
export container
Reference article: https://docs.docker.com/engine/reference/commandline/export/
    docker export 7ec56dec1d8e > qhdata_ubuntu_20_04.tar
    docker export --output="qhdata_ubuntu_20_04.tar" 7ec56dec1d8e
Parameter description.
--output , -o: file to write to, not STDOUT
eg:
    root@qhdata-dev:/home/qhdata/docker# docker export --output="qhdata_ubuntu_20_04.tar" 7ec56dec1d8e
    root@qhdata-dev:/home/qhdata/docker# ls -r
    qhdata_ubuntu_20_04.tar
    root@qhdata-dev:/home/qhdata/docker#
Importing containers - as mirrors
Reference article: https://docs.docker.com/engine/reference/commandline/import/
    // Import from a remote location
    docker import https://example.com/exampleimage.tgz // This will create a new untagged image.
    // Import from a local file
    cat exampleimage.tgz | docker import - exampleimagelocal:new // Import to docker and STDIN via pipeline.
    cat exampleimage.tgz | docker import --message "New image imported from tarball" - exampleimagelocal:new // Import with a commit message.
    docker import /path/to/exampleimage.tgz // Import from local archive to docker.
    // Import from a local directory
    sudo tar -c . | docker import - exampleimagedir
    // Import from a local directory with the new configuration
    sudo tar -c . | docker import --change "ENV DEBUG=true" - exampleimagedir
Parameter Description.
--change,-c:Apply Dockerfile commands to the created image.-message,-m:Set a commit message for imported images.--platform:Set the platform if the server supports multiple platforms.
eg:
    root@qhdata-dev:/home/qhdata/docker# cat qhdata_ubuntu_20_04.tar | docker import - qhdata/ubuntu:20.04
    sha256:db81f58964d10ecf857bbb61777ebe3aa1318eaa71ef3ba58fb15ac87d13aed7

    root@qhdata-dev:/home/qhdata/docker# docker images
    REPOSITORY              TAG           IMAGE ID       CREATED          SIZE
    qhdata/ubuntu           20.04         db81f58964d1   14 seconds ago   116MB
    hello-world             latest        9c7a54a9a43c   3 weeks ago      13.3kB
    ...
    alpine                  latest        e66264b98777   12 months ago    5.53MB
    root@qhdata-dev:/home/qhdata/docker#
Creating Containers
Reference article: https://docs.docker.com/engine/reference/commandline/run/
    root@qhdata-dev:/home/qhdata/docker# docker  run -v ./dm7:/dm7 -w /dm7 -i -t qhdata/ubuntu:20.04 /bin/bash
    root@1867b8bbbbc8:/dm7#

    root@8b5dd52725e5:/dm7# ls -r
    include  drivers  bin
    root@8b5dd52725e5:/dm7#

    root@1867b8bbbbc8:/dm7# cd /
    root@1867b8bbbbc8:/# ls -r
    var  usr  tmp  sys  srv  sbin  run  root  proc  opt  mnt  media  libx32  lib64  lib32  lib  home  etc  dm7  dev  boot  bin
    root@1867b8bbbbc8:/# exit
Parameter description (partial).
--volume,-v:Bind the mounted volume, starting with Docker Engine version 23 you can use relative paths on the host.--workdir,-w:Working directory inside the container.--tty,-t:assign pseudo TTYs--interactive,-i:keep STDIN open even if not attached--env,-e:Set environment variables.--platform: Set the platform if the server supports multiple platforms./bin/bash: Create an interactive shell in the container./bin/echo: echo followed by the command to be used.
restart container
Reference article: https://docs.docker.com/engine/reference/commandline/restart/
Reference article: https://docs.docker.com/engine/reference/commandline/container_restart/
    root@qhdata-dev:/home/qhdata/docker# docker restart 8b5dd52725e5
    8b5dd52725e5
    root@qhdata-dev:/home/qhdata/docker# docker ps
    CONTAINER ID   IMAGE                 COMMAND                  CREATED         STATUS          PORTS                                       NAMES
    8b5dd52725e5   qhdata/ubuntu:20.04   "/bin/bash"              24 hours ago    Up 10 seconds                                               gracious_sanderson
    7b651a8dfc5c   registry:latest       "/entrypoint.sh /etc…"   11 months ago   Up 2 days       0.0.0.0:5001->5000/tcp, :::5001->5000/tcp   registry
    root@qhdata-dev:/home/qhdata/docker#
Parameter description.
-signal,-s: signal to send to the container-time,-t: The number of seconds to wait before killing the container.
Enter container
Reference article: https://docs.docker.com/engine/reference/commandline/exec/
    docker exec -it [CONTAINER ID OR NAMES]
    docker exec -it mycontainer sh // execute interactive shell on container
    docker exec -it mycontainer /bin/bash // Run interactive shell on container
    docker exec -it mycontainer pwd // Run the command when creating a container
Parameter description.
--detach,-d: detach mode: run commands in background--detach-keys: Overwrite the key sequence used to detach the container.--env,-e: Set environment variables.--env-file: Read in environment variable files--interactive,-i: Keep STDIN open even if not attached.--privileged: Grant extended privileges to commands.--tty,-t: Assign pseudo TTY.--user,-u: Username or UID(in the format <name|uid>[:<group|gid>]:)--workdir,-w: working directory within the container
eg:
    root@qhdata-dev:/home/qhdata/docker# docker exec -it 8b5dd52725e5 sh
    # ls -r
    include  drivers  bin
    # cd /
    # ls -r
    var  usr  tmp  sys  srv  sbin  run  root  proc	opt  mnt  media  libx32  lib64	lib32  lib  home  etc  dm7  dev  boot  bin
    # exit
    root@qhdata-dev:/home/qhdata/docker#
If you enter an unstarted container, an error is reported.
    root@qhdata-dev:/home/qhdata/docker# docker exec -it 1867b8bbbbc8 sh
    Error response from daemon: Container 1867b8bbbbc83c348ea1f898d6cfc6dd7208d36d3b3d926a1abcc8f94eb8fa7b is not running
Stop & Shutdown Containers
Reference article: https://docs.docker.com/engine/reference/commandline/stop/
Reference article: https://docs.docker.com/engine/reference/commandline/container_stop/
Reference article: https://docs.docker.com/engine/reference/commandline/kill/
Reference article: https://docs.docker.com/engine/reference/commandline/container_kill/
    // Elegant mode
    docker container stop [container ID or NAMES]
    # shorthand mode (omitting the keyword container)
    docker stop [CONTAINER ID OR NAMES] # Shorthand mode (omit keyword container)
    // Forced mode
    docker container kill [CONTAINER ID OR NAMES] // forced mode
    // shorthand mode (omit container)
    docker kill [CONTAINER ID OR NAMES] // force mode (omit container)
Parameter description.
-signal,-s: signal to send to the container-time,-t: The number of seconds to wait before killing the container.
eg:
    root@qhdata-dev:/home/qhdata/docker# docker ps
    CONTAINER ID   IMAGE                 COMMAND                  CREATED         STATUS      PORTS                                       NAMES
    8b5dd52725e5   qhdata/ubuntu:20.04   "/bin/bash"              3 days ago      Up 2 days                                               gracious_sanderson
    7b651a8dfc5c   registry:latest       "/entrypoint.sh /etc…"   11 months ago   Up 5 days   0.0.0.0:5001->5000/tcp, :::5001->5000/tcp   registry
    root@qhdata-dev:/home/qhdata/docker# docker container stop 8b5dd52725e5
    8b5dd52725e5
    root@qhdata-dev:/home/qhdata/docker# docker ps
    CONTAINER ID   IMAGE             COMMAND                  CREATED         STATUS      PORTS                                       NAMES
    7b651a8dfc5c   registry:latest   "/entrypoint.sh /etc…"   11 months ago   Up 5 days   0.0.0.0:5001->5000/tcp, :::5001->5000/tcp   registry
    root@qhdata-dev:/home/qhdata/docker#
Delete Container
Reference article: https://docs.docker.com/engine/reference/commandline/rm/
Reference article: https://docs.docker.com/engine/reference/commandline/container_rm/
    docker container rm [container ID or NAMES]
    # shorthand mode (you can omit the keyword container)
    docker rm [CONTAINER ID OR NAMES] # Shorthand mode (omit container)
Parameter description.
--force,-f: Force deletion of a running container (using SIGKILL).--link,-l: Removes the specified link.--volumes,-v: Delete anonymous volumes associated with a container.
eg:
    root@qhdata-dev:/home/qhdata/docker# docker rm 8b5dd52725e5
    8b5dd52725e5
    root@qhdata-dev:/home/qhdata/docker# docker ps -a
    CONTAINER ID   IMAGE                          COMMAND                  CREATED         STATUS                      PORTS                                                                            NAMES
    1867b8bbbbc8   qhdata/ubuntu:20.04            "/bin/bash"              3 days ago      Exited (0) 3 days ago                                                                                        intelligent_feynman
    7ec56dec1d8e   ubuntu:20.04                   "/bin/bash"              4 days ago      Exited (0) 4 days ago                                                                                        unruffled_ganguly
    dea79bf486d4   hello-world                    "/hello"                 5 days ago      Exited (0) 5 days ago                                                                                        laughing_joliot
    ...
    7b651a8dfc5c   registry:latest                "/entrypoint.sh /etc…"   11 months ago   Up 5 days                   0.0.0.0:5001->5000/tcp, :::5001->5000/tcp                                        registry
    root@qhdata-dev:/home/qhdata/docker#
Dockerfile
Reference article: https://docs.docker.com/engine/reference/builder/
Reference article: https://www.quanxiaoha.com/docker/dockerfile-build-image.html
Dockerfile builds
    FROM --platform=linux/arm64 python:3.8.10

    ADD . .

    RUN apt-get update -y && \
    apt-get install python-dev -y && \
    apt-get install gcc* -y

    ENV DM_HOME=/dm7 LD_LIBRARY_PATH=/dm7/bin:$LD_LIBRARY_PATH PATH=$PATH:$HOME/bin:/dm7/bin

    RUN cd ./dm7/drivers/python/dmPython/ && python setup.py install  # 安装dmPython

    RUN cd ./dm7/drivers/python/sqlalchemy1.4.6/ && python setup.py install  # sqlalchemy1.4.6

    RUN pip install --upgrade scipy==1.7.3 -i https://pypi.tuna.tsinghua.edu.cn/simple && \
    pip install --upgrade numpy==1.22.4 -i https://pypi.tuna.tsinghua.edu.cn/simple && \
    pip install --upgrade pandas==1.2.4 -i https://pypi.tuna.tsinghua.edu.cn/simple && \
    pip install --upgrade xlrd==1.2.0 -i https://pypi.tuna.tsinghua.edu.cn/simple && \
    pip install --upgrade xlwt==0.7.2 -i https://pypi.tuna.tsinghua.edu.cn/simple && \
    pip install --upgrade python_dateutil==2.8.2 -i https://pypi.tuna.tsinghua.edu.cn/simple && \
    pip install --upgrade pymysql==0.9.3 -i https://pypi.tuna.tsinghua.edu.cn/simple && \
    pip install --upgrade SQLAlchemy==1.4.18 -i https://pypi.tuna.tsinghua.edu.cn/simple && \
    pip install --upgrade openpyxl==3.0.0 -i https://pypi.tuna.tsinghua.edu.cn/simple
Execution generation
root@qhdata-dev:/home/qhdata/docker# docker build -t dm_base/qhdata .
But the execution fails and the following error is reported.
ERROR: failed to solve: process "/bin/sh -c apt-get update -y" did not complete successfully: exit code: 1
Guess it's a new version issue. I switched back to 5:20.10.23~3-0~ubuntu-focal and it no longer prompts the above error.
    Sending build context to Docker daemon  3.164GB
    Step 1/8 : FROM --platform=linux/arm64 python:3.8.10
     ---> a369814a9797
    Step 2/8 : ADD . .
     ---> 8ce022ad8be9
    Step 3/8 : RUN apt-get update -y
     ---> Running in 76f670c26669
    Get:1 http://security.debian.org/debian-security buster/updates InRelease [34.8 kB]
    Get:2 http://deb.debian.org/debian buster InRelease [122 kB]
    Get:3 http://deb.debian.org/debian buster-updates InRelease [56.6 kB]
    Get:4 http://security.debian.org/debian-security buster/updates/main amd64 Packages [508 kB]
    Get:5 http://deb.debian.org/debian buster/main amd64 Packages [7909 kB]
    Get:6 http://deb.debian.org/debian buster-updates/main amd64 Packages [8788 B]
    Fetched 8640 kB in 15s (588 kB/s)
    Reading package lists...
    Removing intermediate container 76f670c26669
     ---> 7b2a2534e290
    Step 4/8 : RUN apt-get install gcc -y
     ---> Running in 0befdb33c623
    Reading package lists...
    Building dependency tree...
    Reading state information...
    ...
    Removing intermediate container da5f1a91fce3
     ---> 0d450fba1928
    Successfully built 0d450fba1928
    Successfully tagged dm_base/qhdata:latest
    root@qhdata-dev:/home/qhdata/docker# docker images
    REPOSITORY              TAG           IMAGE ID       CREATED          SIZE
    dm_base/qhdata          latest        0d450fba1928   21 seconds ago   4.42GB
    <none>                  <none>        926744ce4933   9 minutes ago    4.08GB
    ...
    python                  3.8.10        a369814a9797   23 months ago    883MB
    root@qhdata-dev:/home/qhdata/docker#  docker save -o dm_base.tar dm_base/qhdata:latest
Guess it's a new version issue. I switched back to 5:20.10.23~3-0~ubuntu-focal and it no longer prompts the above error.
    WARNING: The requested image's platform (linux/amd64) does not match the detected host platform (linux/arm64/v8) and no specific platform was requested
    exec /bin/bash: exec format error
Dockerfile switching domestic sources
Reference article: https://blog.csdn.net/xiaowu_wu/article/details/124355694
Reference article: https://mirrors.tuna.tsinghua.edu.cn/help/debian/
Reference article: https://blog.csdn.net/karmacode/article/details/104902656
Reference article: https://blog.csdn.net/weixin_45067618/article/details/122234387
Reference article: https://stackoverflow.com/questions/70789307/how-to-fix-the-following-signatures-couldnt-be-verified-because-the-public-key
Reference article: https://blog.csdn.net/seaofbits/article/details/123647256
Before switching, you need to go into your target image and check the system version (cat /etc/os-release).
    root@qhdata-dev:/home/qhdata/docker# docker run -t -i python:3.9 /bin/bash
    WARNING: The requested image's platform (linux/arm64/v8) does not match the detected host platform (linux/amd64) and no specific platform was requested
    root@016143a4d2f4:/# cat /etc/os-release
    PRETTY_NAME="Debian GNU/Linux 11 (bullseye)"
    NAME="Debian GNU/Linux"
    VERSION_ID="11"
    VERSION="11 (bullseye)"
    VERSION_CODENAME=bullseye
    ID=debian
    HOME_URL="https://www.debian.org/"
    SUPPORT_URL="https://www.debian.org/support"
    BUG_REPORT_URL="https://bugs.debian.org/"
    root@016143a4d2f4:/#
Get the PRETTY_NAME of the target mirror utility. Then go to Tsinghua University Open Source Software Mirror Station to find the corresponding utility version mirror.
! Docker usage records
! Docker usage records
Copy the contents inside to the dockerfile.
    RUN mv /etc/apt/sources.list /etc/apt/sources_backup.list && \
    echo "deb https://mirrors.tuna.tsinghua.edu.cn/ubuntu-ports/ focal main restricted universe multiverse                      " >> /etc/apt/sources.list && \
    echo "deb https://mirrors.tuna.tsinghua.edu.cn/ubuntu-ports/ focal-updates main restricted universe multiverse              " >> /etc/apt/sources.list && \
    echo "deb https://mirrors.tuna.tsinghua.edu.cn/ubuntu-ports/ focal-backports main restricted universe multiverse            " >> /etc/apt/sources.list && \
    echo "deb https://mirrors.tuna.tsinghua.edu.cn/ubuntu-ports/ focal-security main restricted universe multiverse             " >> /etc/apt/sources.list && \
    echo "deb https://mirrors.tuna.tsinghua.edu.cn/debian/ bullseye main contrib non-free                                 " >> /etc/apt/sources.list && \
    echo "deb https://mirrors.tuna.tsinghua.edu.cn/debian/ bullseye-updates main contrib non-free                         " >> /etc/apt/sources.list && \
    echo "deb https://mirrors.tuna.tsinghua.edu.cn/debian/ bullseye-backports main contrib non-free                       " >> /etc/apt/sources.list && \
    echo "deb https://security.debian.org/debian-security bullseye-security main contrib non-free                         " >> /etc/apt/sources.list

    RUN apt-key adv --keyserver keyserver.ubuntu.com --recv-keys 3B4FE6ACC0B21F32 && \
    apt-key adv --keyserver keyserver.ubuntu.com --recv-keys 871920D1991BC93C
The result of this run is blind as shown in the picture:
! Docker usage records
Error 1 :E: Failed to fetch https://mirrors.tuna.tsinghua.edu.cn/ubuntu/dists/focal-updates/main/binary-arm64/Packages 404 Not Found [IP. 101.6.15.130 443]
This is due to the fact that the framework is using arm, but the tutorials given online are for amd. So just change ubuntu to ubuntu-ports in the mirror URL.
Error 2 :The following signatures couldn't be verified because the public key is not available: NO_PUBKEY 3B4FE6ACC0B21F32 NO_PUBKEY 871920d1991bc93c
This is because the key for the image does not exist, just add the key in the dockerfile
apt-key adv --keyserver keyserver.ubuntu.com --recv-keys 3B4FE6ACC0B21F32
Error 3 :`Some packages could not be installed. This may mean that you have requested an impossible situation or if you are using the unstable This may mean that you have requested an impossible situation or if you are using the unstable distribution that some required packages have not yet been created or been moved out of Incoming.
This may mean that you have requested an impossible situation or if you are using the unstable distribution that some required packages have not yet been created or have been moved out of Incoming.
buildx
Reference article: https://docs.docker.com/build/building/multi-platform/
Reference article: https://docs.docker.com/build/building/multi-stage/
Reference article: https://docs.docker.com/engine/reference/commandline/buildx_build/
Reference article: https://blog.bwcxtech.com/posts/43dd6afb/
Reference article: https://waynerv.com/posts/building-multi-architecture-images-with-docker-buildx/
Docker will by default use builders that don't support multi-CPU architectures, we need to switch manually.
Check out the available builders
    root@qhdata-dev:/home/qhdata/docker# docker buildx ls
    NAME/NODE DRIVER/ENDPOINT STATUS  BUILDKIT PLATFORMS
    default * docker
      default default         running 20.10.23 linux/amd64, linux/386
    root@qhdata-dev:/home/qhdata/docker#
Start by creating a new builder:
    docker buildx create --use --name mybuilder
    docker buildx use mybuilder
Start the builder:
docker buildx inspect mybuilder --bootstrap
If you find that you still don't support the arm architecture as I did, use the following method to install support.
Build multiplatform images with three different strategies supported by Buildx and Dockerfiles:
- Use QEMU emulation support in the kernel
- Build on multiple native nodes using the same builder instance
- Cross-compile to different architectures using stages in the Dockerfile
If your nodes already support QEMU (for example, if you're using Docker Desktop), QEMU is the easiest way to get started. It doesn't require changes to your Dockerfile, and BuildKit automatically detects available secondary architectures. When BuildKit needs to run a binary for a different architecture, it automatically loads it by registering the binary with the handler binfmt_misc .
For binfmt_misc to work transparently within the container for QEMU binaries registered on the host OS, they must be statically compiled and registered with the fix_binary flag. This requires kernel >= 4.8 and binfmt-support >= 2.1.7. you can check if F is in /proc/sys/fs/binfmt_misc/qemu-*. Although Docker Desktop comes preconfigured with binfmt_misc support for other platforms, for other installations it may need to be installed using the tonistiigi/binfmt image.
docker run --privileged --rm tonistiigi/binfmt --install all
At this point after retracing the step of starting the builder, check the builder situation.
    root@qhdata-dev:/home/qhdata# docker buildx ls
    NAME/NODE    DRIVER/ENDPOINT             STATUS  BUILDKIT PLATFORMS
    mybuilder *  docker-container
      mybuilder0 unix:///var/run/docker.sock running v0.11.6  linux/amd64, linux/amd64/v2, linux/amd64/v3, linux/amd64/v4, linux/386, linux/arm64, linux/riscv64, linux/ppc64le, linux/s390x, linux/mips64le, linux/mips64
    default      docker
      default    default                     running 20.10.23 linux/amd64, linux/386, linux/arm64, linux/riscv64, linux/ppc64le, linux/s390x, linux/arm/v7, linux/arm/v6

    root@qhdata-dev:~# docker buildx inspect --bootstrap
    Name:          mybuilder
    Driver:        docker-container
    Last Activity: 2023-06-09 06:14:55 +0000 UTC

    Nodes:
    Name:      mybuilder0
    Endpoint:  unix:///var/run/docker.sock
    Status:    running
    Buildkit:  v0.11.6
    Platforms: linux/amd64, linux/amd64/v2, linux/amd64/v3, linux/amd64/v4, linux/386, linux/arm64, linux/riscv64, linux/ppc64le, linux/s390x, linux/mips64le, linux/mips64
    root@qhdata-dev:~#
At this point it was found that all can support arm architecture.
Then use the following statement to build it.
docker buildx build --platform linux/amd64,linux/arm64 --output type=tar,dest=./dm_base_python38.rar -t dm_base/python38 .
Some parameter descriptions.
--load:shortened to -output=type=docker, which automatically loads single-platform build results into docker images--output,-o:output destination (type=local,dest=path:)--platform:Set the target platform for the build.--add-host:add custom host to IP map (format host:ip:)--file,-f:Name of the Dockerfile (default PATH/Dockerfile:)
platform Details:
Sets the target platform for the build. If all FROM commands in Dockerfile do not have their own --platform flag the platform represented by this parameter will be used as the final platform.
Sample docker usage
PostgreSQL
Reference article: https://www.jianshu.com/p/17ae7f0c3fa4
Download the postgres image for PostgreSQL from the Docker repository.
    root@qhdata-dev:/home/qhdata/docker# docker pull postgres
    Using default tag: latest
    latest: Pulling from library/postgres
    faef57eae888: Pull complete
    a33c10a72186: Pull complete
    d662a43776d2: Pull complete
    a3ba86413420: Pull complete
    a627f37e9916: Pull complete
    424bade69494: Pull complete
    dd8d4fcd466b: Pull complete
    03d0efeea592: Pull complete
    4f27e1518a67: Pull complete
    0c8ac8b8eb90: Pull complete
    c08e79653ad2: Pull complete
    d5724e8c22af: Pull complete
    3db4aa0d2013: Pull complete
    Digest: sha256:362a63cb1e864195ea2bc29b5066bdb222bc9a4461bfaff2418f63a06e56bce0
    Status: Downloaded newer image for postgres:latest
    docker.io/library/postgres:latest
    root@qhdata-dev:/home/qhdata/docker#
Creation of containers
docker run --name postgres-db -e TZ=PRC -e POSTGRES_USER=root -e POSTGRES_DB=database -e POSTGRES_PASSWORD=123456 -p 5432:5432 -v pgdata:/home/qhdata/postgresql/data -d postgres
Partial parameter descriptions.
--name: container name postgres-db-e TZ=PRC: Time zone, China-e POSTGRES_USER=root: username is root (do not set default username postgres)-e POSTGRES_DB=database: DB schema database schema-e POSTGRES_PASSWORD: password-p 5432:5432: Port mapping, maps the container's port 5432 to the server's port 5432-v: Store data to the host server.-d: Specify to use a mirror.- (Time zone issue: if you don't set the time zone when you start the container, the default is UTC, there will be a time difference when you use now() to set the default value.)
Then just start the container start the container.
python + redis
Reference article: https://cloud.tencent.com/developer/article/1670205
Reference article: https://ost.51cto.com/posts/16688
First, go to http://www.redis.cn/download.html Download a redis, use the configuration file inside
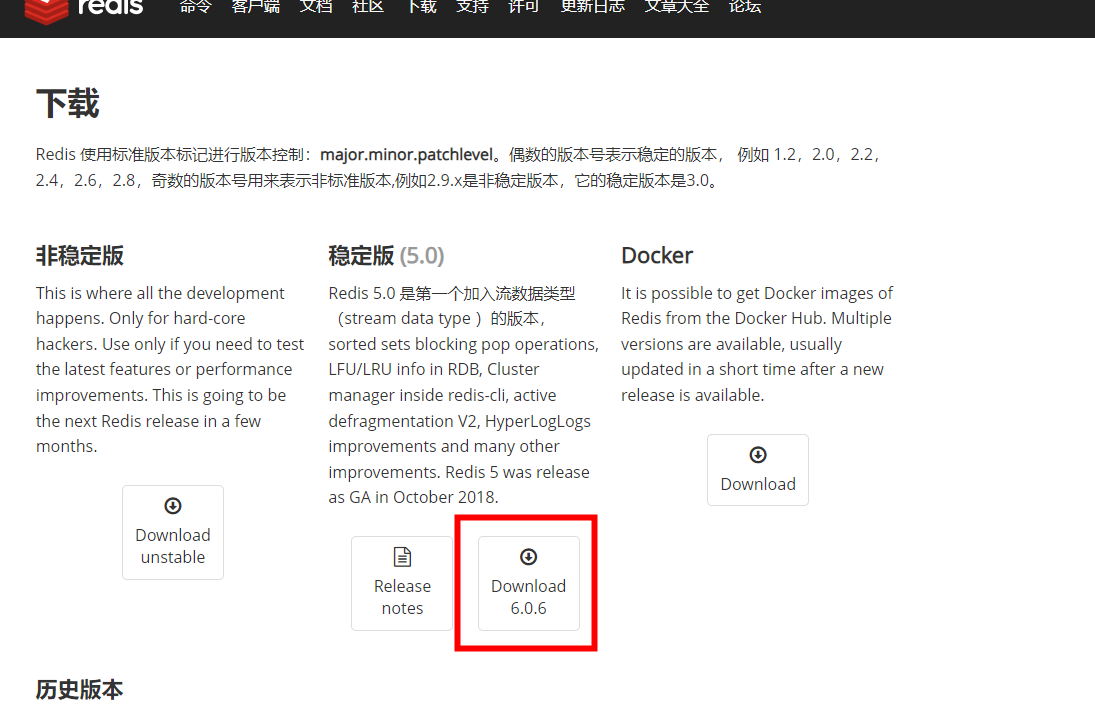
to unzip it, and
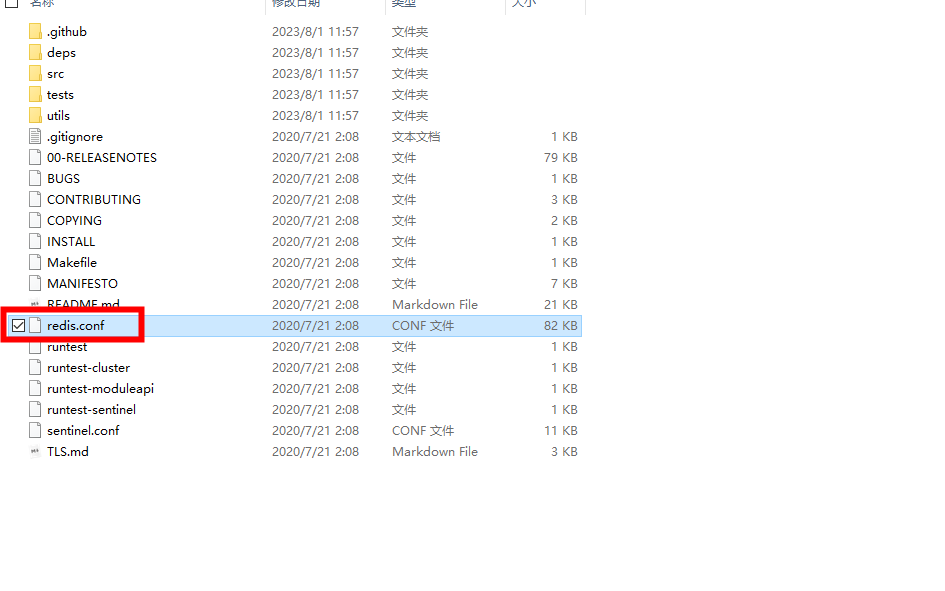
modify the information in redis.conf.
Change bind 127.0.0.1it to bind 0.0.0.0so that the external network can access it. (Or comment it out)
daemonize no#Start as a daemon thread
requirepass your password#Set a password for redis
appendonly yes#The default for redis persistence is no
tcp-keepalive 300#To prevent the error that the remote host forcibly closes an existing connection, the default is 300
Construction of the entire docker file
    FROM --platform=linux/amd64 python:3.10.11

    ADD . /twitter_snowflake/pkg/ . /twitter_snowflake/pkg/

    RUN apt-get update -y && \
    apt update -y && \
    apt install freetds-dev -y && \\
    apt install redis-server -y # pymssql dependencies &reids

    RUN cd /twitter_snowflake/pkg/ && \
    pip install --upgrade -r requirements_api.txt # install package

    RUN cd /twitter_snowflake/pkg/ && \
    pip install --upgrade -r requirements.txt # Install package

    RUN cd /twitter_snowflake && cp -r /twitter_snowflake/pkg/NPC Kingbase/sqlalchemy/dialects/kingbase /usr/local/lib/python3.10/site-packages/ sqlalchemy/dialects/ # replace files

    # Replace supervisor configuration, supervisor version is 4.2.5; replace reids configuration file
    RUN mkdir /etc/supervisor && \
    cp -r /twitter_snowflake/pkg/supervisor/supervisord.conf /etc/supervisor/supervisord.conf && \ \
    cp -r /twitter_snowflake/pkg/redis/redis.conf /etc/redis/redis.conf
Build command
docker buildx build --platform linux/amd64 --load --file org_id.txt -t org_id/python:3.10.11 .
Start command
docker run -v /home/qhdata/docker/twitter_snowflake:/twitter_snowflake -p 34567:9001 -p 34568:8000 -p 34569:6379 -i -t org_id/python:3.10.11 /bin/bash
Command to run after entering
supervisord -c /etc/supervisor/supervisord.conf